Welcome to the Onshape forum! Ask questions and join in the discussions about everything Onshape.
First time visiting? Here are some places to start:- Looking for a certain topic? Check out the categories filter or use Search (upper right).
- Need support? Ask a question to our Community Support category.
- Please submit support tickets for bugs but you can request improvements in the Product Feedback category.
- Be respectful, on topic and if you see a problem, Flag it.
If you would like to contact our Community Manager personally, feel free to send a private message or an email.
laser joint tool

Best Answers
-
You can find the tools here:
Laser joint FeatureScript:
https://cad.onshape.com/documents/578830e4e4b0e65410f9c34e/v/75269c4a1a5ece98be1e2b6f/e/dfd5effddfd7f2ecce4b0246
Auto layout FeatureScript:
https://cad.onshape.com/documents/576e01dbe4b0cc2e7f46a55d/v/731e73ac0b7b1e4334f13106/e/887d6e2324589bfd2058c3e1
Select the + Custom features button:
Then click the feature name:
Hope this helps!Get in touch: contact@alnis.dev | My personal site: https://alnis.dev
@alnis is my personal account. @alnis_ptc is my official PTC account.3 -
thank you so much you are a life saver0

Answers
-
You can find the tools here:
Laser joint FeatureScript:
https://cad.onshape.com/documents/578830e4e4b0e65410f9c34e/v/75269c4a1a5ece98be1e2b6f/e/dfd5effddfd7f2ecce4b0246
Auto layout FeatureScript:
https://cad.onshape.com/documents/576e01dbe4b0cc2e7f46a55d/v/731e73ac0b7b1e4334f13106/e/887d6e2324589bfd2058c3e1
Select the + Custom features button:
Then click the feature name:
Hope this helps!Get in touch: contact@alnis.dev | My personal site: https://alnis.dev
@alnis is my personal account. @alnis_ptc is my official PTC account.3 -
thank you so much you are a life saver0
-
This is exactly what I was looking for. Thanks!0
-
Does this require a professional account? I cannot find the "add custom features" button.0
-
@roderick_kimball custom features are available for all users. Could you make sure you are signed in to Onshape? If that still doesn't work, could you please send a screenshot of what you are seeing?
Get in touch: contact@alnis.dev | My personal site: https://alnis.dev
@alnis is my personal account. @alnis_ptc is my official PTC account.1 -
Hi @alnis
This is a great script thanks for making it. I would like to know more about the option within the laser joint script called allowances.
I'm having trouble getting a great fit with the boxes and I imagine this option has something to do with the amount of kerf taken out by the laser. Could you describe it in a little more detail to me?0 -
Hi @Mr_Hubbard
I did not make this script---all credit goes to @lemon1324!
As for the allowance value: that is how much the faces are offset. So, if you had a part that was made perfectly, and the allowance is 0, then you would have no gap at all. A positive allowance adds extra space, for example for wood glue. A negative allowance allows you to make the parts intersect: this lets you have a tighter fit, especially if you're using a laser cutter that takes out material. If you set it to half of your laser's kerf width, but negative, it will make up the extra material you laser would cut away. You might need to play around with this value a bit by cutting some test parts to get the fit you want. Generally the value will be negative if you're using a laser cutter, waterjet, etc. that cuts directly along DXF lines.
Sorry for the late reply!
Get in touch: contact@alnis.dev | My personal site: https://alnis.dev
@alnis is my personal account. @alnis_ptc is my official PTC account.1 -
Thanks for the tag, @alnis. So the "allowance" option is really intended to adjust specific things about the fit of a joint, not for kerf compensation - I wrote a feature for doing that that offsets all faces to accommodate kerf, here: https://cad.onshape.com/documents/57df36a88f63301089e8ac78/w/d336a806a8a6f0460f7bd440/e/157268905828b0fc910e365b
The advantage here is that the overall dimensions of your part and any holes you drilled etc are also all compensated to come out at the nominal size.
For "typical" hobby/school grade lasers I usually get good results in 6mm wood/acrylic leaving no allowance in the laser joint and compensating 0.008" kerf and 0.001" allowance in the kerf compensation feature.Arul Suresh
PhD, Mechanical Engineering, Stanford University1 -
Thank you so much for the info @lemon1324! So sorry I forgot about the kerf compensation feature... I know you mentioned it to me previously. Your custom features are awesome

Get in touch: contact@alnis.dev | My personal site: https://alnis.dev
@alnis is my personal account. @alnis_ptc is my official PTC account.0 -
Looks awesome, but how to add it on iPad version?0
-
If you add it on the web it shows up on the ipad app.kostiantyn_andriiuk said:Looks awesome, but how to add it on iPad version?0 -
Hi @lemon1324,
I want my tabs to be slightly longer than the thickness of the board so that burnt edges can be easily cleaned by sanding the tabs flush.
However, the Pin face offset feature doesn't always produce expected results, as you can see in document https://cad.onshape.com/documents/0af9f4b3cc178e59f5cb3c30/v/355b649f903f96648a0ed6b4/e/46c857de67462e6ad951460c
All five sides were joined in one operation. Some sides are correct (all tabs have correct offsert), some sides are partially correct (most tabs have offset), but some sides are missing the tab offset completely.0 -
Hi,
I am attempting to use the laser joint tool but I am getting an error that says "change version of linked document." and iot will not work. I've tried to remove and re-add from the toolbar but I get the same issue. Is there a new version of the tool? Any help would be much appreciated!
0 -
Hi @lemon1324
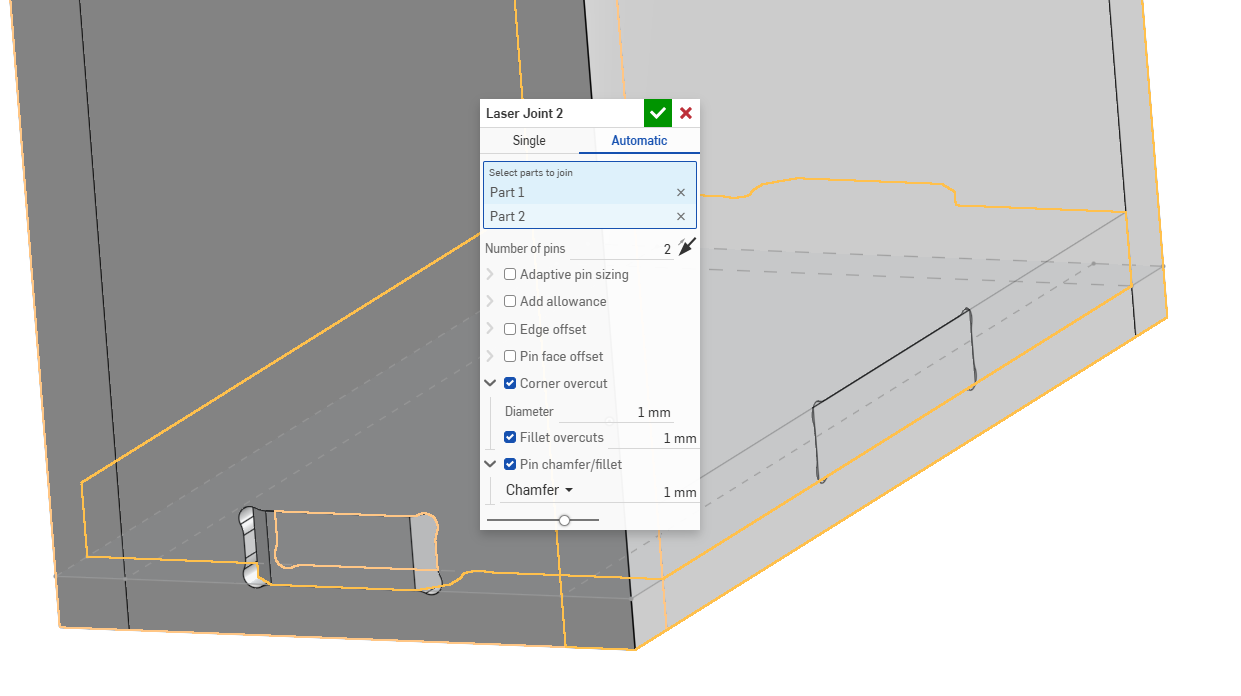
I´ve been using the laser joint for a long time but all of a sudden the chamfers/fillets stopped rendering on one side in all of my projects and I´m having issues connecting laser cut parts with tighter fit.
In this example, the X axis is fine, but the Y is not. Settings are the same on both. Any idea whatś going on, please?
Would you please also modify the max number of pins higher than 12, please?
Linking a random testing document
 0
0 -
@stanislav_kucharčík sorry for the slow response, I've been busy with travel and work recently.
I took a look at this specific issue and I think what's happening is that after the first joint the automatic mode for whatever subtle reason is flipping the "tab" and "base" parts for that joint so it's not the expected direction. And since the "tab" is the larger part, there aren't any true pins created for the chamfer to find and act upon.
I'll take a more detailed look when I get a chance, but for now in any case where you want to specifically control the joint more tightly, I'd recommend using the "single" mode because you can more precisely control where exactly the pins are all going.
Pin bounds shouldn't hurt anything to make it larger, I'll bump that up and push an update soon.Arul Suresh
PhD, Mechanical Engineering, Stanford University0