Welcome to the Onshape forum! Ask questions and join in the discussions about everything Onshape.
First time visiting? Here are some places to start:- Looking for a certain topic? Check out the categories filter or use Search (upper right).
- Need support? Ask a question to our Community Support category.
- Please submit support tickets for bugs but you can request improvements in the Product Feedback category.
- Be respectful, on topic and if you see a problem, Flag it.
If you would like to contact our Community Manager personally, feel free to send a private message or an email.
Best Of

Re: Kitchen Cabinets

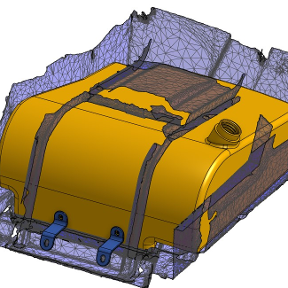
Re: I'm having Issues with OnShape prematurely crashing with imported 3d scans .STLs and .OBJs
So what you say is you have a crash with large scanned and faceted models? Is that a crash of Onshape (in that case your PC and browser would probably still be up and running after the crash), or is that a crash of your browser (Browser would collaps, but you could get back to your session after reboot) or is that a crash of your graphics card (probably everything on your PC would collaps)?
I ask that because Onshape - if it crashed - would crash on the Onshape/Amazon server, not on your PC, for it runs remote.

Re: Stay Signed In
You encourage users to save their credentials in the browser, so what is the point of log them out after a few minutes? Especially when this happens during working on a sketch - it's one of the most annoying "features" in Onshape.
 vanowm
Re: Show/hide construction geometry
yes, I think that would be good. Intuitively, this is exactly the kind of feature that needs a toggle in my opinion.

Re: Can I make a spherical drone cage nearly identical to this one?
That should be possible. Try making only an eighth of one hemisphre. Then mirror to make it a quarter, then put two in an assembly and do a circular pattern. Just a quick incomplete sample, and possibly the strategy could be optimized when trying a second time:


Re: Why doesn't the spur gear feature script update properly when using a variable studio
It's not just that the editGearLogic() editing logic function can't see the changes when it was a changed variable value, it's also that the whole function is not triggered for variable changes, only for changes done in the UI. Interestingly I can watch the module value change in the open Spur Gear UI dialog when I change the `#Module" variable I've set it to, but I can see the pitchCircleDiameter in the UI dialog not changing, even when I've changed the editGearLogic() function to always recalculate pitchCircleDiameter.
I think a big part of the problem is there are interdependent settings in the definition that the UI dialog drives, and it's relying on the editGearLogic() function to change them so they are consistent. In particular, changing any one of the module, diametralPitch, circularPitch, or pitchCircleDiameter values will recalculate the others, and changing numTeeth will also change pitchCircleDiameter. But using variables in any of these means they can change without the others being updated.
It's not so bad for module, diametralPitch, and circularPitch,because they are different ways of specifying the same thing and only one is displayed selected by the GearInputType setting, so you don't really see when they get out of sync. Unfortunately, the current featurescript version only uses the module value and relies on it being set correctly by editGearLogic(). This means if you configure your gear using a variable to set diametralPitch and you change that variable, the change is not applied because module is not updated. You can only use a variable to set module and have it mostly work.
But the big visible problem is pitchCircleDiameter which doesn't get updated, which means although your module change from changing the variable is applied, the gear diameter is not changed, and things get pretty messy.
I'm going to fix this.
 dbaarda
Re: How do I make this geometry work?
Reminds me of this:
https://cad.onshape.com/documents/4aa8905bd5c0b07f56d4f6c8/w/a24b3bea17fd3f8cb6d31784/e/17d0c8c6b3a49897bb2cf7a2


Re: Can I hide construction lines, or dimensions, while viewing a sketch?
It might be worth considering to make the sketches easier to read by adding differentiating properties to sketch items. I cannot see why it should be necessary to have dimensions, construction lines and 'real' lines all appear in black. If construction was a lighter colour, for example, and dimensions another, the 'working' geometry sketched would stand out much clearer. That should be easy and is basically already an industry standard. That has nothing to do with best practise on the user side, but with best GUI design.
Ah! And by the way: Make the difference between unconstrained and constrained more contrasting! I have been searching for a tiny unconstrained blue dot in one of my today's sketches for half an hour, again. Dark blue vs. black is not the kind of sufficient contrast required here. Why can't underconstrained not be bright orange or whatever?
Re: Center rectangle between construcion lines
My suggestion would be to spend some time learning all the sketching tools available even if they don't pertain to what you need at this very moment. and really get a feel for constraints and how they can help you get stuff like this done with ease. Introduction to Sketching. Learning contraints will pay dividends down the road on future design efforts.
For this particular example. since the rectangle is already there. You could use symmetry constraints and eliminate your 1/2 width dimensions. Starting from scratch a center point rectangle will get the job done as well.
 MDesign