Welcome to the Onshape forum! Ask questions and join in the discussions about everything Onshape.
First time visiting? Here are some places to start:- Looking for a certain topic? Check out the categories filter or use Search (upper right).
- Need support? Ask a question to our Community Support category.
- Please submit support tickets for bugs but you can request improvements in the Product Feedback category.
- Be respectful, on topic and if you see a problem, Flag it.
If you would like to contact our Community Manager personally, feel free to send a private message or an email.
Best Of
Custom Feature Collection: 456D Make
-Link to features up front-
There are probably a few among the users of this forum who are CAD veterans who might remember a fun little suite by Autodesk called 123D that had a powerhouse of an fabrication tool in 123D Make. It could take an object as an input and turn it into slices of stacked cardboard or paper templates for foam or a low poly pepakura model. And then like everything cool Autodesk has, they discontinued support for it and permanently shelved it after promising that the features would end up in their other software. There have been attempts to remake some functionality of 123D Make in Onshape but I've tried all of them and found them… wanting.
So rather than wait around for someone else to build the version of the tool I miss dearly, I'm reimplementing all of the features that 123D Make had, the way it had them.
My unsanctioned sequel. 456D Make
Kicking off things with the first of many slicing features comes Waffle It which takes a solid body and turns it into cross cut slices that fill out the volume of the target body. Now, there are other features that do this, so why did I go to the trouble of writing my own version as the intro to this suite? Two reasons. The first reason is that unlike all other attempts I have found in Onshape's featurescript library, I'm thinking inside the box.
Due to the methods I'm using, no edges of my slices exceed the bounding volume of the original input part. All other featurescripts I found used an intersection method that had material sticking out of the input solid. This makes for extra cleanup work if you need these slices to fit into an assembly. The second reason to use Waffle It is that it can output a sheet metal context for easy exports or drawings. Right click the context and export every slice as its own .dxf and send it.
You don't have to use this feature for sheet metal or laser cutting though, even the normalization step is optional if you'd prefer to use this as a structural springboard for plywood with mitered ends for weird corners.
More to come in future updates.
🚨Custom Feature Alert 🚨: Displacement Maps in Onshape
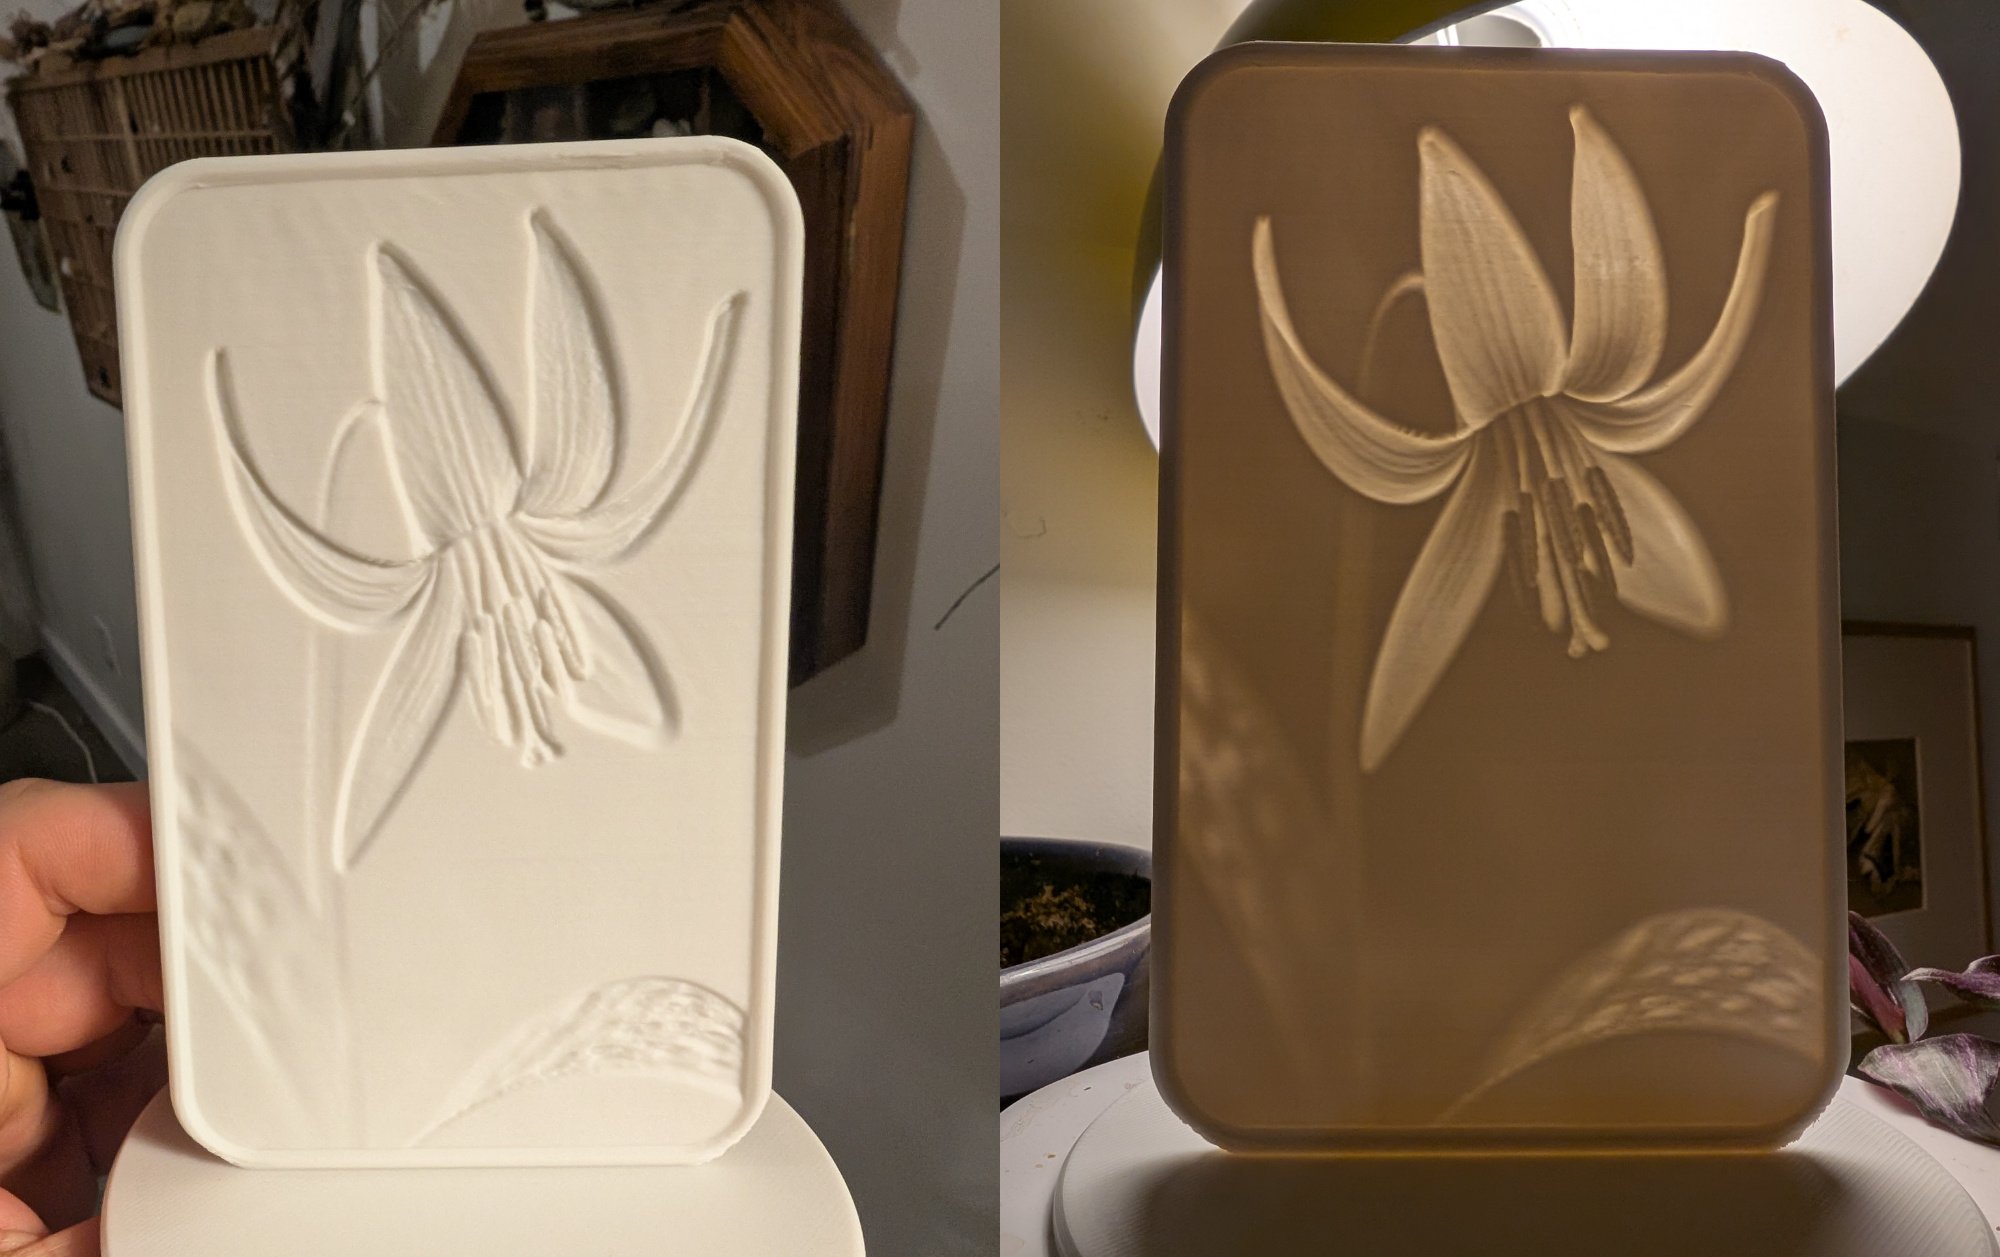
I'm really excited to share this one. I've finally figured out how to get pixel values into a format that FeatureScript can process, which opens up a number of interesting possibilities. First up in that list is using images to modify surfaces. There's a whole video on the topic, so I won't detail it here, but here are some teasers of what's possible.
Re: How Does Surface Text Know Where a Circle Starts and Ends and which way is up?
@jnewth beat me to it! This question actually goes pretty deep so I thought it was a good reason to finally make a video about curve parameterization. See if this answers it..
Re: Custom Feature: Tweep
Now if only there were a place for me to organize all of these scripts. I'm starting to lose track.
Re: 3Dconnexion space mouse has suddenly stopped working.
Giving Onshape "Local network access" permission in Chrome fixed it for me.
 JPM
JPM
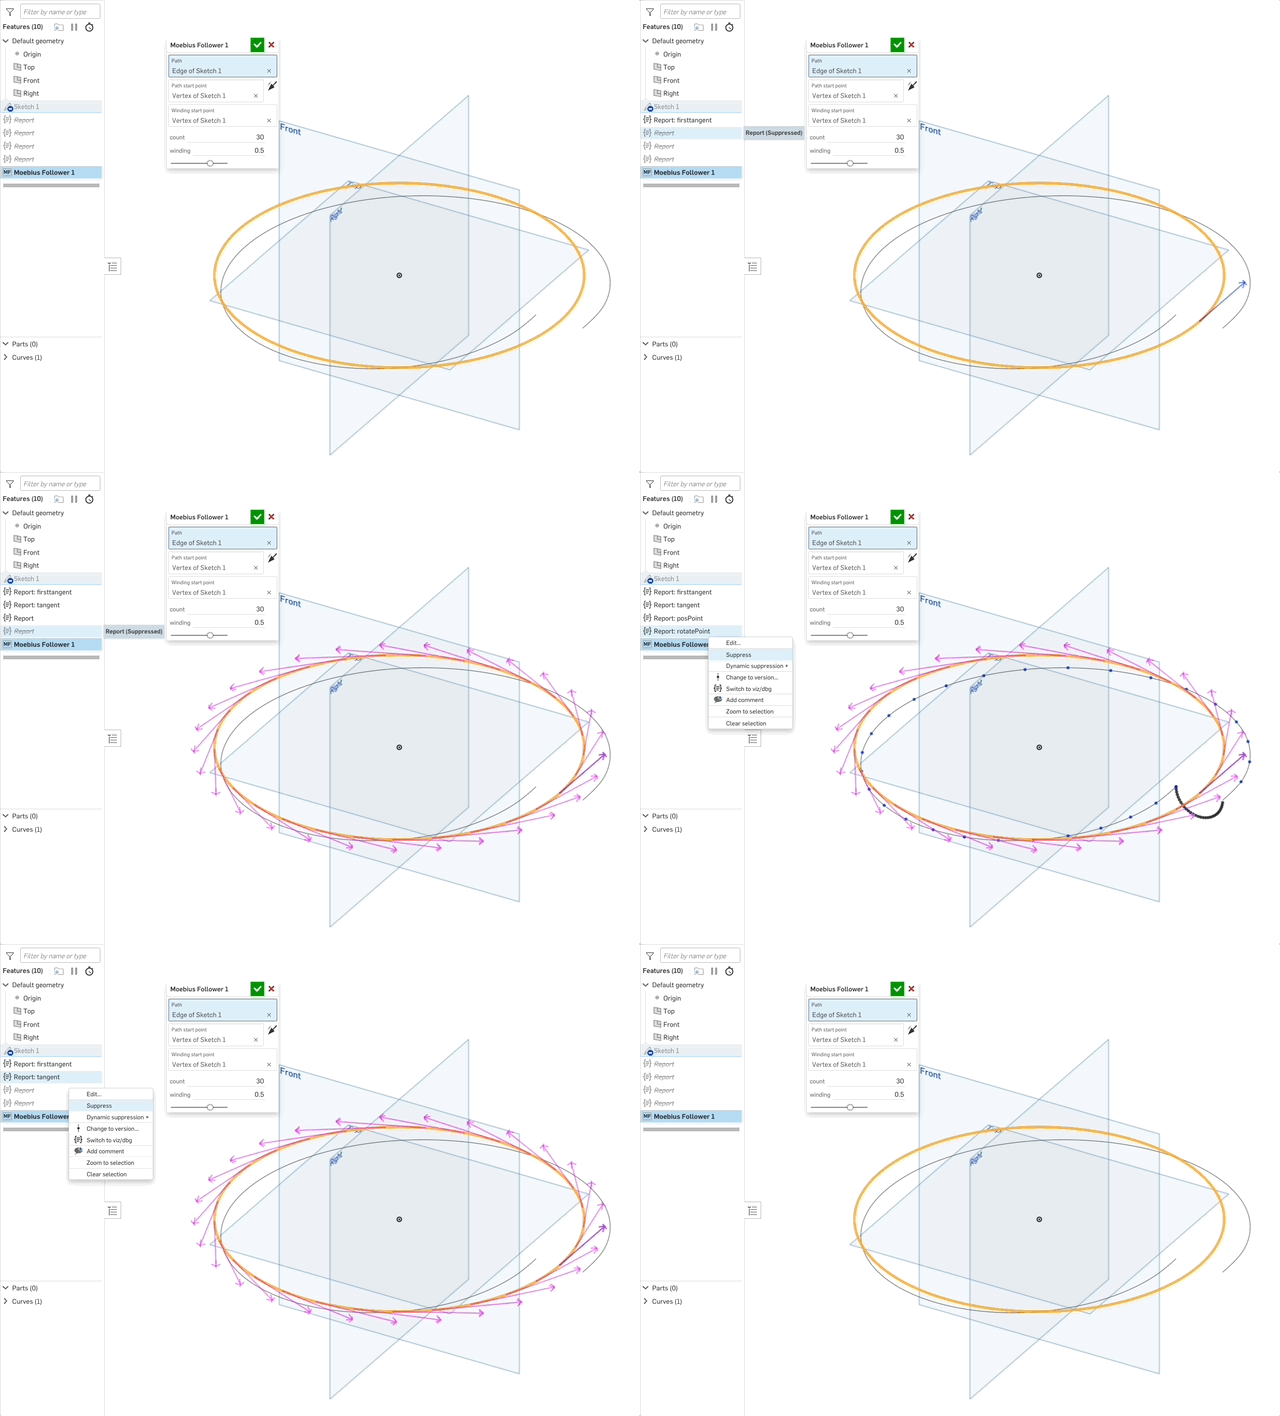
Use Report, viz(), and dbg() for conditional println and debug visualizations
Earlier this year I wrote a utility called "Report". The one-sentence description is "Conditional debug visualization and println controlled by feature and not by code".
Here's an intro video: https://www.youtube.com/watch?v=Eu7puEa8Oak
You can find the feature and functions here: https://cad.onshape.com/documents/e2576bfe13aaaabd67b0fe1d/v/4322f20d8f97ab12eeab937c/e/e954caf65d5d66b94f8bb90a
Here's how it works:
1. Import the feature Report in to your toolbar.
2. Import the functions dbg() and viz() in to your custom features.
3. When writing code, use dbg() instead of println and use viz() instead of adding debug entities through debug or addDebugEntities functions.
4. When your custom feature call viz() and dbg() functions instead of println() and debug(), the Report feature will enable the console printing and debug visualization for only the viz() and dbg() calls you want to activate, all controlled by keyword.
5. Suppress and unsuppress Report features to enable/disable visualization in your custom feature while your custom feature is being edited:
Note: This is very similar to another reporting tool I wrote a while back. I've renamed that tool "Log" as it's much more focused on mimicking logging tools like log4j but otherwise its behavior is unchanged. If that is a better match for your needs you can read about it here: https://forum.onshape.com/discussion/23476/featurescript-writers-stop-using-println-and-start-using-report-new-featurescript-announcement
Let me know what you think!
Also big thanks to my friend and colleague @Ethan_K for encouraging me to polish up and ship Report.
 jnewth
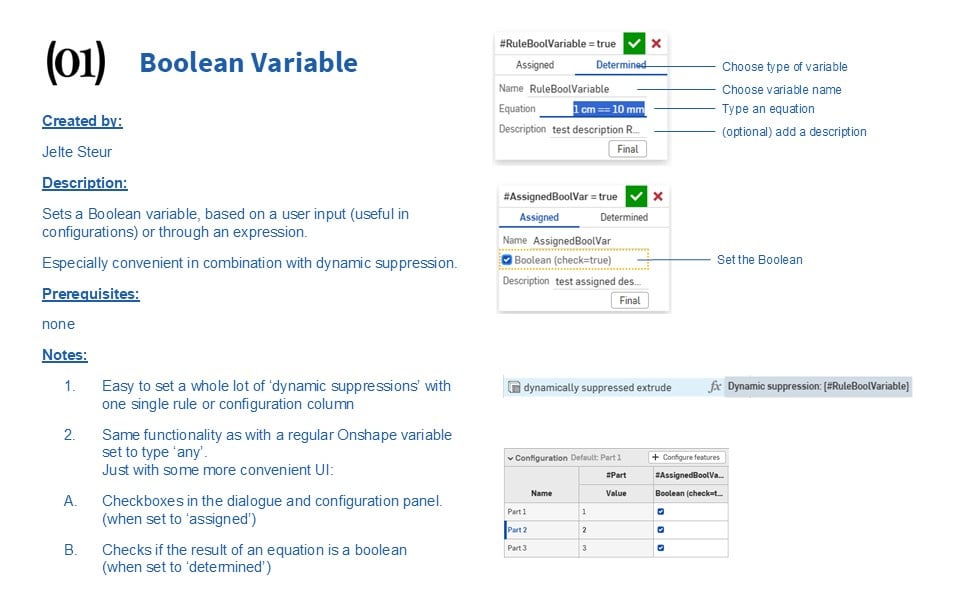
new custom feature: Boolean Variable
Happy winter solstice to everyone!
I was grouping some dynamic suppressions in a configurable document and creating a regular variable, setting it to 'any' and creating an equation, (or typing "true" manually.)
This bothered me, I figured this should be easier if I'm going to do this a lot.
so I created a dedicated:
Boolean Variable
Re: Custom Feature: Triad Transform
My dad always told me to be the CAD you want to see in the world. I thought that was a weird thing to tell your kid but I'm not a parent myself, so what do I know?


