Welcome to the Onshape forum! Ask questions and join in the discussions about everything Onshape.
First time visiting? Here are some places to start:- Looking for a certain topic? Check out the categories filter or use Search (upper right).
- Need support? Ask a question to our Community Support category.
- Please submit support tickets for bugs but you can request improvements in the Product Feedback category.
- Be respectful, on topic and if you see a problem, Flag it.
If you would like to contact our Community Manager personally, feel free to send a private message or an email.
Dimension descrepancy
 philmat15
OS Professional Posts: 12 PRO
I have an o-ring gland with and OD of 60.746 mm and an ID of 57.054 mm which should give a width of 3.692 mm.

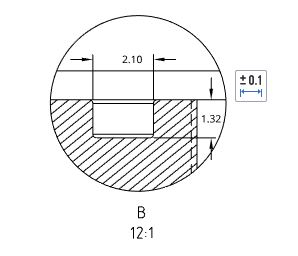
On the second sheet of the drawing I have a front view of the part with a cross-section view and a detail view of the gland. When I dimension the the sidewalls of the o-ring gland in the detail, is shows a width of 2.1 mm.


I'm certain the cross-section is at the right location. What am I missing?
Phil

On the second sheet of the drawing I have a front view of the part with a cross-section view and a detail view of the gland. When I dimension the the sidewalls of the o-ring gland in the detail, is shows a width of 2.1 mm.


I'm certain the cross-section is at the right location. What am I missing?
Phil
0
Best Answer
-
 philmat15
OS Professional Posts: 12 PRO
Never mind, I discovered that I'm dimensioning off the wrong lines in the top picture. There are three lines each at the OD and ID and I wasn't picking the center line.0
Answers