Welcome to the Onshape forum! Ask questions and join in the discussions about everything Onshape.
First time visiting? Here are some places to start:- Looking for a certain topic? Check out the categories filter or use Search (upper right).
- Need support? Ask a question to our Community Support category.
- Please submit support tickets for bugs but you can request improvements in the Product Feedback category.
- Be respectful, on topic and if you see a problem, Flag it.
If you would like to contact our Community Manager personally, feel free to send a private message or an email.
Add Pocket-Hole in Assembly to other Part?
 nocry3
Member Posts: 30 ✭✭
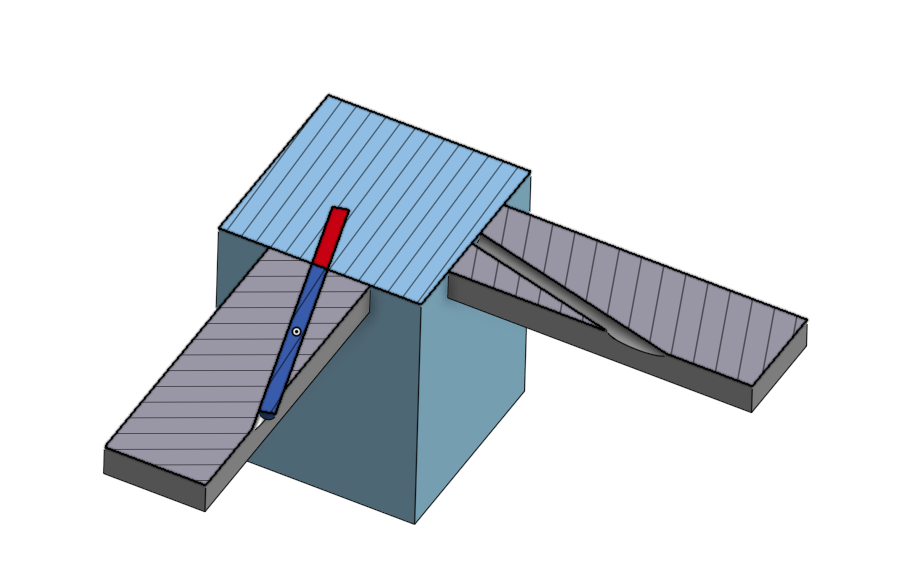
I actually have a simple logical question. I have a timber (60×40 cm), which I want to connect by pocket holes with another timber ( 80×80 cm) in an assembly.
If I add a dowel as shown in the picture (left side), it will be displayed in both squared timbers. If I only add a hole for the dowel as in the picture (right side), it is not shown in the other timber.

If I add a dowel as shown in the picture (left side), it will be displayed in both squared timbers. If I only add a hole for the dowel as in the picture (right side), it is not shown in the other timber.
Is it possible, or how can I make it that a “hole” is displayed depending on the position in the assembly, like the dowel?

Tagged:
0
Comments
Change through all to a blind hole and put in a number that works. On merge scope, select the 80x80 leg, so both parts are in the merge scope. When you are happy with how the dowel hole looks, circular pattern it 90 degrees using the center mate connector of the table leg as the axis.
If instead of a dowel you are using screws, then you might need to split the hole into two features, one for the 60x40, and one for the 80x80, since the diameters are different. But the general procedure would be the same.
If you have multiple locations then you may need to generate part configurations of the column.
However in this design, I don't think they are needed. I think you should draw the vertical leg, and the horizontal rails, in the same studio as they would be located in real life (which is what you did). Then put the dowel holes through both pieces in that studio. Then when you switch to the assembly, you can insert the entire part studio, fix one part, and group the rest. There is not really a need to experiment with leg positions for a table. That is well known. And the dowel positions must be within the leg. I just don't see the need for in-context editing in this case.
Or, probably even better, this looks like you are designing a table, correct? Well on a table the main design intent is the size of the top, and the height of the top from the floor. That should be your driving feature. Then there is an inset amount of where the legs attach to the underside of the table. Draw a rectangle sketch as construction lines on the underside of the table, inset from the table edge. Then draw a rectangle representing one leg. Then draw the rails connecting the legs. Now, if the table size changes, the legs and rails will change automatically.
I think there was another member that was making a table a year ago and I might have modeled up what I just described. I'll see if I can find it and link it for you.
https://cad.onshape.com/documents/c55bd9f097a885f069a96d26/v/02f4b54532a034bbeba18b6d/e/d4875b3cfe46ed30ebd578f7
It is a workbench (everything named in German) and I try to make it mostly configurable. Also, the height of the floor. In the part studio, I tried to design every similar part only once. When I do the pocket hole joinery in the part studio instead of in "2. Assembly “frame half”"I have to insert the same part two or four times. My conclusion is, I can design something (for example a dowel) in an assembly in two parts, but not nothing (for example a hole) in two parts (only if I use context editing).
Many thanks to all for your help and ideas.
1. part studio “wood” (in document named "Holz")
2. Assembly “frame half” (in document named Gestell_halb)
4. Assembly “workbench” (in document named Werkbank)
1) Why did you build the 3 (before they were split) platte parts in the studio on top of each other, instead of where they would go on the real workbench? That makes it confusing to visualize the design as you're building it. I'm sure you had a reason:)
2) Why did you split the frame sub-assy into two identical halves? Is that how it will be built in your shop, then join the two halves together? Or was it for a CAD reason?
3) Is the top subassy meant to slide on and off of the frame after the bench is built? Or will it be permanently attached to the frame.
4) You can fix one of the parts in each subasssy to remove the degrees of freedom.
If you find yourself just creating separate parts "on top of each other" at the origin, they should probably go in separate part studios.
In this case using a variable studio and/or deriving a reference sketch as needed would help implement that.
It's good practice to "fix" (rather than mate to origin) one part in each assembly, preferably in a "logical" spot relative to the origin (even though assembly origins don't mean a whole lot in Onshape...)
2) Makes sense.
3) The subassy called Tischplatte. Maybe you made it separate for 3d printing reasons like #2?
4) Fix is easier. However, mating to the origin can be more reliable. I'd probably start with fix unless you end up having issues with parts shifting.
Check out this custom feature called multi-mate-connector. It's helpful in designs like this when mating in the assembly, if you want to use mates rather than group. https://cad.onshape.com/documents/5d8da63844bedebe5cff72b1/v/a2f8d68037aff39e9d20f7a1/e/629230d0d394845d93416361
Document-UrlIn the configuration, I use a scaling divisor for simple size changes, e.g., 10 for 1:10. The divisor appears in every configurable dimension in the sketch, e.g., #Tabletop_Length/#Scaling_Divisor (German: #Tischplatten_Laenge/#Skalierungsteiler). Now I have two configurations, "Default" and "3D-Print". How can I include the #Scaling_Divisor as a column? I only manage to do it with the entire expression "#Tabletop_Length/#Scaling_Divisor".
The tabletop should have a grid of holes, with a diameter of 20 mm and a distance of 96 mm from hole center to hole center. Depending on the size of the tabletop, there should be different numbers of holes. The distance between the table edge and the center of the first hole should be at least 120 mm, for example. I have created a complex formula that calculates the number of holes and the exact edge distance >120 mm for the length and width of the tabletop, so that a row of holes runs exactly through the middle. But how do I get this configurable into a sketch that also works?