Welcome to the Onshape forum! Ask questions and join in the discussions about everything Onshape.
First time visiting? Here are some places to start:- Looking for a certain topic? Check out the categories filter or use Search (upper right).
- Need support? Ask a question to our Community Support category.
- Please submit support tickets for bugs but you can request improvements in the Product Feedback category.
- Be respectful, on topic and if you see a problem, Flag it.
If you would like to contact our Community Manager personally, feel free to send a private message or an email.
CAM Studio - Best practices, tips and tricks
 John_P_Desilets
Onshape Employees, csevp Posts: 273
John_P_Desilets
Onshape Employees, csevp Posts: 273
Hello everyone
I am starting a new discussion that will focus on best practices, tips and tricks for cam studio. There are many settings for each operation that can dramatically change the outcome of the toolpath. The goal is to help users understand these settings and to optimize toolpaths for quality and performance.
Please post questions, examples to cut or general feedback here.
Example part to machine
Public document for the part model. https://cad.onshape.com/documents/6c0b709deffb5e6a06fe1b66/w/bc1cc3aaf2baa5278e47436a/e/67fafb8d3a2a5de2105741c4


We will start with 2 axis rough operation to machine the outside of the part.
2 axis rough
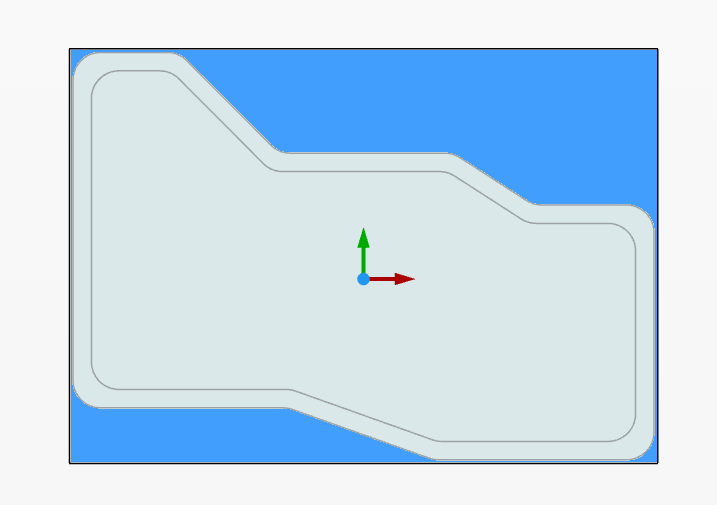
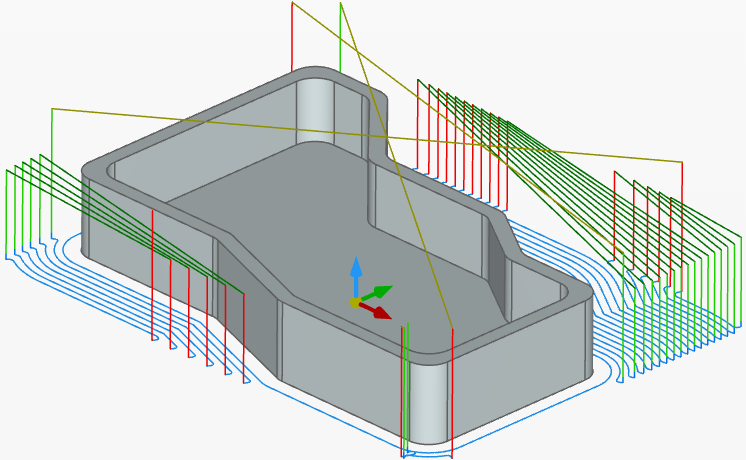
In this example, the area colored in blue will be machined.
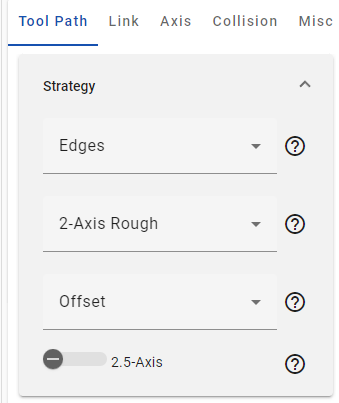
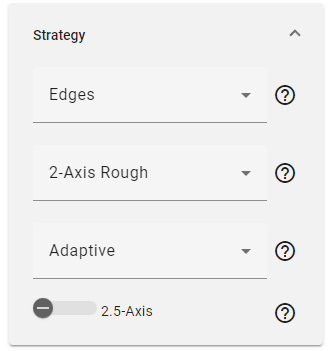
Strategy: Edges, 2 axis rough, sub-pattern offset.
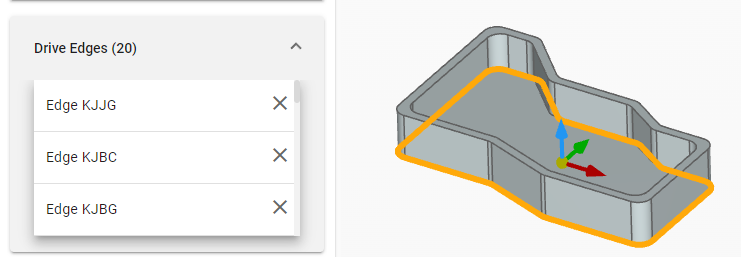
The drive edges are selected on the outside of the part.
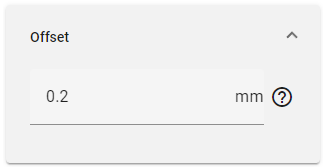
Offset is set to .2mm. (This leaves material on the walls of the part)
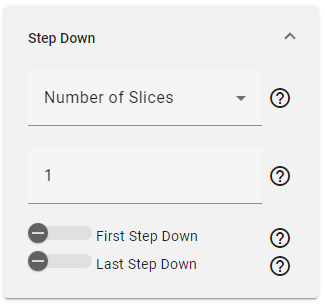
Step down = 1 slice.
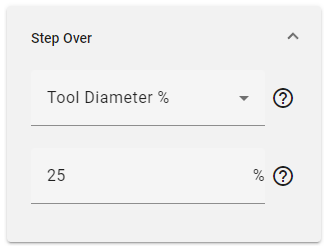
Step over = 25%
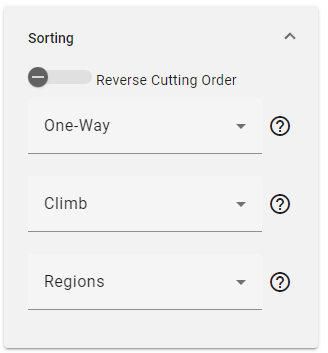
Sorting is set to one-way, climb and regions.


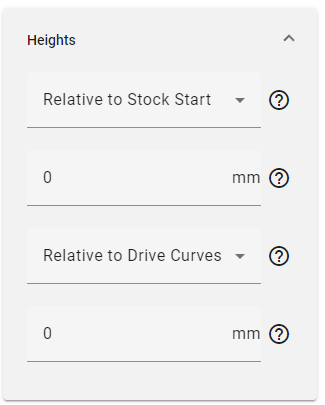
Set the heights to relative to stock start and end height to relative to drive edges. (To leave material on the floor of the part, adjust the end height)
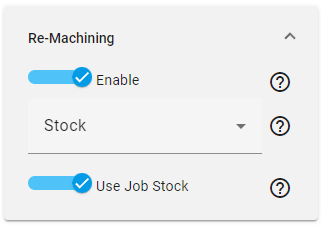
In order for the toolpath to cut the outside of the part, we need to enable re-machining, and tell the toolpath to cut the stock that we have defined. If this option is not enabled, the toolpath will cut inside the drive edges. We want the toolpath to cut outside.
Today, cam studio has combined re-machining and stock definition into the same category for ease of use. This may change in the future.
Enable re-machining, choose stock and use job stock. This tells the toolpath to look at the initial job stock we have defined to calculate the toolpath.

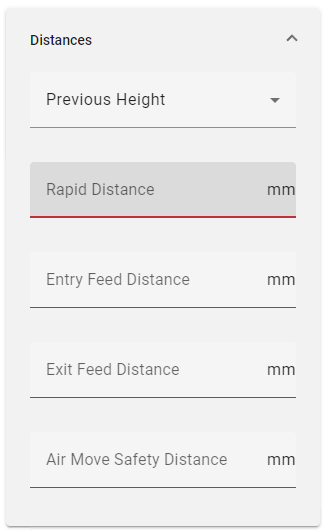
Under the link section, all the settings are set to default except for distances and arc fit.
The entry feed distance is changed to 2mm. *Note* any value that does not have a description can be deleted from the widow to display what the value controls.

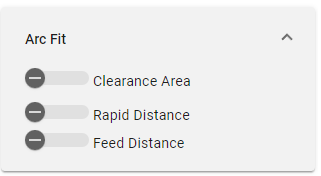
The arc fit option is turned off. This option is designed to prevent rapid changes in direction when the tool retracts. This is ideal for larger machines but will add more lines to the posted g code. For our example it has been disabled.
Click ok and generate the toolpath.
The results show the tool removing the material on the outside of the part. The tool climb cuts along the side of the part, retracts, and moves to the next step of the cut.

There are additional settings we can adjust to change the behavior of this toolpath.
Edit the 2 axis roughing toolpath. (You can also copy the toolpath and edit the copy)
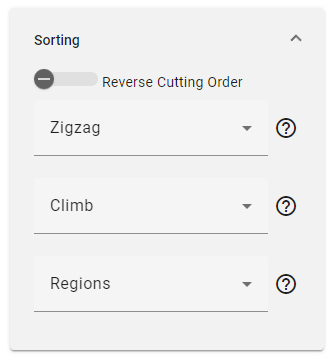
Under sorting, change from one way to zigzag
To keep the tool from retracting we need to change a setting in the link section.
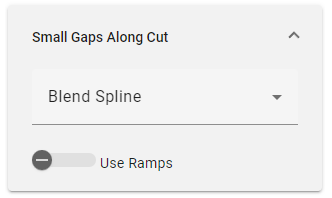
Set small gaps along cut to bend spline and disable use ramps.
Click ok and calculate the toolpath.
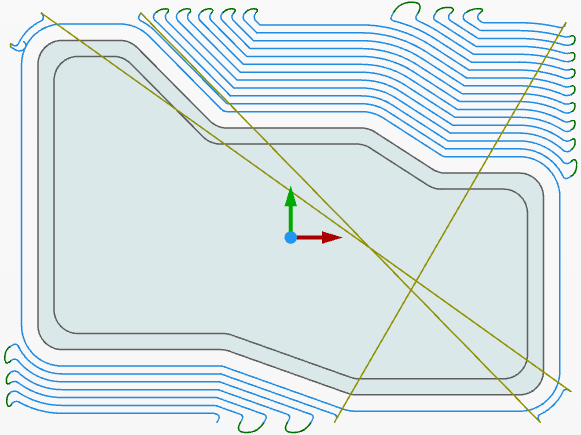
The result shows the tool cutting in a zigzag motion while keeping the tool down. This will climb and conventional cut the material.

*********************************************************************************************************************************************************************************************************************************************************
2 axis rough with adaptive
Next, lets take a look at 2 axis rough with the sub-pattern adaptive.
Create a new 2 axis rough toolpath. Select the sub-pattern type adaptive.
Select the same drive curves as before

Offset is set to .2mm.
Step down = 1 slice.
Step over = 25%
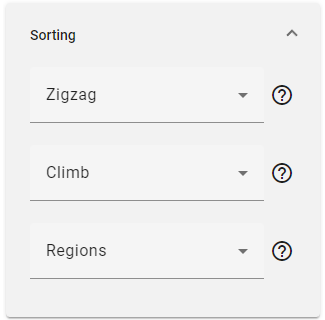
Sorting is set to one-way, climb and regions.


Set the heights to relative to stock start and end height to relative to drive curves

Same as before, set re-machining to enable, stock and use job stock.
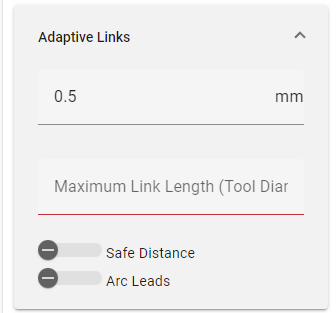
In the link section go to adaptive links.
The .5mm value adjusts the "micro lift" the tool performs between passes. The adaptive option will cut the part, lift slightly off of the current level, move to the next cut location, and approach back into the material. The value of .5 mm is a default value but can be adjusted to change this height. The image below highlights the retract distance of .5 mm.

Next, change the maximum link length to 25. This keeps the tool down when cutting along the part. If kept at the default of 5, the toolpath may introduce unnecessary retracts.

Click ok and calculate the toolpath
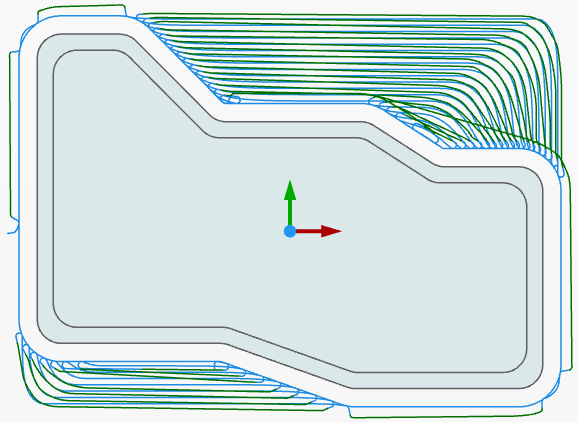
The resulting toolpath cuts the part using the adaptive sub pattern. The dark green links show the tool lifting and moving into position for the next cut. The tool is climb cutting

Edit the toolpath ang change the sorting from one-way to zigzag.
Click ok and calculate the toolpath,
The tool moves in a zig-zag pattern (Climb and conventional) reducing in the number of small retracts between cuts.


I am starting a new discussion that will focus on best practices, tips and tricks for cam studio. There are many settings for each operation that can dramatically change the outcome of the toolpath. The goal is to help users understand these settings and to optimize toolpaths for quality and performance.
Please post questions, examples to cut or general feedback here.
Example part to machine
Public document for the part model. https://cad.onshape.com/documents/6c0b709deffb5e6a06fe1b66/w/bc1cc3aaf2baa5278e47436a/e/67fafb8d3a2a5de2105741c4

We will start with 2 axis rough operation to machine the outside of the part.
2 axis rough
In this example, the area colored in blue will be machined.
Strategy: Edges, 2 axis rough, sub-pattern offset.
The drive edges are selected on the outside of the part.
Offset is set to .2mm. (This leaves material on the walls of the part)
Step down = 1 slice.
Step over = 25%
Sorting is set to one-way, climb and regions.
Set the heights to relative to stock start and end height to relative to drive edges. (To leave material on the floor of the part, adjust the end height)
In order for the toolpath to cut the outside of the part, we need to enable re-machining, and tell the toolpath to cut the stock that we have defined. If this option is not enabled, the toolpath will cut inside the drive edges. We want the toolpath to cut outside.
Today, cam studio has combined re-machining and stock definition into the same category for ease of use. This may change in the future.
Enable re-machining, choose stock and use job stock. This tells the toolpath to look at the initial job stock we have defined to calculate the toolpath.
Under the link section, all the settings are set to default except for distances and arc fit.
The entry feed distance is changed to 2mm. *Note* any value that does not have a description can be deleted from the widow to display what the value controls.
The arc fit option is turned off. This option is designed to prevent rapid changes in direction when the tool retracts. This is ideal for larger machines but will add more lines to the posted g code. For our example it has been disabled.
Click ok and generate the toolpath.
The results show the tool removing the material on the outside of the part. The tool climb cuts along the side of the part, retracts, and moves to the next step of the cut.
There are additional settings we can adjust to change the behavior of this toolpath.
Edit the 2 axis roughing toolpath. (You can also copy the toolpath and edit the copy)
Under sorting, change from one way to zigzag
To keep the tool from retracting we need to change a setting in the link section.
Set small gaps along cut to bend spline and disable use ramps.
Click ok and calculate the toolpath.
The result shows the tool cutting in a zigzag motion while keeping the tool down. This will climb and conventional cut the material.
*********************************************************************************************************************************************************************************************************************************************************
2 axis rough with adaptive
Next, lets take a look at 2 axis rough with the sub-pattern adaptive.
Create a new 2 axis rough toolpath. Select the sub-pattern type adaptive.
Select the same drive curves as before
Offset is set to .2mm.
Step down = 1 slice.
Step over = 25%
Sorting is set to one-way, climb and regions.
Set the heights to relative to stock start and end height to relative to drive curves
Same as before, set re-machining to enable, stock and use job stock.
In the link section go to adaptive links.
The .5mm value adjusts the "micro lift" the tool performs between passes. The adaptive option will cut the part, lift slightly off of the current level, move to the next cut location, and approach back into the material. The value of .5 mm is a default value but can be adjusted to change this height. The image below highlights the retract distance of .5 mm.
Next, change the maximum link length to 25. This keeps the tool down when cutting along the part. If kept at the default of 5, the toolpath may introduce unnecessary retracts.
Click ok and calculate the toolpath
The resulting toolpath cuts the part using the adaptive sub pattern. The dark green links show the tool lifting and moving into position for the next cut. The tool is climb cutting
Edit the toolpath ang change the sorting from one-way to zigzag.
Click ok and calculate the toolpath,
The tool moves in a zig-zag pattern (Climb and conventional) reducing in the number of small retracts between cuts.
2
Comments
Having each tool path ASSUME that it is "re-machining" from the results of the previous is a way to make the UI simpler and the tool paths more optimized. But the first tool path should assume it starts with the stock as defined in the setup. But I assume this is not the default in other systems because of the computational complexity of generating and using all the partial stock definitions. But if you can justify the complexity without making the UI too slow. It would be a wonderful way to structure the UI.
But in the above example, having to enable "re-machining" on the first tool path to get it to use the stock is very odd and something it would have taken me a good bit longer to figure out (if not for your excellent step-by-step here).
Also, I find the name re-machining confusing. It's like using a double negative ("not off" vs just saying "on") that is redundant and confusing. The stock to be machined for a tool path should just be defined as "from stock" or "from the previous operation", etc. Or just remove the option entirely and always assume the stock to be machined is what is left from the previous operation and when there is no previous, from the stock defined in the setup.
So CAM systems have a re-machining option for the common approach of using a big tool to rough out an area fast, and follow up with a small tool to finish the tight corners that the big tool could not reach. (I know you know this). But isn't it just far cleaner if the CAM always assumes "re-machining" on every tool path, and all you have to do is pocket with a big tool, then pocket with a small tool, and it just works correctly without you having to tell it to "re-machine"? Just "machine" the pocket with a big tool, then "machine" the same pocket with a small tool, and it just works? From an end-user perspective, that is what would be simpler and better if you could just justify the computational complexity..
All the CAM I have used makes the user think about what stock is left, and the tool path calculations in general don't care, and one must very carefully fake out the tool paths by selecting boundaries and clicking lots of options to make it just machine the stuff you need to remove, and not waste time with accidental air-cutting stock that isn't there etc. It would be so much better if all the tool paths took into account what stock is there, and optimized every tool path that way?
For example, if I need to drill a hole in the bottom of a pocket, in fusion, I have to define the x y location of the hole, but then I must carefully watch how the heights are set to so that it doesn't start a slow drilling and picking at the top of where the stock was before the pocket was cut out so it ends up air-drilling all though the pocket just to get to the bottom and finally drill a 4 mm deep hole through the bottom. If the drilling op assumed "re-machining and knew the pocket was cut, in a previous tool path, I wouldn't have to double-check all these options to make sure the height of the drilling op starts in the correct place (and triple make sure it doesn't do a rapid move of the drill into the stock).
T0 make this safe, it seems to me all you need is a "stock" option that says "from previous", or "from stock", to make this safe. It would default to "from previous" for all and the tool paths would be smart and not machine stock that wasn't there, and when you wanted extra safety, say because you had to stop a job in the middle, change the CAM, and restart in the middle, and the actual stock on the machine is not what you CAM has defined, then you can make the op safe by assuming "from stock" for the modified tool paths, and have it air-cut some that isn't there.
The re-machining with stock basically says look at the initial stock model for calculating the toolpath. This can be confusing for the first toolpath since there is no stock to re-machine.
The re-machining based off of tool or operation requires the user to pick a tool or operation to calculate the toolpath.
In the future, we may have a "stock manager" for toolpaths based off of the initial stock model. Re-machining will be used only for rest roughing or rest finishing operations.