Welcome to the Onshape forum! Ask questions and join in the discussions about everything Onshape.
First time visiting? Here are some places to start:- Looking for a certain topic? Check out the categories filter or use Search (upper right).
- Need support? Ask a question to our Community Support category.
- Please submit support tickets for bugs but you can request improvements in the Product Feedback category.
- Be respectful, on topic and if you see a problem, Flag it.
If you would like to contact our Community Manager personally, feel free to send a private message or an email.
Next shell question..
 chriss_ko
Member Posts: 13 ✭
chriss_ko
Member Posts: 13 ✭
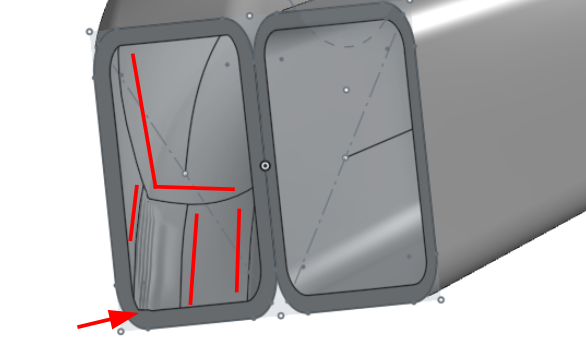
Hi *,
I have two lofts following two 3D fit splines and I want to transform them into a "pipe" with the shell function. That works with one of the two but the 2nd looks a bit strange:
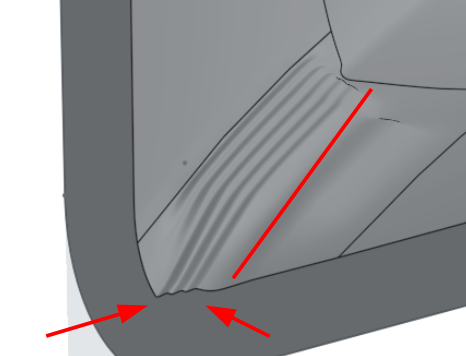
Closeup:
Here is the sketch:

Here is the link to the document:
https://cad.onshape.com/documents/fa4bce245ef9d6596f869a94/w/2937cd3cfb02db366ad4770f/e/d8de7c90881730ef750c7d2b
Cheers, Chriss
I have two lofts following two 3D fit splines and I want to transform them into a "pipe" with the shell function. That works with one of the two but the 2nd looks a bit strange:
Closeup:
Here is the sketch:
Here is the link to the document:
https://cad.onshape.com/documents/fa4bce245ef9d6596f869a94/w/2937cd3cfb02db366ad4770f/e/d8de7c90881730ef750c7d2b
Cheers, Chriss
0
Best Answer
-
chriss_ko
Member Posts: 13 ✭
S1mon said:Can you loft the square profiles and then add fillets after before shelling? Loft or sweep can often create funky surfaces.I'm not sure what you mean with "loft" in this context? "Base" where the two "horns" are starting is a separate part till I merge the three.The "horns" are 0.8mm now, I think that this will be robust enough anyway. But I'm always open for new/better techniques to solve that problem. This will not be the last part where I will have this problem.0
Answers
As before, any problems with shell have to do with the root outer surfaces. In this case, you are asking the outer surfaces to follow your loft path, twist along the way, end at very sharp angles, and change radius along the way. This all can cause funny defects in the surface, especially when the surface is offset, which is what the shell does. If you make the twisting more "gradual" that might solve the issue. That's the idea with making the end profiles more perpendicular to the path curve. It will make all the twists more gradual.
You may also solve the problem simply by changing the radius at the profile rectangles.
> You may also solve the problem simply by changing the radius at the profile rectangles.
I do not think so to be honest. The other "horn" the same radius, bend etc but not that "problem".
Anyway, I still do not understand why it is working at the "right" side but the left side has this problem. I made a new face which is perpendicular with the other sketch for testing and the duct does not nor at all anymore. That made me give up for now. I will clean up the sketches on the "Connector" part first. I have the feeling that the multi use of one sketch brings in a unnecessary complexity. I will come back later.....
[edit] Looking at your model quickly, I wonder if you tried adding connections in your lofts? You might get something more like what you intended.
Simon Gatrall | Product Development, Engineering, Design, Onshape | Ex- IDEO, PCH, Unagi, Carbon | LinkedIn
https://cad.onshape.com/documents/a06a050f379f472ab93ce664/w/9707f8de7e7b36c8cb97e42b/e/86e6c3a26f490355765c7ee8
Simon Gatrall | Product Development, Engineering, Design, Onshape | Ex- IDEO, PCH, Unagi, Carbon | LinkedIn