Welcome to the Onshape forum! Ask questions and join in the discussions about everything Onshape.
First time visiting? Here are some places to start:- Looking for a certain topic? Check out the categories filter or use Search (upper right).
- Need support? Ask a question to our Community Support category.
- Please submit support tickets for bugs but you can request improvements in the Product Feedback category.
- Be respectful, on topic and if you see a problem, Flag it.
If you would like to contact our Community Manager personally, feel free to send a private message or an email.
Render Studio lighting problem
 Max_Kluge
Member Posts: 21 ✭✭
Hello Community
This call goes out to all Render Studio users:
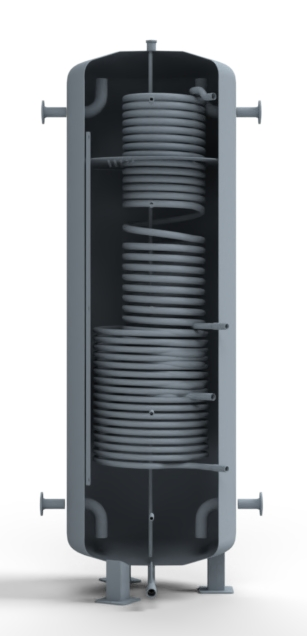
Do you have any idea of how to apply light to the inside of things without using additional light sources?


We want the inside to be evenly lighted, but all settings that I can find can only achieve to manage the lighting of the world around the model. I also tried to set a light appearance to certain faces, but that did not work out as well.
Has anybody an idea of creating some omnipresent lighting? (looking like in the Assembly or Part Studio)
Thanks!
BR
Max
This call goes out to all Render Studio users:
Do you have any idea of how to apply light to the inside of things without using additional light sources?


We want the inside to be evenly lighted, but all settings that I can find can only achieve to manage the lighting of the world around the model. I also tried to set a light appearance to certain faces, but that did not work out as well.
Has anybody an idea of creating some omnipresent lighting? (looking like in the Assembly or Part Studio)
Thanks!
BR
Max
0
Comments
The "Add emission" and "Add thermal emission" appearances do allow you to turn any object into a source of light so this would be the most common approach to creating additional light sources or adding a constant brightness to any appearance.
I think you can rotate the enviroment to get more lighting inside. At the moment the shadow is on the left side, and main light source is on the right side. You can also rotate the part.
Or you change the color of the inside surface to white. This should bounce more light around.
@Paul_Arden
Is it possible to artificially increase the global illumination in Render Studio? Maybe by increasing the amount of ray bounces? I think the pixar movies use more global illumination to get a warmer look with softer shadows. Just an idea.
I totally agree, that it works really well for this purpose, and I'm pretty pleased with the results in terms of real life looking objects. In creating marketing material it hast at the moment no use for us because it makes the models so dark that you cannot use the renders for marketing material. The customers are not interested in how it may look in a realistic scenario more than what did we put inside.
I will try the workarounds from Martin for the moment and see what we can do but an omnipresent lighting as a setting is in our perspective a must have.
Also it is not possible to select transmission on metal material looks. is that right? Or do I have to add it somehow?
Omnipresent lighting is in our company a must have for all renderings as is makes marketing material 100% better. I hope this will be an option soon.
If you are referring to the library metals then generally they don't have transmission parameters since they are modelled after real-world metals. However you could add the "Add cutouts" modifier on top of that and set the opacity to something other than 1.0 to create transparency of any appearance. This would be non-refractive, though that's probably what you'd want in that case.
Do you have an example of previous images you have generated with this look? If you literally had what is often called an 'omni' light source with no shadows then essentially all of the surfaces will look flat with no shading, so I'm assuming that is not quite what you are trying to get (if so you can do that with the "Stylized" rendering mode).
You can also use the "Add emission" modifier to add a constant brightness to any appearance regardless of what light it receives, however such an appearance will then also emit light onto other appearances so it would be a tricky balance. As I say though, would be good to see an example of the type of image you are looking for.
There are hardly any shadows and you have a bright clear view. In the new pictures we want to dismiss the shadows completely if possible. But there is another Problem with the setting: As I understood, it is not possible to safe one master setting and just switch out the parts/assemblies, right? As well as it is not possible to save own material looks , right?
I used your example and deactivated all additional light sources and only change the tone mapping:
@Max_Kluge
There are also options for stylized rendering, like flat shading:
I used your example and deactivated all additional light sources and only change the tone mapping:
That looks like it is pretty close tho what Max could use. I'll try playing with this next time I render. Thanks!
Stylized rendering unfortunatelly is no option, I found those options earlier and think its a nice feature for fun projects.
Thanks to all helping out an putting time and effort into my problem!