Welcome to the Onshape forum! Ask questions and join in the discussions about everything Onshape.
First time visiting? Here are some places to start:- Looking for a certain topic? Check out the categories filter or use Search (upper right).
- Need support? Ask a question to our Community Support category.
- Please submit support tickets for bugs but you can request improvements in the Product Feedback category.
- Be respectful, on topic and if you see a problem, Flag it.
If you would like to contact our Community Manager personally, feel free to send a private message or an email.
Working with Variables and Sketch dimensions.
 douglas_clark
Member Posts: 11 ✭
My first question here, probably a very basic one...
I have a sketch with a Variable driven dimension (#foo for eample), I would like to be able to:
- Read the value of the Variable
- Update the Variable to a new value (I assume that the sketch will recompute at that point).
- Read the value of driven (grey) dimensions in the sketch, or maybe get the properties of the elements they're connected to if its not possible to get at the driven dimension.
- Write the collected information out to a file.
I thought the SetVariable and GetVariable functions were going to be what I needed to get 1 and 2 done, that does not appear to be the case, so is this possible to do and if so whats the basic direction to take in doing it?
Thanks for the help.
Doug.
Best Answer
-
 viru
Member, Developers Posts: 619 ✭✭✭✭
@douglas_clark, Create a variable for use in expressions in a Part Studio, and assign a value. Use the variable in dimensions and expressions.
viru
Member, Developers Posts: 619 ✭✭✭✭
@douglas_clark, Create a variable for use in expressions in a Part Studio, and assign a value. Use the variable in dimensions and expressions.Variable

 This functionality is also available on iOS and Android.
 Steps
Steps- While in a Part Studio, click
 .
.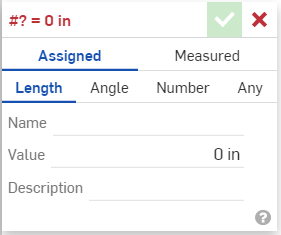
- In the dialog, select individual features:
Enter a name (usually a single letter), and a numeric value (decimals accepted).
The value entered in the Name field becomes part of the name (in the title of the dialog and in the Feature list).
Use only English letters and numbers in the name (at least one English letter followed by letters and/or numbers).
- Click
 .
.Note that the variable name is case-sensitive.
 Variables in dimensions
Create a dimension, in the dimension field enter # and the variable name (and optionally, as part of an expression, as shown below):
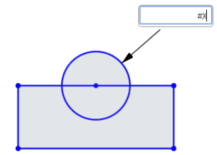 and
and 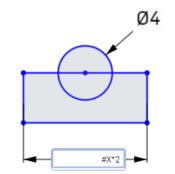
Save the dimension; the variable is replaced with the value and the expression (if applicable) is solved:
When you double-click the dimension for editing, the variable (and expression) is displayed:
 Variable in a solid body feature
Use variables anywhere you use expressions in a Part Studio. For example, in an extrude or revolve operation:
Start the operation as usual (in this case, Revolve); in the numeric value field, enter # and the variable name (or optionally, as part of an expression):
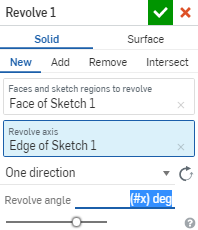
Accept the feature.
When you edit the feature, the solution is displayed in the numeric value field:
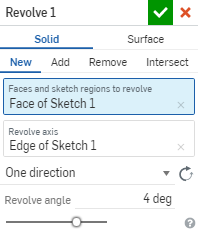
Click in the field and the variable (and expression, if applicable) is displayed.
 Arrays in Variables
Variable values can contain expressions but must evaluate to a scalar value. You can specify an array with an index, and the index can be a variable. This allows you to change the value of the variable by changing the value of the index variable.
To use arrays in variables, you must first set up a zero-based index.
- Create a variable and set the name to ‘config’. Set the value of #config to ‘2’.
- Create a variable and set the name to ‘diameter’. Set the value of #diameter to ‘[0.25, 0.5, 1][#config]’.
It is the second set of brackets [#config] that serves as the index pointer in the array.
Create a variable and set the name to ‘length’. Set the value of #length to ‘[2, 4, 10][#config]’.
- Create a circle.
- Create a line.
- Set the diameter of the circle to ‘#diameter’.
Since #config = 2, the diameter of the circle is 1.
- Set the length of the line to ‘#length’.
Since #config = 2, the length of the line is 10.
Change the value of the index variable to change the indices of all array variables.
Please refer below gif animation for variable. Tips
Tips- When you change the value of a variable (edit it as you would any feature), all operations that use the variable are automatically updated.

5 - While in a Part Studio, click
Answers
I would take a look at the Measure Distance sample that Ilya has posted. I'm not sure if getting a driven dimension in the sketch is going to work. I'm guessing it would be simpler to allow for selection of the sketch entities in your feature and set whether it is vertical/horizontal/min distance (or whichever ones you are interested in) and compute the value based on that and store to your variable.
Variable
Enter a name (usually a single letter), and a numeric value (decimals accepted).
The value entered in the Name field becomes part of the name (in the title of the dialog and in the Feature list).
Use only English letters and numbers in the name (at least one English letter followed by letters and/or numbers).
Note that the variable name is case-sensitive.
Create a dimension, in the dimension field enter # and the variable name (and optionally, as part of an expression, as shown below):
Save the dimension; the variable is replaced with the value and the expression (if applicable) is solved:
When you double-click the dimension for editing, the variable (and expression) is displayed:
Use variables anywhere you use expressions in a Part Studio. For example, in an extrude or revolve operation:
Start the operation as usual (in this case, Revolve); in the numeric value field, enter # and the variable name (or optionally, as part of an expression):
Accept the feature.
When you edit the feature, the solution is displayed in the numeric value field:
Click in the field and the variable (and expression, if applicable) is displayed.
Variable values can contain expressions but must evaluate to a scalar value. You can specify an array with an index, and the index can be a variable. This allows you to change the value of the variable by changing the value of the index variable.
To use arrays in variables, you must first set up a zero-based index.
It is the second set of brackets [#config] that serves as the index pointer in the array.
Create a variable and set the name to ‘length’. Set the value of #length to ‘[2, 4, 10][#config]’.
Since #config = 2, the diameter of the circle is 1.
Since #config = 2, the length of the line is 10.
Change the value of the index variable to change the indices of all array variables.