Welcome to the Onshape forum! Ask questions and join in the discussions about everything Onshape.
First time visiting? Here are some places to start:- Looking for a certain topic? Check out the categories filter or use Search (upper right).
- Need support? Ask a question to our Community Support category.
- Please submit support tickets for bugs but you can request improvements in the Product Feedback category.
- Be respectful, on topic and if you see a problem, Flag it.
If you would like to contact our Community Manager personally, feel free to send a private message or an email.
Linear pattern Tool???
 ray_sleeper
Member Posts: 5 ✭
How do I choose a direction?
Best Answer
-
 viru
Member, Developers Posts: 619 ✭✭✭✭
@ray_sleeper, Please refer below step for part and sketch linear pattern.
viru
Member, Developers Posts: 619 ✭✭✭✭
@ray_sleeper, Please refer below step for part and sketch linear pattern.Linear part Pattern

Replicate selected parts, faces, or features and arrange them in a row or grid pattern. Create new parts or modify existing parts by adding or removing material, or intersecting bodies in its path.
 Steps
Steps- Click
 .
.
- Select a Result body operation type:
- New - Create new material that results in a new part
- Add - Create new material and add to the existing material
- Remove - Take material away from existing material
- Intersect - Leave material only where geometry overlaps
- Select the pattern type:
- Part - To pattern an individual part
- Feature - To pattern a specific feature (or features) listed in the Feature list (an extrude, fillet, sweep, sketch, etc)
- Face - To pattern a specific face on a specific part
- With focus on the Entities to pattern field, select entities to replicate into a pattern.
- Set focus in the Direction field, and then select an edge or face of the part along which to place the replicated pattern entities.
- Enter the distance between each pattern entity, and then the number of repetitions (Instance count). Select a direction for the pattern in the workspace (shown below as the highlighted edge).
- Use Centered to make the seed instance/face/feature as the center of the pattern.
In this case, the instance count is N instances from the seed (inclusive of the seed) in one direction and N instances from the seed (inclusive of the seed) in the other direction. With N being the number you enter in the Instance count field in the dialog:

- Click
 .
.
 Linear part pattern
Pattern an individual part
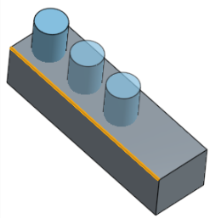
 Linear feature pattern
Pattern a specific feature (or features) listed in the Feature list (an extrude, fillet, sweep, sketch, etc)
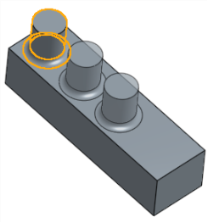
 Linear face pattern
Pattern a specific face on a specific part
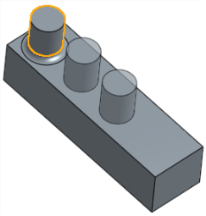
 Linear pattern New/Add (new material)
New - Create new material that results in a new part.

Add - Create material and add to the existing material

 Linear pattern Remove
Take material away; select the part to pattern, and then Remove
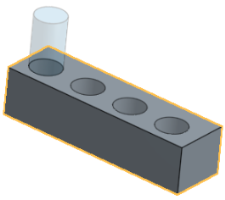
 Linear pattern Intersect
Leave material only where geometry overlaps; select the part to pattern, and then Intersect
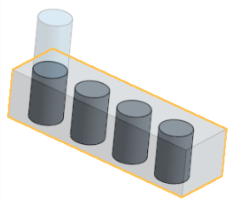
 Tips
Tips- When selecting a face or edge to set the Direction, you can use the Directional arrows
 to flip the result if necessary.
 - When you select a face for the Direction, you are using the direction that is 'normal to' the face.
- When patterning a feature, you can select anything in the feature list, in any order. Regardless of the order selected, the features are applied in the order listed in the Feature list.
- If you select a pattern in the Feature list, you will pattern that pattern, but not the seed. In order to get the seed included, select it as well.
- When patterning a boolean feature (Boolean, Split, etc), you must also select the features the boolean was applied to.
- When creating Feature patterns, all aspects of a feature are applied; for example, the end conditions in an extrude feature. (By contrast, Face patterns do not recognize these types of modifiers.)
Linear Sketch Pattern

 This functionality is also available on iOS and Android.
Create multiple instances of sketch entities uniformly in one or two directions.
Steps
- Select the sketch to pattern and then click the Linear pattern tool icon:

The initial pattern created is:
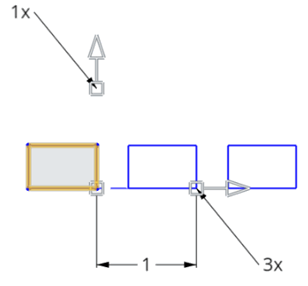

Double-click to enter the number of entities to pattern. 
Click and drag the arrow head to change the distance between entities; drag the arrow base to move the pattern at an angle. 
Double-click to specify the distance between entities.  Tips
Tips- You can delete any sketch entity in the pattern without affecting the integrity of the pattern. Changing the number of sketch entity occurrences does not reinstate a deleted entity; the space for that entity is left empty.
- In linear sketch patterns, you can drag the arrow manipulator's base to position the pattern at an angle (the base is shown highlighted below):
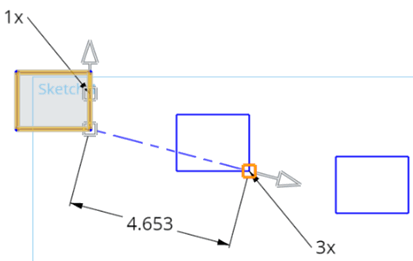
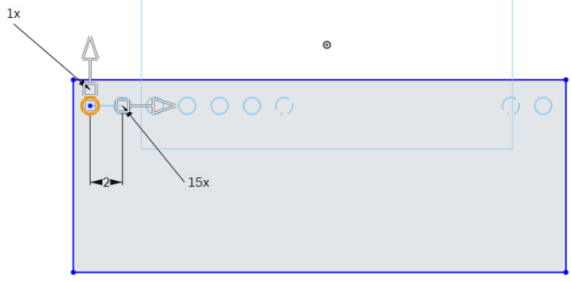
- When you create more than ten pattern entities, the system shows only up to the first 10 to prevent dips in performance from generating the preview.
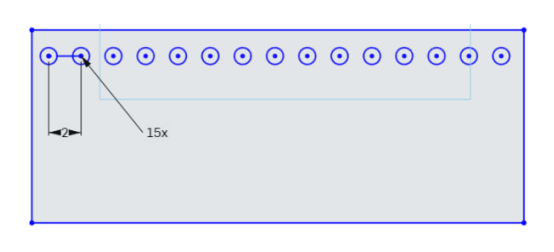
5 - Click
Answers
Linear part Pattern
Replicate selected parts, faces, or features and arrange them in a row or grid pattern. Create new parts or modify existing parts by adding or removing material, or intersecting bodies in its path.
In this case, the instance count is N instances from the seed (inclusive of the seed) in one direction and N instances from the seed (inclusive of the seed) in the other direction. With N being the number you enter in the Instance count field in the dialog:
Pattern an individual part
Pattern a specific feature (or features) listed in the Feature list (an extrude, fillet, sweep, sketch, etc)
Pattern a specific face on a specific part
New - Create new material that results in a new part.
Add - Create material and add to the existing material
Take material away; select the part to pattern, and then Remove
Leave material only where geometry overlaps; select the part to pattern, and then Intersect
Linear Sketch Pattern
Create multiple instances of sketch entities uniformly in one or two directions.
Steps
The initial pattern created is:
Hi,
I have one question regarding the centered option. I am trying to make ventilation cuts in a plastic casing and I used the pattern tool on an extrude feature to create them. Then I used a mirror feature to copy those cuts to the other side of the casing. Now, I noticed that the center piece is not becoming part of the mirrored linear pattern - it is missing on the other side.
What am I doing wrong?
@Jin, the pattern and the seed are different features. In the Mirror definition, make sure you select the seed feature, too.
Also, everyone at Onshape will tell you that feature patterns/mirrors are much slower to rebuild than face/body patterns.
Hmm, OK, I will try that. I am a beginner, so for now I was just happy to get where I wanted just "somehow"