Welcome to the Onshape forum! Ask questions and join in the discussions about everything Onshape.
First time visiting? Here are some places to start:- Looking for a certain topic? Check out the categories filter or use Search (upper right).
- Need support? Ask a question to our Community Support category.
- Please submit support tickets for bugs but you can request improvements in the Product Feedback category.
- Be respectful, on topic and if you see a problem, Flag it.
If you would like to contact our Community Manager personally, feel free to send a private message or an email.
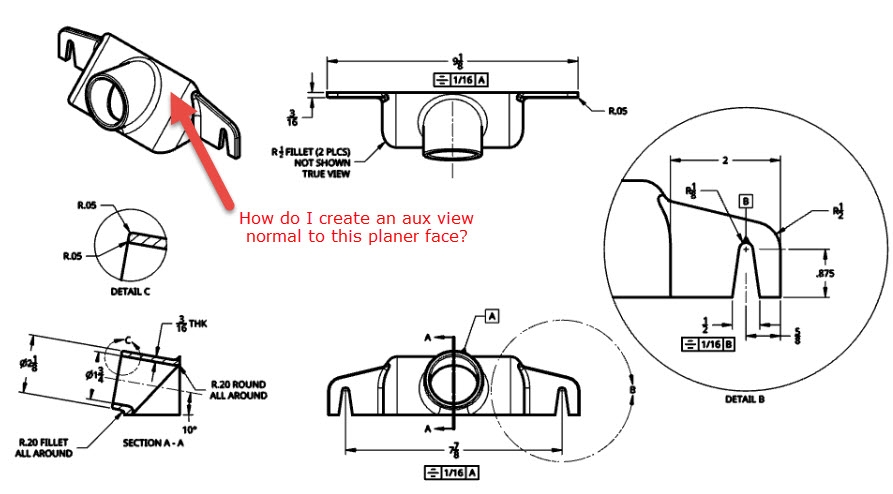
How do I create an Auxiliary View without having a line of sight in a drawing?
 StephenG
Member Posts: 384 ✭✭✭
I want to be able to create an aux view so it can be sectioned to expose a fillet curve so it can be dimensioned "true view" as an arc. (I faked the dim callout as a Note w/Leader.)

There appears to be a line in "SECTION A-A" that I should be able to select that is perpendicular to my line of sight for the desired aux view.
Onshape doesn't appear to allow me to select section view or detail view geometry to establish aux view line of sight (confirmed this in On Line Help). Is OS enforcing a drawing industry convention that precludes it? (I am not formally trained in drafting.)
(Oops, I missed a key dimension.)
0
Answers
Create that section on another scrap sheet then move the aux view to your main page.
It doesn't look like you can use the section view at all to create a aux view (though I could be wrong..still learning OS myself.) You'll need to create a left or right side view and project from that. But it doesn't look like you can move the aux view away from the sheet where its parent view is.
https://cad.onshape.com/documents/36c46c293217fc4abf6eece5/v/de59939ebb4057f62d1c6440/e/380ca19301cae99fbae9c523
What I really want to do is be able to select any face, linear edge in the 3D model, or even a non-linear curve that has plane quality to establish a line of sight. Even though 2D drafting convention is to create paper space alignment of the Aux view to a parent view that contains the line of sight I do not have an accessible line of sight.
I think I found the proper way to do it, but I have hit another road block. You need to create a "real" left or right view and from there select a line that will build the aux view.
The problem now is creating a section view that cuts through the part in a way that exposes the fillet arc in a true view orientation. The section line is either horizontal or vertical relative to paper coordinate system not the aux view's coordinate system.
Things have improved a little since my original post. The ability to create the section line at an arbitrary angle through 2 points on geometry in a view is now possible. However, it is still not possible create a section line that is perpendicular to a line (or 2 points) through a 3rd point.
I resorted to a hack that allows the creation of a section view with the correct line of sight to "properly" dimension of a radius in a true view orientation.
It involves adding a tiny flyspeck cylinder part volume representing the desired line of sight and then using it to define the section line. Note: The cylinder has to be created as a separate part volume because the two points at the middle-ends of the cylinder are the point that must be selected.
With respect to creating auxiliary views from sections views, or section views from aux views, I am afraid that this will never be supported because it apparently falls outside the norm of accepted drafting practices.