Welcome to the Onshape forum! Ask questions and join in the discussions about everything Onshape.
First time visiting? Here are some places to start:- Looking for a certain topic? Check out the categories filter or use Search (upper right).
- Need support? Ask a question to our Community Support category.
- Please submit support tickets for bugs but you can request improvements in the Product Feedback category.
- Be respectful, on topic and if you see a problem, Flag it.
If you would like to contact our Community Manager personally, feel free to send a private message or an email.
dimensions parallel to other angles
hello,
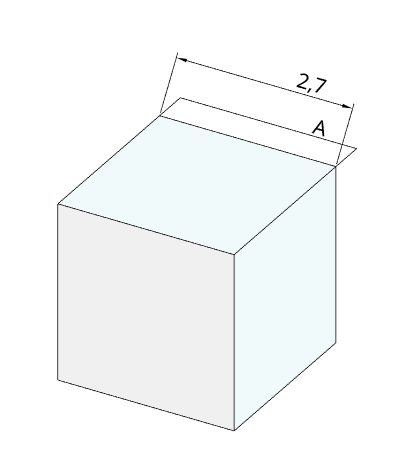
I was trying to indicate dimensions in a trimetric view, but I can not get to put the dimension parallel to the view to be more graphic: 2.7 mm is the dimension i am measuring and what i would like to indicate is "A" that I fabricated manually from 2 points center line, note and line commands:

I am looking to know if it is possible to do something like this with the dimension command or if at least it could be done manually as what I used for the example the line under the A is not parallel to the size of the cube (and does not have the end arrows).
Best regards,
franco
I was trying to indicate dimensions in a trimetric view, but I can not get to put the dimension parallel to the view to be more graphic: 2.7 mm is the dimension i am measuring and what i would like to indicate is "A" that I fabricated manually from 2 points center line, note and line commands:

I am looking to know if it is possible to do something like this with the dimension command or if at least it could be done manually as what I used for the example the line under the A is not parallel to the size of the cube (and does not have the end arrows).
Best regards,
franco
0

Answers
https://forum.onshape.com/discussion/comment/63085#Comment_63085
In the meantime, there is a workaround that will give you the correct dimension and it will put the dimension line at the angle that you want also. It’s not a perfect work around. But there is something that gives you the correct dimension at the correct angle.
Did you take a look at the PDF ?
1.create curves in the part
2.create a composite part with my parts and the curves
3. print the part without showing the curves.
4. put the composite part with transparence 100%
5. erase everything from the drawing except for the composite part
6. exported in pdf
7. open the png (step 3.) and the pdf (step 6.) in inkscape
8. use the curves in the pdf to be able to create vector lines in inkscape
9. superposed the pdf and created vectors with the png
10. erase the pdf figure
11. exported en png the original png + the created vectors and indications
not perfect solution but it gave me the reason to begin the learning of inkscape at the same time ^^
best regards!