Welcome to the Onshape forum! Ask questions and join in the discussions about everything Onshape.
First time visiting? Here are some places to start:- Looking for a certain topic? Check out the categories filter or use Search (upper right).
- Need support? Ask a question to our Community Support category.
- Please submit support tickets for bugs but you can request improvements in the Product Feedback category.
- Be respectful, on topic and if you see a problem, Flag it.
If you would like to contact our Community Manager personally, feel free to send a private message or an email.
Face Vase Modeling Help Needed!
 suzi_grossman
Member Posts: 11 ✭
suzi_grossman
Member Posts: 11 ✭
I'm trying to do a kind of tricky model and I think I'm on the right track with a loft along a guide curve, but it's not quite working. I have two complex profile sketches from imported dxg files that are on the same plane 180 degrees apart. I want to do a rotation, but also morph from one to the other as it rotates.

Here's how it looks with just a normal rotation with one of the profiles, which is what I want, just plus the morph.

I tried making a circle as the guide path to loft between the two profiles, but I think I must not be understanding something because I get some pretty funky results. Here is the circle:
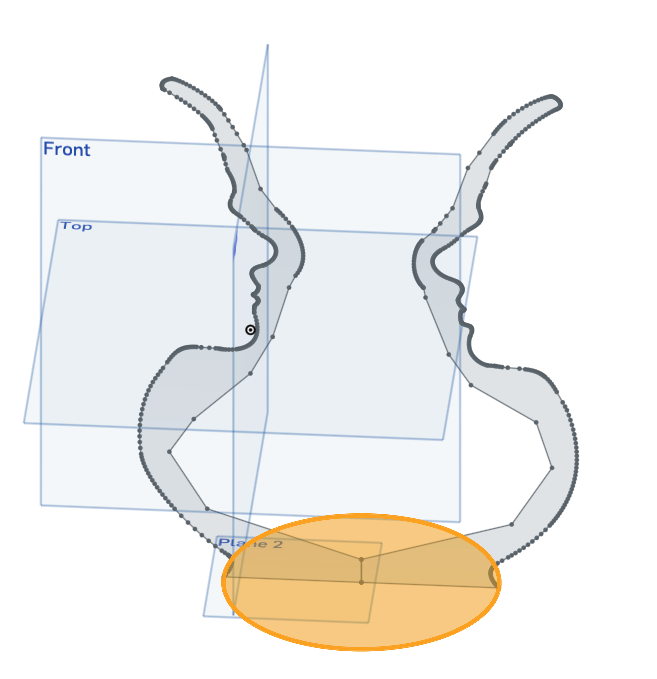
And here are the results. It looks like it is making a weird shape inside that's confusing things?


Any ideas on how to solve this? Thanks!!
Here's how it looks with just a normal rotation with one of the profiles, which is what I want, just plus the morph.
I tried making a circle as the guide path to loft between the two profiles, but I think I must not be understanding something because I get some pretty funky results. Here is the circle:
And here are the results. It looks like it is making a weird shape inside that's confusing things?
Any ideas on how to solve this? Thanks!!
0
Answers
I think you are going to need multiple "guides" along the the way at least one at the top as well probably a few intermediate ones.
You may also have to add an intermediate "section" at 90deg (you could do that by superimposing the two sketches and getting a "midpoint" line although I'm not sure there's a way to do this automatically so it would be really tedious with the number of points you have!
There is a slight possibility it could work "as is", have you tried enabling the "match profiles" (or whatever it's called), it looks like that could be part of the issue from the bottom image...
The Onsherpa | Reach peak Onshape productivity
www.theonsherpa.com
I have this thing where I see a CAD challenge and can't stop thinking about it in the back of my head even if I want to... so I have an update for you, haha!
I see now that your import seems polygonal (made of lines, not curves), so you can't use fit spline to combine all of the edges to help with lofting. You could, however, still use the fit spline tool and select each point one-by-one in order to make a smooth curve through them. I'd only do the parts that are unique (so focus on the faces), then use the normal sketch tools in onshape to sketch the rest of it. You could make the inside of the vase smoother by re-sketching it anyway. Once that's all set up, I think lofting with a path should work. This is the slow "get it done" solution, but if you're doing this kind of thing a lot I'd take time to find a better workflow.
The Onsherpa | Reach peak Onshape productivity
www.theonsherpa.com
I greatly simplified the sketch, drew fit splines between corresponding points, and did a loft.
Maybe I’m missing something
I think Anton has the best little logo or whatever you call that
Every time I see that little hippo with the beady eyes, it just cracks me up
I think the whole point is that there are two different profiles of two different people. As the surface revolves around it morphs from one person to the other.
The recently added loft connections might help with this problem.
I would also recommend sketching one side with some splines and mirroring them, removing the mirror constraints and then tweaking the positions of the control points of the mirrored version to match the second profile. When you have similar splines, you’re more likely to get a loft which behaves better.
Simon Gatrall | Product Development, Engineering, Design, Onshape | Ex- IDEO, PCH, Unagi, Carbon | LinkedIn
anyway if that were the case, it seems that you’d want to put this on a turntable with one of the new iPhones on a tripod and use the LIDAR, but whatever
And I did exactly what you talked about doing Simon. To draw one side and mirror and then remove the constraints and adjust. And this kept me from having to play with any type of connections
https://cad.onshape.com/documents/c8df6fa178c4bef62de18087/w/72d3fb6d5ac6f22ef4484a80/e/dbb90e6a6914fc348c152472
Ohh, I see it now!
RENDERCAD
rendercad.ai - Photorealistic product rendering.
▚▞▚▞▚▞▚▞▚
________________________________________________________________________
And these are the single profile vases that I've 3D printed:
I like how the vases turned out !!
Yes you’re exactly right. Sketch 3, was a circle that I split in half. So at this point it is a 180° arc. And yes, it was used as a guide.
I used 180° arcs for both the path and guide. I did this because I wanted to extrude the two main profiles off of the front plane so I would have some faces to use for the MATCH TANGENT at the start and end of the loft. So if I have extrudes that are NORMAL TO the front plane, and both 180° arcs start and end on that front plane and are coincident to the profiles, we’ll that will allow me to use match tangent in the loft
So below is a picture that shows how the outside faces ended up being tangent as a result of that. No crease where the front and back came together upon doing the mirror of surface
But notice how the inside is not tangent, and there are creases on the inside
So on the inside, I got lazy. I did not make extrusions for match tangent on the inside loft. But that certainly could be done
I also was a bit lazy on the main sketch of the two main profiles.
I first sketched the right side and then mirrored to the left. But notice that there are some blue curves on the left.
Well, after I removed all of the mirrored constraints on the left, in order to move the curves into place, like I said — I got lazy, and failed to fully constrain them by using the fix constraint. Of course it can be done. So as is, you have to be careful not to move any of those blue curves
WOW !!!! it took me a long time to get what was going on here
Well for starters. Even though it was titled FACE VASE … The word face didn’t register with me at all. I saw vase and I thought — OK, here we go
Then I read Simon is referring to these profiles as persons — and I thought — ‘maybe that’s the way some mechanical engineers refer to a technical profile’ — as a person.
Then I see some artwork by Michael that looks kind of like some type of foliage or what not spilling out of a vase. And then I looked down and I see his artwork was voted up four times. And I think — ‘I guess everybody really likes his artwork’. And I know I did because I think I was the first to vote it up
And then I see Suzi post 2 pictures of herself. And I thought – ‘well that’s interesting that Suzi would share that with us’. And the thought passes through my mind — ‘I think one of my nieces might’ve had some kind of TMJ surgery or whatever it was’. But I still didn’t get it.
So I figure you guys should all have a good laugh on me because I’ll tell you what, I sure had a good laugh once I finally realized what was what. Slow as all get out — I FINALLY SAW IT. Belly laughing out loud
Here is the link to the project. https://cad.onshape.com/documents/514325f5a53490ec0db47b5d/w/01774faf8c8be8fb8c264ba1/e/6e505c9402efa307b5706d78?renderMode=0&uiState=64150579fa9ad113ece4ed5b
It doesn't show up initially since the loft isn't working, double click the loft to see it. It looks like it should be doing exactly what I want, I'm not sure what the issue is, any thoughts? @steve_shubin ? Thanks!! (And sorry it took me so long to get back to this, I got distracted by modelling a capybara lol)
Here's a screenshot:
It was a bit of a challenge for me.
https://cad.onshape.com/documents/9b7aa1ef7fed9cdc1f9226bb/w/3bdb142e3d9fb68f5e68f87c/e/279ed955883c65d69b0266fc
https://cad.onshape.com/documents/9b7aa1ef7fed9cdc1f9226bb/w/3bdb142e3d9fb68f5e68f87c/e/7b4e231438db3ad37cf776c6
BTW The last surfice put in has no path or guides. If loft will get you what you want without, then less overhead.
And thanks for the great guide and path tutorial @glen_dewsbury !
Starting position:
Rotated 90 degrees:
Rotated 180 degrees: