Welcome to the Onshape forum! Ask questions and join in the discussions about everything Onshape.
First time visiting? Here are some places to start:- Looking for a certain topic? Check out the categories filter or use Search (upper right).
- Need support? Ask a question to our Community Support category.
- Please submit support tickets for bugs but you can request improvements in the Product Feedback category.
- Be respectful, on topic and if you see a problem, Flag it.
If you would like to contact our Community Manager personally, feel free to send a private message or an email.
Best Of
Re: Why is my sheet metal flat view reversed from my isometric view?
@verne_severson
Could you please submit this via Feedback tool (In ? menu) to support and share your document.
Could you please submit this via Feedback tool (In ? menu) to support and share your document.
 lana
lana
6
Re: Why is my sheet metal flat view reversed from my isometric view?
Right now there is no way to define the 'up' direction in sheet metal models. We pick an 'up' for you on body creation and all of the bend directions are relative to that. Like you pointed out, your model won't be built incorrectly, it is just isn't the direction you wanted.
We also only show the bend centerlines and bend notes on one side.
We know this is an issue and are looking to address it in the future.
We also only show the bend centerlines and bend notes on one side.
We know this is an issue and are looking to address it in the future.
 Jason_S
6
Re: Section views in drawings
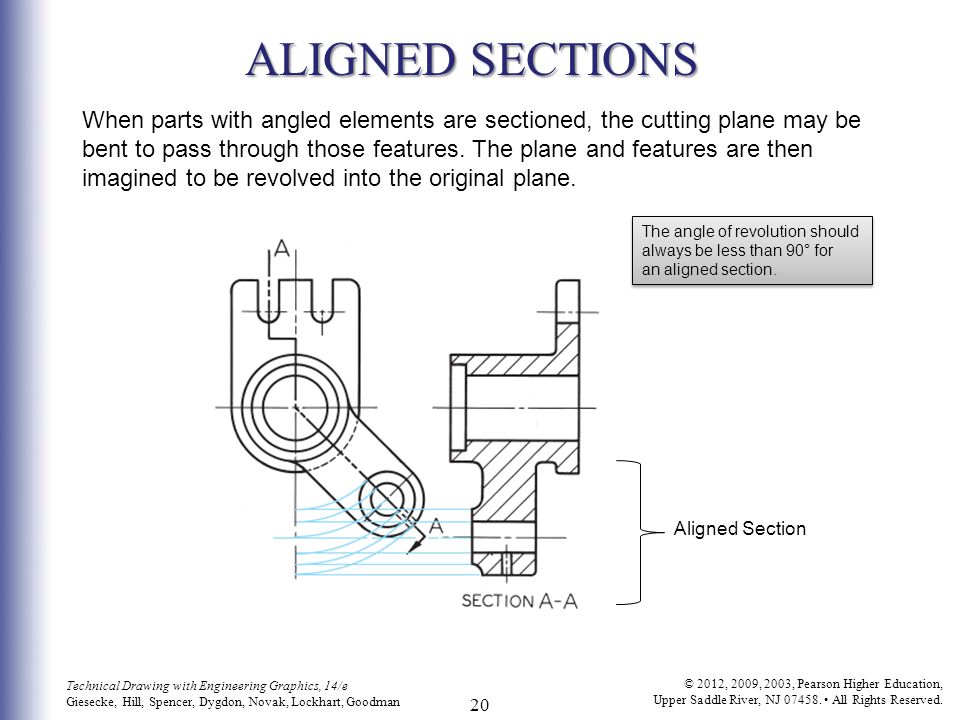
Please vote for the Aligned Section view improvement if you want it. Aligned section views have a portion of the view that is folded out from the centerpoint/pivot point of the cutting line, and another portion that is projected. Our current section tool only does projection portions. For cylindrical parts, aligned section views can save you an extra section view. Until we provide an aligned section tool, many users create two section views, and perhaps one of them might even be a partial section view. You can turn any current section view into a partial section view by dragging the cutting line endpoints into the view.


Re: Boolean Intersect with MESH
@tim_hess427
@lougallo
@john_mcclary
Here is a Boolean FeatureScript that I put together that supports solid parts, surfaces and meshes (I just updated it to support meshes).
https://cad.onshape.com/documents/84d939daceef6a928b8abcba
@lougallo
When has Onshape supported booleaning of meshes since?
@lougallo
@john_mcclary
Here is a Boolean FeatureScript that I put together that supports solid parts, surfaces and meshes (I just updated it to support meshes).
https://cad.onshape.com/documents/84d939daceef6a928b8abcba
@lougallo
When has Onshape supported booleaning of meshes since?
Re: Save As new file name
Nothing like being voted down for giving someone a link to the page they asked for... thanks
Re: Thoughts on the logo
https://forum.onshape.com/discussion/15092/new-onshape-logo
Please vote up.
Really, I am bit disgusted with the new logo.
It just does not fit the interface and the open feel of Onshape, exactly like the threadstarter describes.
The sharp corners, the standard font letters. Just like any other CAD software: Onshape is not that!
Practically, the GREEN thing draws my attention. I feel I have to look in the top left corner. Ow wait, it's only the logo...
The tiny light grey letters on the light grey background, so impractical.
The amount of white-space (or grey space) around the logo in the corner, it does not look good.
And pleaaase, do not tell me this is only the first step and everything wil be green instead of blue... :'(
Re: Animation fun
Finally,
I have an animation project that is actually for work.
I am trying something new, at beginning of the gif you will see a little clock.
That is what is being animated, 1 revolution. Everything else is timed through relations and the wave paths.
This way I am hoping to be able to use this sub assembly as a "caned cycle" seeing's how this is one of a dozen sub assemblies all working in unison but at different intervals.
My hope is to be able to only need a simple 1 revolution on the top level assembly every time I want to 'cycle' this operation.
Which should simplify the whole process.

Re: Standard content component requests
If we could get access to McMaster Carr's library of STEP/SLDPRT files that would be fantastic


