Welcome to the Onshape forum! Ask questions and join in the discussions about everything Onshape.
First time visiting? Here are some places to start:- Looking for a certain topic? Check out the categories filter or use Search (upper right).
- Need support? Ask a question to our Community Support category.
- Please submit support tickets for bugs but you can request improvements in the Product Feedback category.
- Be respectful, on topic and if you see a problem, Flag it.
If you would like to contact our Community Manager personally, feel free to send a private message or an email.
Arc causing sketch to be overdefined - how?!?
 tom_auger
Member Posts: 129 ✭✭
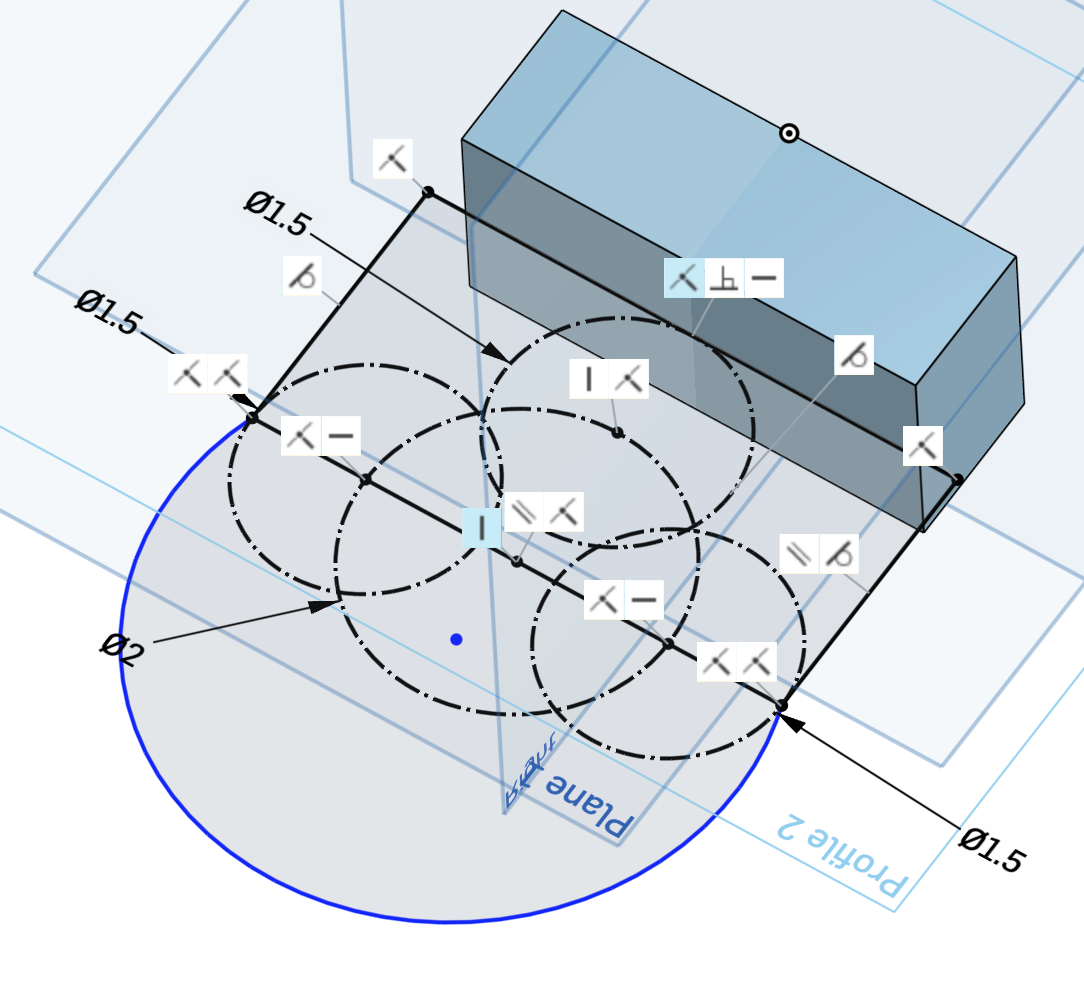
In the first image you can see I've just drawn the arc and its endpoints are snapped to opposite sides of my construction circles. I believe it's actually snapped to the endpoints of the lines that are tangential to the circles and also vertically constrained to their centerpoints.

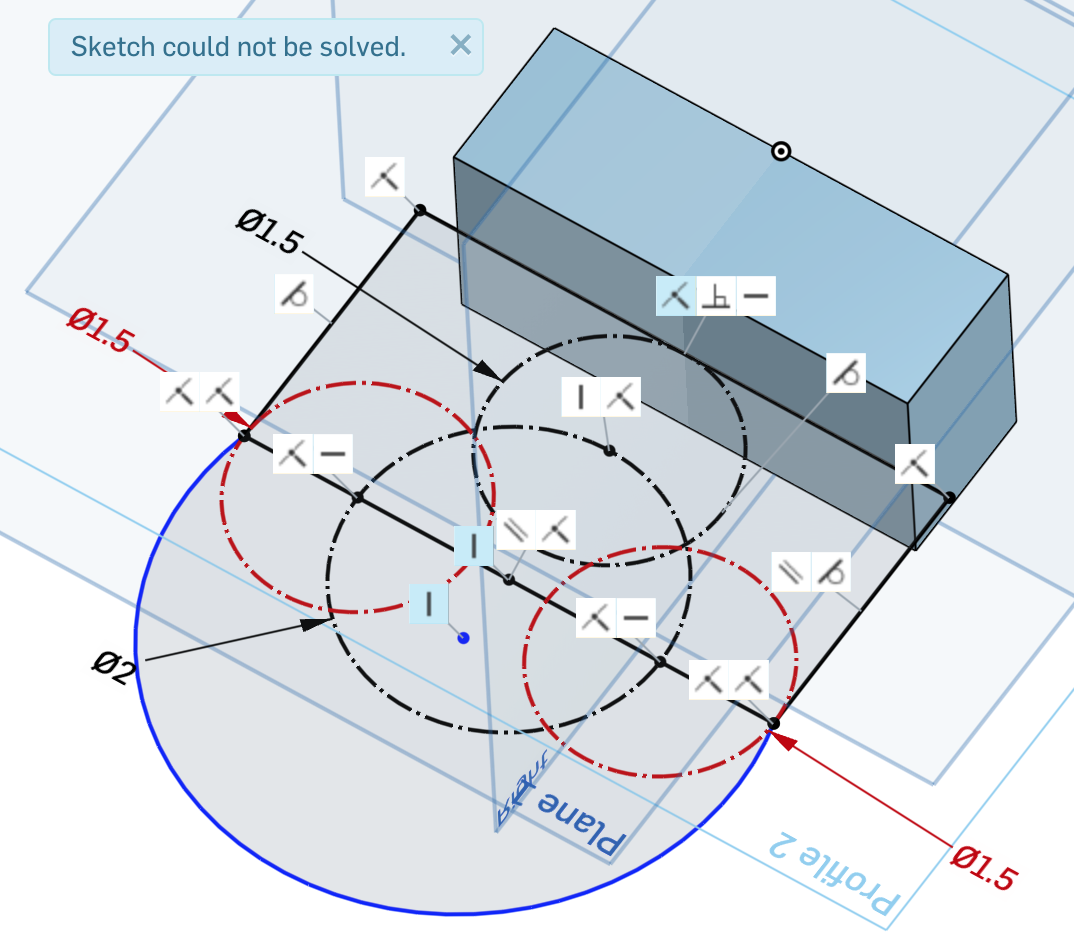
Now, here's a second screenshot where I've just adjusted the centerpoint of the arc slightly, and BAM overdefined.

Note that I have added no further constraints here.
Also note that if I delete the arc, the sketch can once again be solved. If I use a Circle instead of the arc, no problems at all. Unless I Trim the circle (turning it back into an arc) and the sketch can't be solved again.
https://cad.onshape.com/documents/2dd5eab6ad81749b5e236dff/w/374fb7f54571a1292c9618c9/e/bffabec7a9892f93e183e1aa if anyone cares to take a look at the doc.
Thank you so much in advance for your EYES!
Best Answers
-
 tim_hess427
Member Posts: 648 ✭✭✭✭
@tom_auger - I think the thing to remember here is not that the geometry is invalid, rather as you say, its's overdefined. And because it's overdefined, the software throws an error.
The sketch solver has to solve a system of equations. So for example, we have equations:
x+1=2
y+x=5
x+2=3
We can easily figure out that x=1 and y=4. The third equation isn't incorrect, its just not needed (and the system of equations is over-defined).
Similarly, in your sketch, you could look at the one of the vertical edges. It's position (1.75 inches from the center of the large circle) is defined by the size of your construction circles and the sketch is happy. However, when you add the last arc and constrain the center of the arc on the horizontal line and tangent to either of the vertical lines, it has to also be tangent to the other vertical line. Therefore they two vertical lines have to be symmetric and each 1.75 inches from the center of the large circle (creating a duplicate constraint that makes Onshape unhappy).
So, while all the dimensions currently add up, you're essentially providing too much information. There are probably many different constraints you could delete to solve the issue. But, I think what you're looking for is something that would also retain design intent (deleting one of the small circle tangent constraints would allow the sketch to solve, but that might not reflect design intent).
I deleted the large arc and re-drew it using the 3-point arc tool. When I re-drew it, I allowed it to auto-inference that I wanted the center of the arc at the center of the large construction circle. All seems to be happy with this method.
https://cad.onshape.com/documents/1036e67ad80fbb5bff9b7631/w/910b633452369b807538751f/e/01b67eec6b0226517cc0c871
5 -
 steve_shubin
Member Posts: 1,118 ✭✭✭✭
@tom_auger
steve_shubin
Member Posts: 1,118 ✭✭✭✭
@tom_augerIn the first GIF, notice the way YOU sketched the arc and circle. As I moved my finger DIAGONALLY, the two center points stayed aligned vertically. So even though I had suppressed inferencing, the two points still stayed aligned vertically
In the second GIF I did not bother to suppress inferencing.
The two points were aligned vertically, so all I had to do was punch in a vertical dimension — between the two points — of ZERO — in order to make the two points coincident.
Look at the latter part of the second GIF, where it shows the X, Y & Z coordinates for the centers of the arc and circle. Notice they are exactly the same

 5
5 -
 MBartlett21
Member, OS Professional, Developers Posts: 2,064 ✭✭✭✭✭
@tom_augertom_auger said:
Thanks for your suggestion!MBartlett21 said:If you delete one of the 1.5mm dimensions, it should work then.\
But those circles need to be that dimension as that measurement is derived from a real-world measurement. Does that make sense?
If you delete one of the controlling dimensions, then make the two 1.5mm circles equal, it should then work fine without being over-defined.
5
Answers
That indeed temporarily solves the issue, allowing the sketch to be solved but ultimately doesn't solve the problem for me which is that I NEED the center of the arc to be constrained to the center of the circle, as you can see in the following sketch which represents the final shape I'm trying to achieve:
In the spirit of teaching me to fish, is there a reliable process you use to "debug" these kinds of conflicts (other than just sequentially deleting constraints and UNDOing until you find the one that's causing the conflict)?
was getting at the external constraint (external constraints are blue) between the center of your arc (and the large construction circle) and the Origin of the Part Studio. It's likely the Blue Vertical constraint that's causing the trouble. You can see (when I hover over the blue vertical constraint) that it is in fact constrained to the origin:
For me, when I have these "unsolvable" sketches, I eliminate the external constraints first as I debug. Usually there aren't too many of them, so it's a quick way to get started.
Good luck!
IR for AS/NZS 1100
Thanks Romeo for your response! But I WANT the whole thing constrained to that origin point. It might not appear important in this example, but the rest of the part is constrained to this origin across a number of different sketches and parts. I almost always constrain something in every one of my sketches to the Origin - is this a bad practice?
But those circles need to be that dimension as that measurement is derived from a real-world measurement. Does that make sense?
The problem I'm having here is that I NEED that there to be a constraint - I want this arc to share a center point with the construction circle's center point, so it would need the constraint that seems to be causing all the trouble.
I guess I'm trying to understand what is making this sketch unsolvable and why a contraint on the centerpoint of that arc is causing the overdefined state. I'm not seeing it, maybe you are?
The sketch solver has to solve a system of equations. So for example, we have equations:
x+1=2
y+x=5
x+2=3
We can easily figure out that x=1 and y=4. The third equation isn't incorrect, its just not needed (and the system of equations is over-defined).
Similarly, in your sketch, you could look at the one of the vertical edges. It's position (1.75 inches from the center of the large circle) is defined by the size of your construction circles and the sketch is happy. However, when you add the last arc and constrain the center of the arc on the horizontal line and tangent to either of the vertical lines, it has to also be tangent to the other vertical line. Therefore they two vertical lines have to be symmetric and each 1.75 inches from the center of the large circle (creating a duplicate constraint that makes Onshape unhappy).
So, while all the dimensions currently add up, you're essentially providing too much information. There are probably many different constraints you could delete to solve the issue. But, I think what you're looking for is something that would also retain design intent (deleting one of the small circle tangent constraints would allow the sketch to solve, but that might not reflect design intent).
I deleted the large arc and re-drew it using the 3-point arc tool. When I re-drew it, I allowed it to auto-inference that I wanted the center of the arc at the center of the large construction circle. All seems to be happy with this method.
https://cad.onshape.com/documents/1036e67ad80fbb5bff9b7631/w/910b633452369b807538751f/e/01b67eec6b0226517cc0c871
In the first GIF, notice the way YOU sketched the arc and circle. As I moved my finger DIAGONALLY, the two center points stayed aligned vertically. So even though I had suppressed inferencing, the two points still stayed aligned vertically
In the second GIF I did not bother to suppress inferencing.
The two points were aligned vertically, so all I had to do was punch in a vertical dimension — between the two points — of ZERO — in order to make the two points coincident.
Look at the latter part of the second GIF, where it shows the X, Y & Z coordinates for the centers of the arc and circle. Notice they are exactly the same
Grateful to have such a helpful and active community!
If you delete one of the controlling dimensions, then make the two 1.5mm circles equal, it should then work fine without being over-defined.
IR for AS/NZS 1100