Welcome to the Onshape forum! Ask questions and join in the discussions about everything Onshape.

First time visiting? Here are some places to start:
  1. Looking for a certain topic? Check out the categories filter or use Search (upper right).
  2. Need support? Ask a question to our Community Support category.
  3. Please submit support tickets for bugs but you can request improvements in the Product Feedback category.
  4. Be respectful, on topic and if you see a problem, Flag it.

If you would like to contact our Community Manager personally, feel free to send a private message or an email.

Options

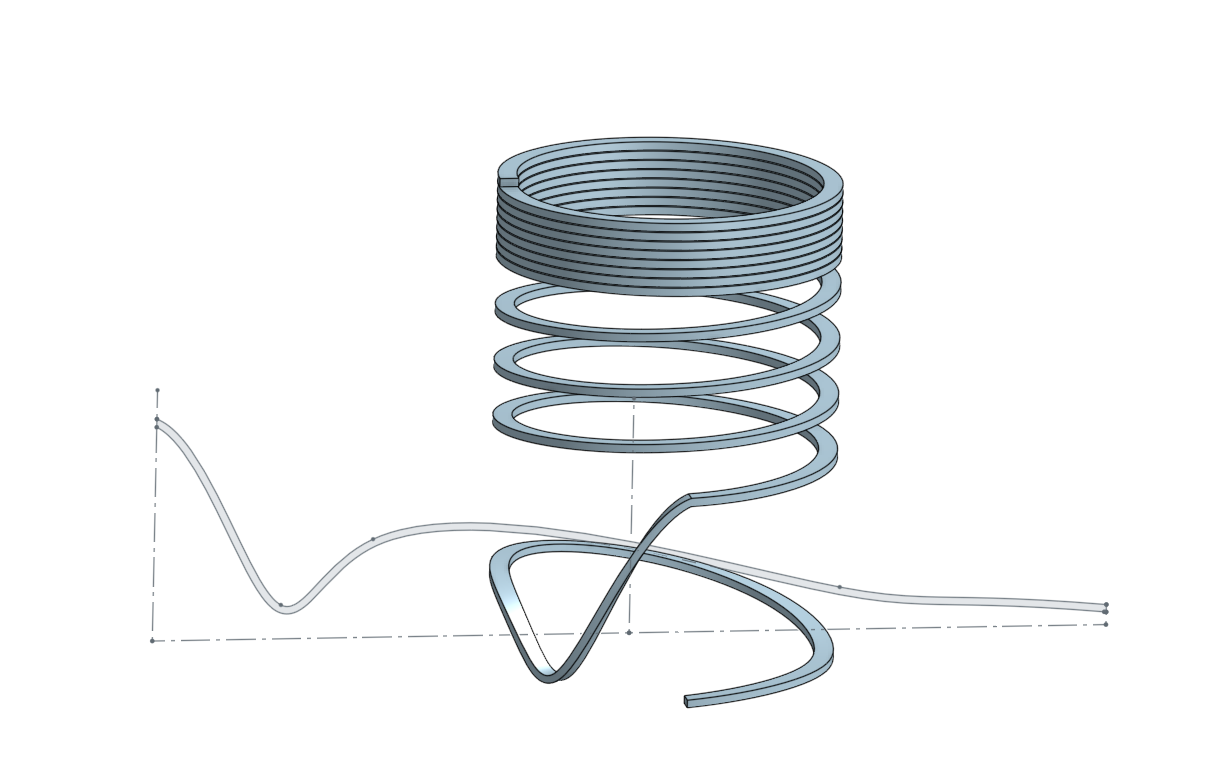
Spring with a very general pitch

ladislav_schejballadislav_schejbal Member Posts: 9
A spring with a completely general variable pitch.

Unfortunately, I couldn't make it out of round wire.
I wanted to use the Loft function, but it doesn't work with the Bézier curve.
I wanted to use the edge of a square profile as the leading curve.


Tagged:

Comments

  • Options
    NeilCookeNeilCooke Moderator, Onshape Employees Posts: 5,393
    Hi, not sure what question you are asking? Is this a custom feature? If so, take a look at the wave spring example. 
    Senior Director, Technical Services, EMEAI
  • Options
    ladislav_schejballadislav_schejbal Member Posts: 9
    No, it's not a function.
    I wanted a spring whose windings thicken at the beginning and end until the coils lie close together.
    I've got it in square wire, but I don't have round yet. 
    I tried to create a spring with a very general variable pitch defined on the auxiliary plane, using a Bézier curve. I used the Wrap function to project the curves onto the cylinder.
    So far, I have only managed a spring with a square cross section.
    I then wanted to use the Loft function. And use the edge of that cross-section as a guide curve. Anything less, in this case, you probably can't use a curve that doesn't lie in a plane.

    I guess this is it:

     I'm going to use a normal spiral composed of several parts with different gradients.

    Square section
    Spring | Part Studio 1 (onshape.com)


  • Options
    NeilCookeNeilCooke Moderator, Onshape Employees Posts: 5,393
    Have you tried using Sweep? Also, what is the end goal? Just a modelling exercise? In general, you wouldn’t bother modelling a standard purchased part to this level of detail since it doesn’t add any value. 
    Senior Director, Technical Services, EMEAI
  • Options
    ladislav_schejballadislav_schejbal Member Posts: 9
    Yes, that's what I came across when modelling.
    I do orienteering maps, yes, I'm very fond of the Bézier curve.

     The truth is: "generally you wouldn't bother modelling a standard purchased part to this level of detail as it adds no value". 
    I am a beginner in 3d modelling, I made do with 2d drawings before I fell into 3d printing.

    I've tried Sweep, but it's not quite the same. 

     Hi, Hi, I probably shouldn't, as a one year user, get into dealing with such details.
     I just wanted to discover a solution, but unfortunately I have very little experience here.

    The Onshape program has been very useful for me, although getting started in 3D was quite difficult.

    Just for info:

    Spring | Part Studio 1 (onshape.com)


  • Options
    NeilCookeNeilCooke Moderator, Onshape Employees Posts: 5,393
    If the sweep is not touching the path it can go wonky. But, since you are using Wrap, you could try just creating a surface and then use Thicken.

    Senior Director, Technical Services, EMEAI
  • Options
    mahirmahir Member, Developers Posts: 1,291 ✭✭✭✭✭
    edited July 2021
    Here's an example of a variable pitch spring using sweep and my Parametric Curve FS.

    https://cad.onshape.com/documents/57acdfaae4b005c413ed9b6f/w/3fd585a46d3af1b3ba413c53/e/9f334d884b522c64159c0322

  • Options
    Evan_ReeseEvan_Reese Member Posts: 2,066 PRO
    @mahir
    I'd love to see a video explaining your workflow or the equations you're using.
    Evan Reese / Principal and Industrial Designer with Ovyl
    Website: ovyl.io
  • Options
    Evan_ReeseEvan_Reese Member Posts: 2,066 PRO
    here's how I'd approach it since I'm not sure how to use Mahir's awesome feature.
    https://cad.onshape.com/documents/509fbb825e08a1856bbe5dde/w/8b721817ffbe23752bd59d97/e/fe41ec3c9dca768c5eb95bc9
    Evan Reese / Principal and Industrial Designer with Ovyl
    Website: ovyl.io
  • Options
    mahirmahir Member, Developers Posts: 1,291 ✭✭✭✭✭
    @mahir
    I'd love to see a video explaining your workflow or the equations you're using.
    Evan, the workflow is pretty straightforward. 

    1) Figure out how I want a curve to behave in 3 dimensions and which coordinate system would work best. In this case it’s cylindrical (R, theta, Z). 
    2) Craft the pieces of each function for the various behaviors. 
    3) Combine into 3 functions to make the final curve
    4) Sweep


    For this model:

    R = 20mm
    Constant

    Th = #t*10*360*degree
    10 circles one after the other corresponding to the number of coils

    Z = 1.19*50mm*(atan(8*(#t-.5)))/(180deg)
    Inverse tangent yields an S shaped curve with a slope/derivative that looks like a bell curve. So, Z ends up moving slowly, then fast, then slowly again. That’s how you get the bunching up at the beginning and end of the curve. 

  • Options
    ladislav_schejballadislav_schejbal Member Posts: 9
    Spring Bézier curve - Wrap -Thicken - Sweep

    So it was done, 
    thanks in no small part to your help. 
    Even though we are already in a rather not very practical area, there will probably be no use for it. I only solved this for the presentation of the jig, for cutting the thread with a tap on the lathe.

    Here's an example of a general use of a bezier curve that doesn't lie in one plane, but in a general area.

    SpringBézier curve - Wrap -Thicken - Sweep | Part Studio 1 (onshape.com)
  • Options
    BrettKuenkelBrettKuenkel Member Posts: 5 PRO
    Could you explain the Z function a little more in depth? (what each number in the equation means, or where did it come from)

    I want to use your feature script to make a bunch of closed and ground springs and I was able to play with the numbers to get the helix close to what it is supposed to be but it is not exact. I want to take the guesswork out of making these helices and understand the function to find out what numbers are correct.

    Design Engineer - NXTUL
    Innovative Woodworking Tools - www.nxtul.com

  • Options
    mahirmahir Member, Developers Posts: 1,291 ✭✭✭✭✭
    edited October 2021
    b_kuenkel said:
    Could you explain the Z function a little more in depth? (what each number in the equation means, or where did it come from)

    Sure, no problem. I hope this helps

    Here's the Z function in question:
    Z = 1.19*50mm*(atan(8*(#t-.5)))/(180deg)

    I agree. It's not very intuitive at first glance. It took me a second to remember why I used this particular form.

    Replacing the numbers with generic variables:
    Z = D*E*(atan(A*(#t-B)))/C + F

    A: This number is somewhat subjective. Multiplying the input to the Arctan function scales/stretches the shape and dictates what portion of the function you want to use, or in other words how much the curve/spring pitch is compressed at the beginning and end. It also dictates where this change in pitch occurs. Increasing this number stretches the spring. Decreasing it compresses it. 8 just seemed like a reasonable compromise


    B: Arctan(t) naturally starts negative and has an inflection point at t=0. I want this inflection point to correspond to the middle of the spring. Since #t goes from 0 to 1, the midway point corresponds to #t=.5. Replacing "t" with "#t-.5" shifts the inflection point so that it occurs at #t=.5. A similar effect can be obtained by instead changing #t to go from -.5 to .5, but then the other functions may need to be updated as well. You also may

    C: This is a normalization factor. Since Arctan has natural asymptotic limits of +/- 180deg, dividing by 180deg makes those limits +/- 1 instead.

    D: This is also a normalization factor, but it's dependant on C. In this case, setting C=8 yields a maximum value of approximately .42 (after normalization) instead of .5. And .5/.42=1.19. C and D could be combined, but it seems easier to separate them out so the overall length (E) can be changed independently. D changes inversely with C.


    E: This is how long you want the spring to be end to end. In this case it was 50mm.


    F: This parameter is optional and was not used in the original Z function. But if you would like Z=0 to correspond to the start or stop of the spring instead of its center, set F=+/- E/2.
Sign In or Register to comment.