Welcome to the Onshape forum! Ask questions and join in the discussions about everything Onshape.
First time visiting? Here are some places to start:- Looking for a certain topic? Check out the categories filter or use Search (upper right).
- Need support? Ask a question to our Community Support category.
- Please submit support tickets for bugs but you can request improvements in the Product Feedback category.
- Be respectful, on topic and if you see a problem, Flag it.
If you would like to contact our Community Manager personally, feel free to send a private message or an email.
Frame trim four pipes together
 kevin_mason558
Member Posts: 70 PRO
kevin_mason558
Member Posts: 70 PRO
I have a job to draw up soon and there are four tubes coming up from four corners meeting in the centre
I've managed to make a frame by doing it as a "v" then making a second one 90° to the first.
I've managed to make a frame by doing it as a "v" then making a second one 90° to the first.
Sketching and extrude/removing corners.
Can I just select the four as a frame and have them trimmed to each other
they are rising up at an angle and then 45° to each other towards the corner of another frame
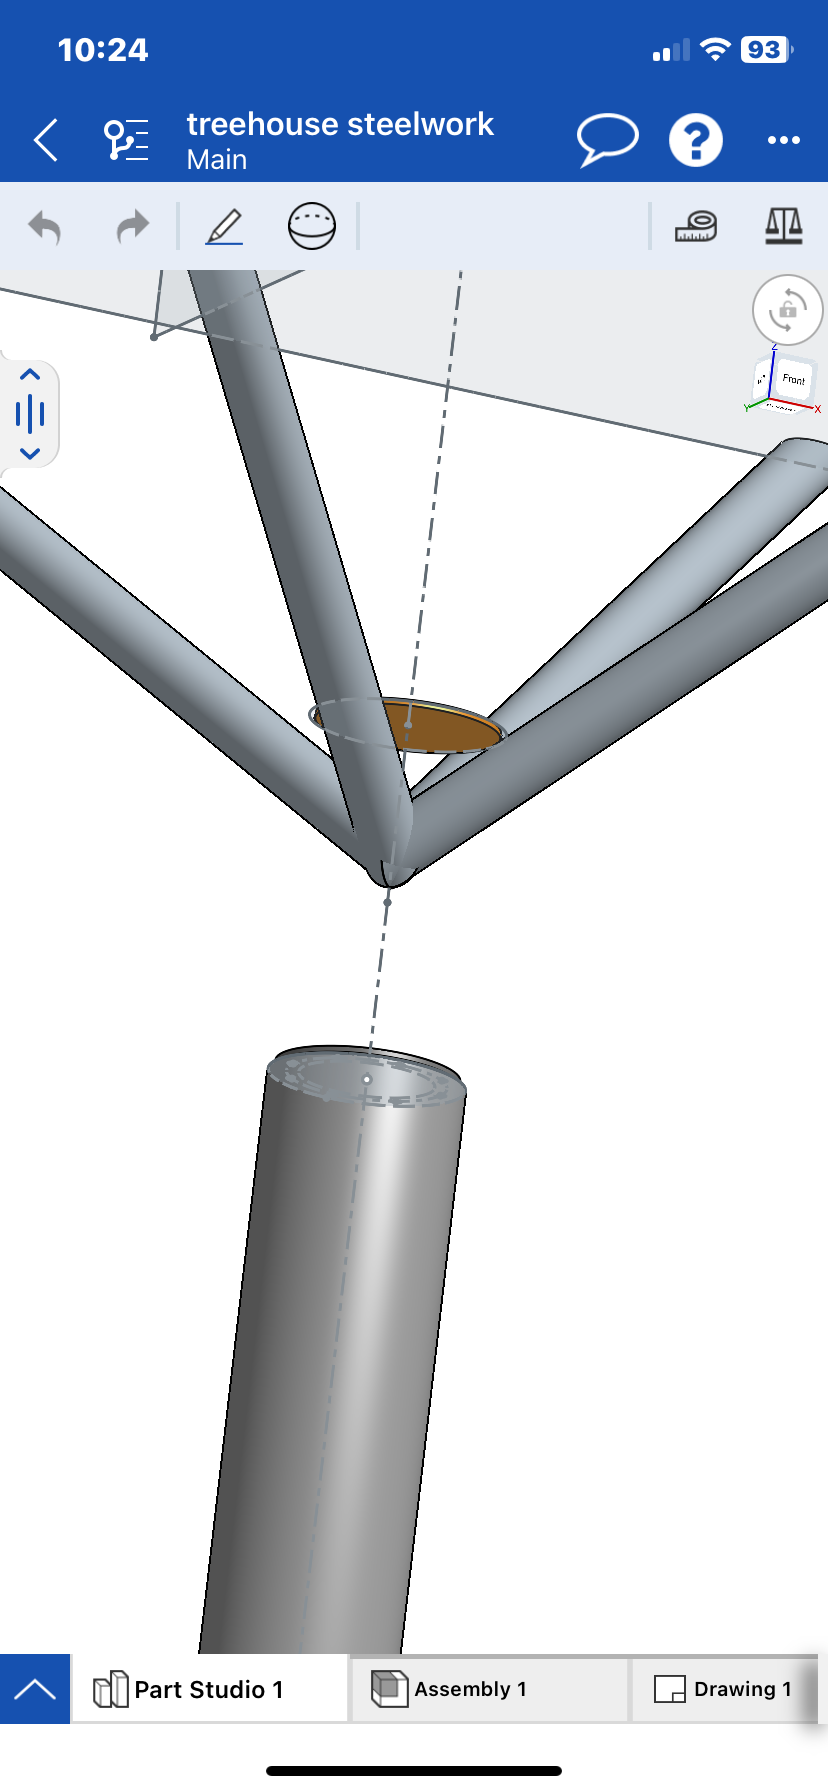
they are rising up at an angle and then 45° to each other towards the corner of another frame
0
Best Answer
-
 jnewth_onshape
Member, Onshape Employees Posts: 89
jnewth_onshape
Member, Onshape Employees Posts: 89  I made a copy and did what I think you wanted. Take a look:
You can find it here: https://cad.onshape.com/documents/06e5185dc579efff7e6f074e/w/c41d775d5733500a7eca7453/e/bc3bcc15272daa4376502857
The primary mistake you were making was making it impossible to use the frame trim tools properly. It is very important to remember: When working with frames, only use the frame, frametrim, and move face tools to modify the "ends" of the frame segments.
Your "Extrude 2" operation was removing some attribution from the tip of the branch which made it so any trims on the base of the branches would fail.
Even though it's nowhere near the end of the segment you care about, it removes attributes from the frame segment that lets the frame tools do clever things. So your original frameTrim operations were reporting:
That "Failed to find frame start and end faces." message is your clue that some operation has cut away some part of the segment, so watch for it.
If you want, you can use the custom "Frame Attribute Visualizer" in the part studio to examine segments. After your extrude 2 operation, there is no attribute on the segment:
But if you suppress that extrude operation, you can see the segment end is "painted" with attributes:
(See how the end is "painted" a different color? This means the frame segment is still recognizable to downstream trim operations as a frame segment).
After I suppressed that operation, I was able to perform two face trims to a segment, then a group trim, then another two face trims, then a final group trim. Please take a look at the sequence of trims at the end of this part studio to see how it works. I had to flip the orientation of the trim to point towards the segment I wanted to keep.
For that Extrude 2 - Just replace it with a frameTrim.1
Answers
https://cad.onshape.com/documents/49ef4817a2e3fe8aeb5a00bd/w/0502d47d9cd0706b6e8f1326/e/e19bf99c541e0f4214f52d37
https://cad.onshape.com/documents/174eb7988c8cf61d5d226c4e/w/fd539f6558863d1fdb96a671/e/6fe24f6ebf90e5207f18ca6b
2. Are these parts extrudes that you want to "treat as a frame"? That wont work: Frame parts start life as frames coming out of the frame tool. Under the hood, there's stuff happening that makes it work slightly differently than just a regular extruded tube.
3. If they are just regular extrudes, you'll need to do regular split/boolean type operations to get the tube ends to be what you want. If they are frames, then you can use frameTrim which comes in two flavors: "ordered groups" and "trim to face". Briefly: ordered groups says "cut group 2 against group 1", "cut group 3 against group 2 and against group 1" -- see the pattern? It works when there are "primary" beams that shouldnt be cut, and then other beams that can be trimmed to fit. Trim to face is more like what youd expect: Pick the segments you want to trim, then the tools you want to trim them against.
Judging from the screenshot, I myself would define split planes (using the plane tool) that are the bisection of the angle between any two adjacent segments. I'd split both segments along each face and repeat for all adjacent pairs. This should give you the adjoining face geometry that would need to be cut in order to make for flush welding surfaces.
From a mechanical design for assembly perspective: Are you planning on welding this like that? Thats a lot of tricky trimming and welding. If I was assembling this, I would:
trim all segments against a flat disk. Each segment is adjacent to but not intersecting other segments. Each segment has only one mechanical interface and split: Against the flat disk.
Weld the 4 segments to the flat disk.
Weld (or attach with fasteners) the disk to the vertical "trunk".
Depending on the loads applied to each segment I may include gussets between adjacent segments.
here is the document
we have recieved this design from a customer and the engineer they are working with
Theyre drawings are no good for manufacturing from so I am drawing them out again for us to use in the workshop they want the four pipes to pass through a "leg"
Joined together and then welded to the leg
the profile when I have drawn it will be sent to a company who can CNC cut the pipe to save us notching them all.
but still can't get my head around the ordered groups
whatever I do it doesn't seem to work
trimming frames together works some times but I usually use the face trim tool.
You can find it here: https://cad.onshape.com/documents/06e5185dc579efff7e6f074e/w/c41d775d5733500a7eca7453/e/bc3bcc15272daa4376502857
The primary mistake you were making was making it impossible to use the frame trim tools properly. It is very important to remember: When working with frames, only use the frame, frametrim, and move face tools to modify the "ends" of the frame segments.
Your "Extrude 2" operation was removing some attribution from the tip of the branch which made it so any trims on the base of the branches would fail.
Even though it's nowhere near the end of the segment you care about, it removes attributes from the frame segment that lets the frame tools do clever things. So your original frameTrim operations were reporting:
That "Failed to find frame start and end faces." message is your clue that some operation has cut away some part of the segment, so watch for it.
If you want, you can use the custom "Frame Attribute Visualizer" in the part studio to examine segments. After your extrude 2 operation, there is no attribute on the segment:
But if you suppress that extrude operation, you can see the segment end is "painted" with attributes:
(See how the end is "painted" a different color? This means the frame segment is still recognizable to downstream trim operations as a frame segment).
After I suppressed that operation, I was able to perform two face trims to a segment, then a group trim, then another two face trims, then a final group trim. Please take a look at the sequence of trims at the end of this part studio to see how it works. I had to flip the orientation of the trim to point towards the segment I wanted to keep.
For that Extrude 2 - Just replace it with a frameTrim.