Welcome to the Onshape forum! Ask questions and join in the discussions about everything Onshape.
First time visiting? Here are some places to start:- Looking for a certain topic? Check out the categories filter or use Search (upper right).
- Need support? Ask a question to our Community Support category.
- Please submit support tickets for bugs but you can request improvements in the Product Feedback category.
- Be respectful, on topic and if you see a problem, Flag it.
If you would like to contact our Community Manager personally, feel free to send a private message or an email.
Trouble Creating an Angled Face
 pho_sho
Member Posts: 5 ✭
pho_sho
Member Posts: 5 ✭
Howdy All,
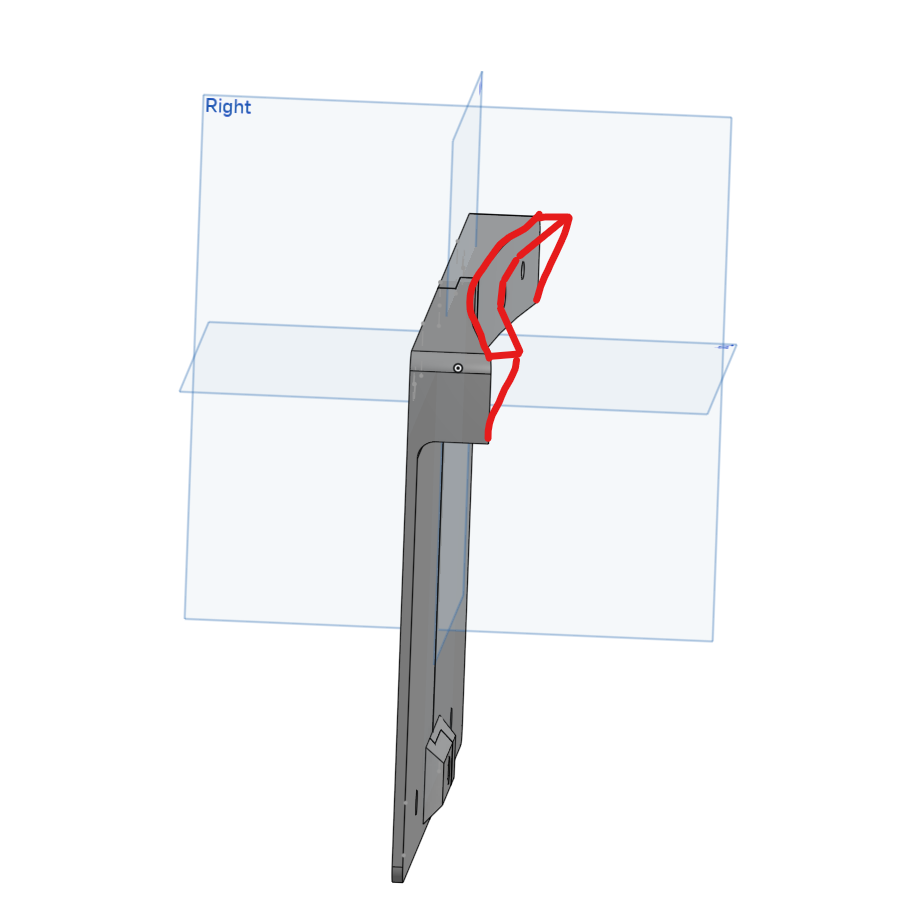
I am having difficulty creating an angled face along a curved body. The part is a license plate mount. I have the horizontal curvature pretty well set, but I need to have the mounting face taper down from about 3mm out at the top to the existing edge at the bottom, along the curve. Its following the curve that is giving me trouble (I think). Marked-up photo below should provide a crude visual of what I talking about. I am a total novice at this and have only made very simple parts so far and so any help would be greatly appreciated. Thanks
https://cad.onshape.com/documents/3a7e52a0e44a119b394fd277/w/f4a9d744ae81414d4380b776/e/9f8638d5b12f7696cc5b00a4
Best Answers
-
robert_scott_jr_
Member Posts: 859 ✭✭✭
Hello. Since the Revolve won't work, Sweep would be the tool to use. In this document, I first tried the sweep using the right plane for the sweep profile but ran into some problems. Using the face of part 2 for the sketch plane, things worked out except for the far end of the sweep. That was fixed in the part studio copy. - Scotty
1 -
 David_YL_Nguyen
Member, Onshape Employees Posts: 183
David_YL_Nguyen
Member, Onshape Employees Posts: 183 
Hey @pho_sho,
As Scotty said, the "Sweep" Tool would be a fit for this situation. Check out the documentation to learn more about how it works or also in this video.
Probably best to do the sweep first to add material to your part and then split it into two halves. If possible it would also be good to have your part symmetric from the mid plane if that is intended though.1 -
 MDesign
Member Posts: 1,451 PRO
MDesign
Member Posts: 1,451 PRO
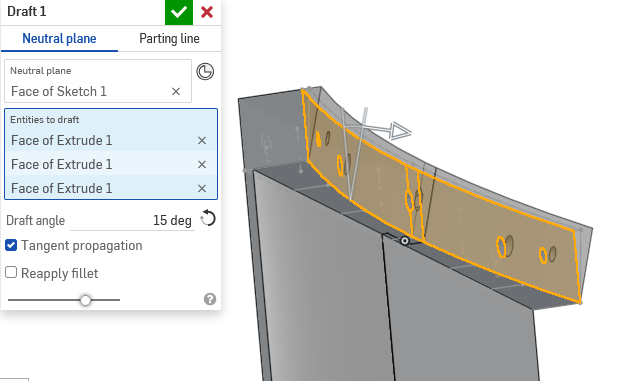
Pretty sure a simple draft will get you what you need in this situation.
 2
2
Answers
Hey @pho_sho,
Create a sketch of the tapered profile on the "Right" plane and the use the sweep feature or even revolve (seems like your curve is circular).
Let me know if it works for you. Cheers
Hi David! Thank you for the advice. I tried your suggestion and I unfortunately cannot seem to make it work. I think the issue is that the mounting face is not quite circular. The shape of the mounting surface requires two different radius values (one on each half of the face). I also tried creating an offset surface (at half the max distance) with the intent of rotating it about its central axis a few degrees so I could possibly attempt to extrude the existing face to it, but I am cannot seem to get that to rotate correctly either. I am probably still just doing something wrong here, but I am stuck none the less.
Hello. Since the Revolve won't work, Sweep would be the tool to use. In this document, I first tried the sweep using the right plane for the sweep profile but ran into some problems. Using the face of part 2 for the sketch plane, things worked out except for the far end of the sweep. That was fixed in the part studio copy. - Scotty
Hey @pho_sho,
As Scotty said, the "Sweep" Tool would be a fit for this situation. Check out the documentation to learn more about how it works or also in this video.
Probably best to do the sweep first to add material to your part and then split it into two halves. If possible it would also be good to have your part symmetric from the mid plane if that is intended though.
Pretty sure a simple draft will get you what you need in this situation.
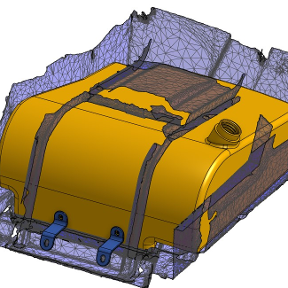
If this is really important to get a close fit to the bumper, then you could scan the bumper (if you have an iphone and the Onshape app you have all you need). Then create a Constrained surface for the area of interest. Carefully align this newly created surface (i.e. Derive it into the Part studio of the mount bracket) then use Replace face to get things perfect. Hint: aligning it will be the biggest challenge, but is doable.
Note: This may sound like a contrived/extravagant answer to your problem, but…. i was just visiting a customer last week where this is one of many such fancy things they are doing extremely successfully in Onshape.
Thank you all for the help!
Scotty - You went the extra mile and I really appreciate it.
David - Thank you for your continued support. My process was inherently flawed. You comments helped me learn why.
MDesign - I had not used Draft until I came across your post. Thanks for the intro - it seems pretty powerful and I will definitely be making use of it.