Welcome to the Onshape forum! Ask questions and join in the discussions about everything Onshape.
First time visiting? Here are some places to start:- Looking for a certain topic? Check out the categories filter or use Search (upper right).
- Need support? Ask a question to our Community Support category.
- Please submit support tickets for bugs but you can request improvements in the Product Feedback category.
- Be respectful, on topic and if you see a problem, Flag it.
If you would like to contact our Community Manager personally, feel free to send a private message or an email.
How can I measure distances between different parts ?
 shaddy_eldesouky
Member Posts: 6 ✭
 I'm frustrated because I need to check up the distances between parts using the dimension tool, or even between different entities on the same part ( that I solved badly by creating a drawing and inserting a part and used the different dimension tools, but I had to go back and forth between part studio tab[to change] and drawing tab[to check], but then I realised that the drawing didn't change and I had to create a new drawing and insert the same part I wanted to check after the changes....), I found another way to make distance relations between different parts but only while sketching and only on the same plane, and the extruded parts doesn't have sketches in the plane I want to do my check on. I think I will have the same problem in the assembly tab.
 Best Answers
-
 bradley_sauln
Moderator, Onshape Employees, Developers Posts: 373
  We have a measure tool available in both part studios and assemblies. You simply click on the entities that you want to measure and take a look at the bottom right of your window. Here are the help links:
https://cad.onshape.com/help/index.htm#measure-ps.htm?Highlight=measure
https://cad.onshape.com/help/index.htm#measurement-assembly.htm?Highlight=measure
5 -
 NeilCooke
Moderator, Onshape Employees Posts: 6,035
  If you hover your mouse over the XYZ results, dotted lines appear in the graphics area red=X green=y blue=zSenior Director, Technical Services, EMEA5
 -
 viru
Member, Developers Posts: 619 ✭✭✭✭
@shaddy_eldesouky, The Onshape measure tool is available in Part Studio, for sketches and parts, and in Assemblies for parts and assemblies; it appears in the bottom right corner of the interface when a selection is made:
Select the part edges, faces, or mate connectors to obtain measure information about, then click the up triangle in the bottom right corner of the window to expand the measurement information (as shown above).
You can use the information displayed to enter values elsewhere in the system, for example, as a dimension.
With the Measurement dialog expanded, click and drag to highlight the value you want to copy:
- Before releasing the mouse button when highlighting, use keyboard shortcuts to copy the value
- OR after releasing the mouse button when highlighting, open the Measurement dialog again (the value will still be highlighted) and use keyboard shortcuts to copy the value.
Interpreting the measure information
When you hover over measurement information in the flyout, the measurement is visualized in the graphics area, depicting the exact measurement referred to. For example:
Minimum distances between entities are shown as bold dotted lines:
- Changes in X are shown in red
- Changes in Y are shown in green
- Changes in Z are shown in blue
-
Center distances are shown in black
Note that when measuring to the center of a circle, you can select a planar face, edge, and edge of a cylinder

Minimum distance can be shown in two ways, such as:

and

Angles are shown as thin lines:

Measure Tool in 3d part studio:
The Onshape measure tool is available in Part Studios, for sketches and parts, and in Assemblies for parts and assemblies; it appears in the bottom right corner of the interface when a selection is made:

The measure tool displays measurements dynamically whenever you select entities.
- Select any entity. The measure tool show measurements for that entity.
- Select another entity. The measure tool shows measurements between the entities, as shown above.
Note the triangle on the measure tool. Clicking it shows more measurements.
You can use the information displayed to enter values elsewhere in the system, for example, as a dimension.
With the Measurement dialog expanded, highlight the value you want to copy and use hot keys or context menu to copy.
Interpreting the measure information
When you hover over measurement information in the flyout, the measurement is visualized in the graphics area, depicting the exact measurement referred to. For example:
Minimum distances between entities are shown as bold dotted lines:
- Changes in X are shown in red
- Changes in Y are shown in green
- Changes in Z are shown in blue
- Center distances are shown in black
Note that when measuring to the center of a circle, you can select a planar face, edge, and edge of a cylinder


Angles appear as thin dotted lines:

5
Answers
https://cad.onshape.com/help/index.htm#measure-ps.htm?Highlight=measure
https://cad.onshape.com/help/index.htm#measurement-assembly.htm?Highlight=measure
Twitter: @bradleysauln
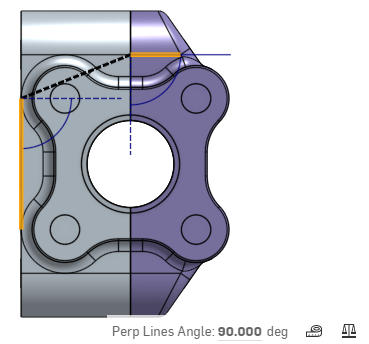
this is a case that I need to check the distance between the highlighted edge (or the centre) of the circle and the straight line from other part on this 2d plane and the Min dist: 3.955cm is probably in 3d because it should be around 1cm
so I went 3d and tried to choose the edge of the cylinder which is on the same plane I want so I can get the Min Dist I want but I couldn't and the whole cylinder was selected, I guess the result now is what I want but I'm not certain, and I need information that I can rely on.
I recommend: 1- colouring the measures with the same colour of the part( instead of typing length or area of name of part and instead of leaving length or area undefined) 2- clarifying in the help page https://cad.onshape.com/help/index.htm#measure-ps.htm?Highlight=measure that the measuring of parts is in 3d so you should make your selections in 3d and not in 2d plane to avoid misleading info.
Select the part edges, faces, or mate connectors to obtain measure information about, then click the up triangle in the bottom right corner of the window to expand the measurement information (as shown above).
You can use the information displayed to enter values elsewhere in the system, for example, as a dimension.
With the Measurement dialog expanded, click and drag to highlight the value you want to copy:
Interpreting the measure information
When you hover over measurement information in the flyout, the measurement is visualized in the graphics area, depicting the exact measurement referred to. For example:
Minimum distances between entities are shown as bold dotted lines:
Center distances are shown in black
Note that when measuring to the center of a circle, you can select a planar face, edge, and edge of a cylinder
Minimum distance can be shown in two ways, such as:
and
Angles are shown as thin lines:
Measure Tool in 3d part studio:
The Onshape measure tool is available in Part Studios, for sketches and parts, and in Assemblies for parts and assemblies; it appears in the bottom right corner of the interface when a selection is made:
The measure tool displays measurements dynamically whenever you select entities.
Note the triangle on the measure tool. Clicking it shows more measurements.
You can use the information displayed to enter values elsewhere in the system, for example, as a dimension.
With the Measurement dialog expanded, highlight the value you want to copy and use hot keys or context menu to copy.
Interpreting the measure information
When you hover over measurement information in the flyout, the measurement is visualized in the graphics area, depicting the exact measurement referred to. For example:
Minimum distances between entities are shown as bold dotted lines:
Note that when measuring to the center of a circle, you can select a planar face, edge, and edge of a cylinder
Angles appear as thin dotted lines: