Welcome to the Onshape forum! Ask questions and join in the discussions about everything Onshape.

First time visiting? Here are some places to start:
  1. Looking for a certain topic? Check out the categories filter or use Search (upper right).
  2. Need support? Ask a question to our Community Support category.
  3. Please submit support tickets for bugs but you can request improvements in the Product Feedback category.
  4. Be respectful, on topic and if you see a problem, Flag it.

If you would like to contact our Community Manager personally, feel free to send a private message or an email.

Beams not quite as it should be?
bigrogfbigrogf Member Posts: 10 ✭✭
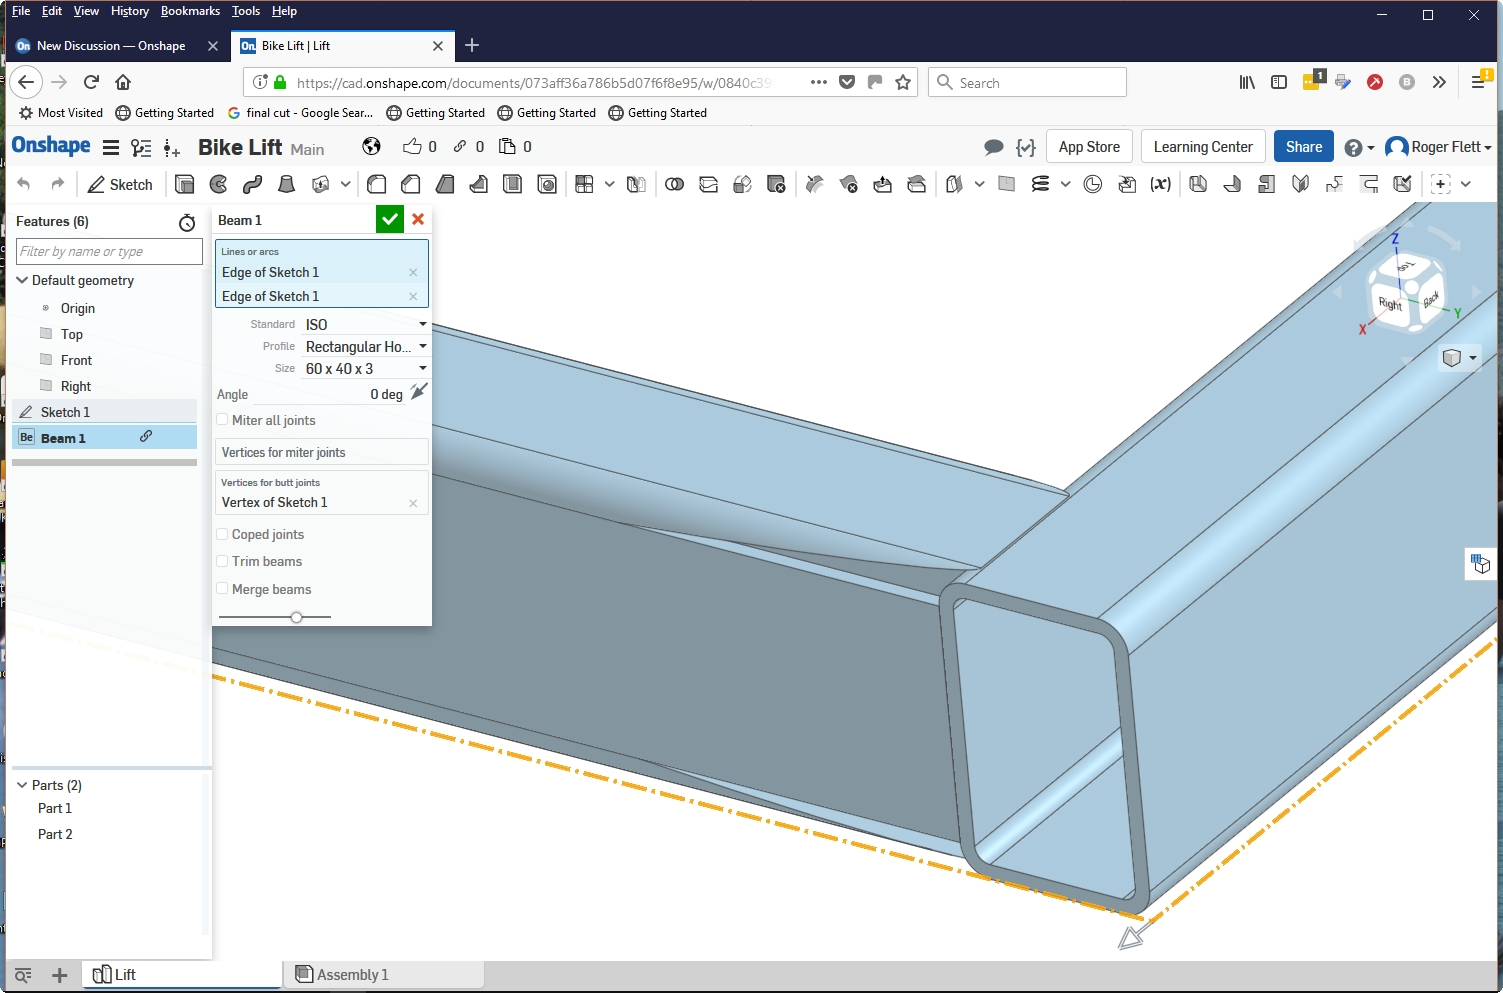
Earlier this year I tried out the beams feature and it worked fine, tonight I tried it again on a real project but the "butt joints" feature does not seem to be working. I reduced the complexity to just two beams and nothing I did would make it work correctly. It seems to do a wierd coped joint, and it is not just a rendering problem because it carries through to the drawing of the  cropped beam part. I have included a screen grab so maybe someone else has an idea of what is happening. BTW I am using Firefox, but it does the same in Chrome


Comments

  • NeilCookeNeilCooke Moderator, Onshape Employees Posts: 5,721
    Not seen that before so it must be a regression - it seems to only do it on certain profiles (of course the one you want to use). I will have to take a look at it.

    In the meantime you can either a) use the "coped joint" option and manually do a "replace face" to remove the coping afterwards (which is what the beams feature is doing internally anyway, or at least trying to) or b) create the beams in two separate beam features then use the "trim beams" option and "planar faces to trim to"

    Sorry for the inconvenience.
    Senior Director, Technical Services, EMEAI
  • bigrogfbigrogf Member Posts: 10 ✭✭
    NeilCooke said:
    Not seen that before so it must be a regression - it seems to only do it on certain profiles (of course the one you want to use). I will have to take a look at it.

    In the meantime you can either a) use the "coped joint" option and manually do a "replace face" to remove the coping afterwards (which is what the beams feature is doing internally anyway, or at least trying to) or b) create the beams in two separate beam features then use the "trim beams" option and "planar faces to trim to"

    Sorry for the inconvenience.
    Thank you for responding, I thought it might just be something that I was doing wrong

  • bigrogfbigrogf Member Posts: 10 ✭✭
    edited August 2018
    I think that this has been updated recently and now the joints work as expected, thank you. However I have been tearing my hair out for the last few days trying to animate a lift with a hydraulic ram, and I have tracked my problem down to the way that the beams trim to each other. For each butt/coped joint, the trimmed beam seems to be .02mm too short. However the internal dimensions of the frame do not reflect this error, since they remain as expected. To illustrate this I made a simple square frame from the same 40x60x3mm section with coped joints (butt joints give the same result), and produced the attached drawing which clearly shows the problem on each trimmed beam.

    Because of the way that I referenced mates for mounting brackets from the ends of trimmed beams, I kept getting over constrained or inconsistent mate errors thrown up.

    (Edited the offset to be .02mm not .002)
  • bigrogfbigrogf Member Posts: 10 ✭✭


    bigrogf said:
    I think that this has been updated recently and now the joints work as expected, thank you. However I have been tearing my hair out for the last few days trying to animate a lift with a hydraulic ram, and I have tracked my problem down to the way that the beams trim to each other. For each butt/coped joint, the trimmed beam seems to be .002mm too short. However the internal dimensions of the frame do not reflect this error, since they remain as expected. To illustrate this I made a simple square frame from the same 40x60x3mm section with coped joints (butt joints give the same result), and produced the attached drawing which clearly shows the problem on each trimmed beam.

    Because of the way that I referenced mates for mounting brackets from the ends of trimmed beams, I kept getting over constrained or inconsistent mate errors thrown up.
    Sorry error should read .02mm too short
  • kevin_o_toole_1kevin_o_toole_1 Onshape Employees, Developers, HDM Posts: 565
    edited August 2018
    Generally the beams feature is meant for statically joined parts, so a group mate of the Part Studio is usually more appropriate than using individual mates.

    I believe the 0.02mm offset is done to ensure the trimming works without geometric issues from trimming one beam with the other in complex cases. If you want a beam whose butt joints trim flat, rather than trimming flush to the contour, you can use a custom profile with "Enable coping" unchecked. This will skip the offset and perform a simpler trimming operation.
  • bigrogfbigrogf Member Posts: 10 ✭✭
    edited August 2018
    Generally the beams feature is meant for statically joined parts, so a group mate of the Part Studio is usually more appropriate than using individual mates.

    I believe the 0.02mm offset is done to ensure the trimming works without geometric issues from trimming one beam with the other in complex cases. If you want a beam whose butt joints trim flat, rather than trimming flush to the contour, you can use a custom profile with "Enable coping" unchecked. This will skip the offset and perform a simpler trimming operation.
    This actually was a group mate, also as I pointed out, the straight butt joint does the same (see this attached pdf first page). If the individual beams are mated individually then they do mate flush, but the structure does not have the dimensions of the designed intent, also individual beam cutting lengths are not correct (see the second page in the attachment).

    This discrepancy of .02mm may seem insignificant, but when mating brackets with or without offsets that are referenced to the end of the beams, the brackets end up in the wrong positions. This breaks the spacial relationship between mated parts and requires extra plus or minus offsets at each of these joints to make the mates work. It took me a long time to figure out what was happening in my fairly simple structure, it would be a nightmare in a more complex structure where some beams are grouped, some individually mated, some trimmed, some not trimmed, etc, etc.

    If the .02mm is required to solve the trims then it needs to be added back in some way to end up with the correct dimensions. To my mind it is not acceptable to arbitrarily digress from the designed intent, whatever the reason for doing so.

    (Edited to correct the attachment)
  • kevin_o_toole_1kevin_o_toole_1 Onshape Employees, Developers, HDM Posts: 565
    Yeah. I can definitely see the need for not having the offset. To more clearly describe the workaround above: You can make a custom profile sketch of the desired profile (using the beams feature itself if necessary), then use a custom profile with "Enable coping" unchecked.

    I will defer to Neil to say if there is a better solution for coped or non-custom profiles.

  • NeilCookeNeilCooke Moderator, Onshape Employees Posts: 5,721
    @bigrogf - the offset was added because some profiles failed when trimmed due to a Parasolid requirement - I did not add the offset back on because of the same failure (I also assumed, rightly or wrongly, that you can't cut steel to that accuracy anyway). Without thorough QA testing I could unintentionally break thousands of user's docs by making this change, so in the short term there are two solutions: 1) use custom profiles as per @kevin_o_toole_1 or 2) make a copy of the beams feature document for your own use and change the constant at the top of the script to zero:
    const offsetTolerance = 0.0 * millimeter;
    
    Senior Director, Technical Services, EMEAI
  • bigrogfbigrogf Member Posts: 10 ✭✭
    edited August 2018
    NeilCooke said:
    @bigrogf - the offset was added because some profiles failed when trimmed due to a Parasolid requirement - I did not add the offset back on because of the same failure (I also assumed, rightly or wrongly, that you can't cut steel to that accuracy anyway). Without thorough QA testing I could unintentionally break thousands of user's docs by making this change, so in the short term there are two solutions: 1) use custom profiles as per @kevin_o_toole_1 or 2) make a copy of the beams feature document for your own use and change the constant at the top of the script to zero:
    const offsetTolerance = 0.0 * millimeter;
    
    Thank you again for your reply, at the moment I have worked around it using offsets, so no need to change anything at the moment. However I will try your second suggestion out of interest, because I found myself in a myriad of information while looking into Feature Script, which has certainly tickled my interest.

    As you say, the small offset in the real world will not matter too much, other than cutting lists having strange dimensions. The real problem is with mates and assembly animation, since there is no tolerance here for misalignment of mates. So on another tack, is there any way that your beams script could move the standard mates to compensate for the offsets on the trimmed end of beams?
Sign In or Register to comment.