Welcome to the Onshape forum! Ask questions and join in the discussions about everything Onshape.
First time visiting? Here are some places to start:- Looking for a certain topic? Check out the categories filter or use Search (upper right).
- Need support? Ask a question to our Community Support category.
- Please submit support tickets for bugs but you can request improvements in the Product Feedback category.
- Be respectful, on topic and if you see a problem, Flag it.
If you would like to contact our Community Manager personally, feel free to send a private message or an email.
Thatched roof effect for 3d printing
 kees_bijker
Member Posts: 171 ✭✭
kees_bijker
Member Posts: 171 ✭✭
in General
Hello all,
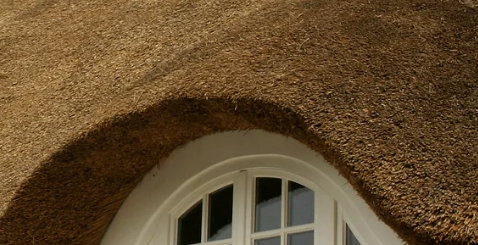
I looked in the previous threads on surfacing and surface effects but could not really find something that is random enough. What I want to achieve is for a flat panel which gets printed flat on the bed to have a thatched roof effect on the top with some similarity at its ends that show the reeds it was made from.
What I am after may not be achievable but I thought it needs to be asked just in case there is something I do not know of that may help.
0
Comments
That sounds more like something you would do in the slicer, maybe some "fuzzy skin" although I'm not sure if you can get that effect on the top faces.
Using "attractor pattern" FS or "texture FS" would likely be extremely slow but might be an option?
I tried both your suggestions and thank you very much for them.
Texture is not resulting in something that is doing what I want so I tried Evan Rees' attractor pattern.
I started by creating one reed, a simple cylinder of certain length.
I made the pattern and chose random with orientation of the reed in the direction I wanted. Then up the count number, in my case 2000 for the large surface up the top and 1000 for the small surface below. I then split with the sides of the real part to get rid of the overhanging edges.
In the part studio it works really well, visually it is totally what I was after. We will see how it prints.
https://cad.onshape.com/documents/a324a3665cd6fddc61f7aa9d/w/9258b3167b71c11b746e2369/e/27b7d4c5e72bcdba993fee75
Stunning effect
Many thanks to @eric_pesty and a special thanks to @EvanReese for making this thing work easy enough that even I can do it. 😁
That looks pretty cool!
Almost surprised it doesn't completely grind to a halt!
it is slow in regeneration and movement on screen. I will not put this part into my assembly where there are eight of them, I think it will melt my laptop.
so this is one version seperate from the real build only to try on the printer.
um wow! didn't picture this use-case when I wrote it, but it works.
Have you seen this tool for texturing prints from Formlabs? https://formlabs.com/meshy/?srsltid=AfmBOopJCVhaQgV9RuTrvSZMIidhw5JI__mc_hD4Ym0Q7GbBS37AhihK
The Onsherpa | Reach peak Onshape productivity
www.theonsherpa.com
@EvanReese that tool from Formlabs is so useful, except that it requires owning a Formlabs printer to actually use the full resolution and capabilities of their software because it's proprietary and there's no way to export it to your own print slicer afterwards. It would be a dream to have a Print Studio tab in Onshape that can take part studio data, do some voxelling or some meshing with displacement mapping in Onshape one day and allow you to do these kinds of surface texturing things without blowing up build times in your main studio or relying on featurescript's constraints.
Derek Van Allen | Engineering Consultant | Meddler@Derek_Van_Allen_BD I'm able to get it into Bambu Studio, but you're right the quality seems kind of disappointing for fine textures. I'd only played with it a bit, but never really needed to use it
The Onsherpa | Reach peak Onshape productivity
www.theonsherpa.com
TBH, the correct approach is probably to post-process in Blender or ZBrush or similar. It won't be parametric, but triangle meshes are way better for this kind of thing.
That's what I'm talking about though is that there's more opportunity being based in the Onshape ecosystem to be able to push and pull metadata about surfaces and IDs to be able to do some parametric stuff and pipe it one way into a mesh post processor for export. Going straight to those other softwares you'll lose the ability to select face groups as easily or precisely as you can in a parametric context.
Derek Van Allen | Engineering Consultant | MeddlerPreform has a much more advanced version of this tool that unlocks all of the surface detail you see on their website in the sample prints and lets you control more parameters about where and how texture is applied. Can't be exported though after you're done.
Derek Van Allen | Engineering Consultant | MeddlerYeah my workflow for this kind of texture involves UV unwrapping and displacement maps in Rhino. Would love to see something native to Onshape though.
The Onsherpa | Reach peak Onshape productivity
www.theonsherpa.com
I was aware that this is an ideal example of doing post processing in blender, but I have never worked in blender and it is quite some involved software so I did not consider it for this case simply based on my frustrating first experience some years ago.
And even if it could be much better if onshape had some native feature, I am still happy with how this looks tbh. I think if the printer will print this somewhere close I will be wringing my hands and grinning. If the texture is more detailed you would loose most of it unless you start printing with a 0.25 nozzle, I avoid this for large models.
So thanks again to all and @EvanReese , something native would be nice, please? 🤣
@kees_bijker I had a similar Blender experience many years ago, but from what I've been seeing it has come a long way and there is a lot more of a community out there too. If It had more time, I'd enjoy taking the plunge. Doing something natively isn't really possible as doing this with a mesh displacement approach is beyond the ability of current FeatureScript functions. I'd love to see a photo of the finished print!
The Onsherpa | Reach peak Onshape productivity
www.theonsherpa.com
@EvanReese I am talking to a blender artist on discord who claims that it will look very much better but hasn't yet sent me any samples that shows this and has not yet commented on how well it would print. I will see what he comes back with and then decide. Also he says he will only be able to export STL or OBJ and that if I want to change something later I will need to convert to step myself with another tool. This in my experience can be a hit n miss adventure as not all STL's convert so well.
As for the print I will need to get some more colours first, in all the exitement of patterning with your FS I forgot about that part. As soon as I have one I will share it with you.
@EvanReese
The blender route did not result in conclusive evidence that it would print something better so I decided to exploit the attractor pattern to the max and optimise it as much as I can.
From the first test print it is clear that as long as the textured surface is flat, it will work.
On the bottom photo you clearly see that layerlines completely eliminate the effect and ruin the part. I stopped it early because there is no way this will be useful. So I will split the part and print both parts flat.
This leaves me with a new problem.
This part is the rooftop, which will be hard to print flat. I will see what I can do with splitting, but not sure if it will be succesful.
But very happy with the flat results sofar.
What I forgot to mention is that layer height affects the result dramatically. The slicer rounds things up or down of course and on some layer heigths the effect is almost gone while a small step from 0.2 down to 0.16 suddenly exposes all the lines from the cad model.
Cool to see so far. I'd crank the layer height as low as possible and look into adaptive layers height too. If you can use a resin-based printer I bet it would come out great!
The Onsherpa | Reach peak Onshape productivity
www.theonsherpa.com