Welcome to the Onshape forum! Ask questions and join in the discussions about everything Onshape.
First time visiting? Here are some places to start:- Looking for a certain topic? Check out the categories filter or use Search (upper right).
- Need support? Ask a question to our Community Support category.
- Please submit support tickets for bugs but you can request improvements in the Product Feedback category.
- Be respectful, on topic and if you see a problem, Flag it.
If you would like to contact our Community Manager personally, feel free to send a private message or an email.
Bike Head Tube Organic Shape
 marcel_graber
Member Posts: 7 ✭
marcel_graber
Member Posts: 7 ✭
in Drawings
Hi all,
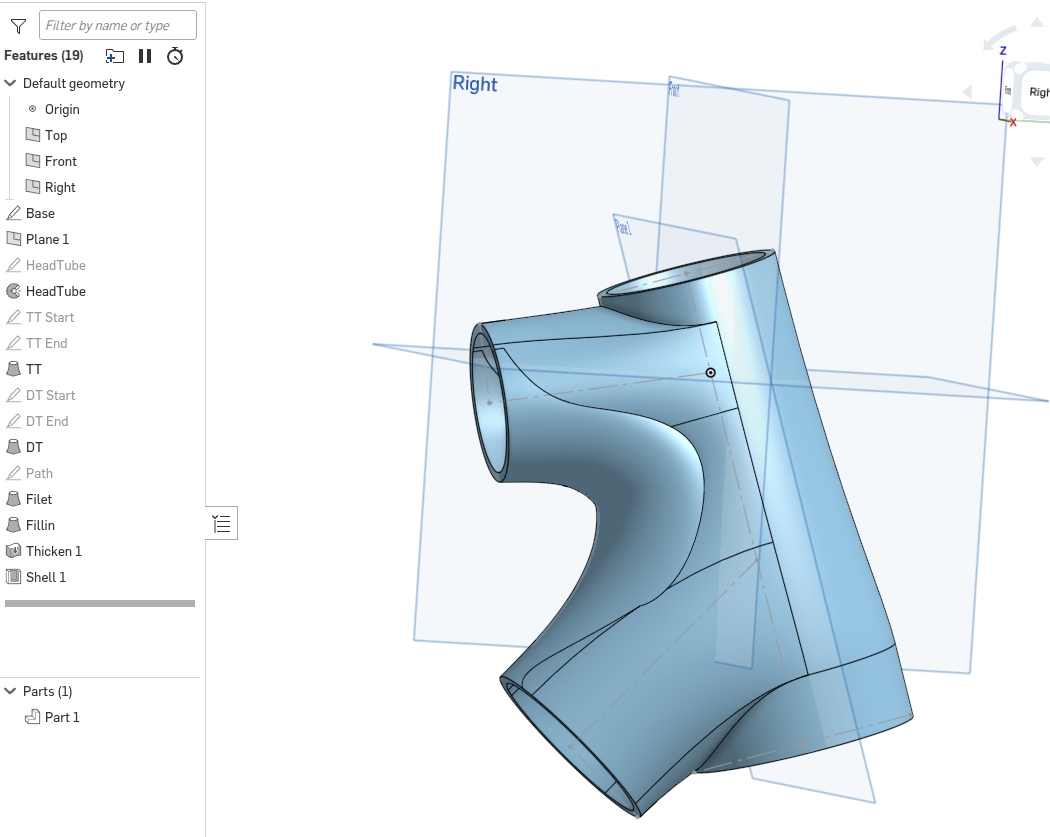
I'm in the design of a bicycle frame with 3d printed lugs and carbon tubes. But I'm still struggeling with a clean organic shape for the lugs. As an example, I made a simplified lug. Can you help me in how to do it the "clever" way in OnShape? As you see on the picture, I do not get a smooth transition between the loft of the tubes and the "filet" between these lofts.
https://cad.onshape.com/documents/3962d9bf5086bf7cc2562aaa
Tagged:
0
Comments
marcel_graber - You might try working with the variable fillet option inside the fillet command - there is a bit of a learning curve involved. I've found that getting a perfectly flowing organic shape can be quite challenging.
Thanks @rick_randall
I tried the whole day… the problem with the fillet is, that it brakes, when I change the base geometry (which happens often, because of the different frame sizes) I tried another approach with bridging-curves and fills. Looks better now, but still not perfect.
These kinds of joints are extremely challenging with any NURBS based modeling tool. NURBS are by definition 4 sided surfaces, but there's no simple way to break up this transition without 5 or 6 sided surfaces. Even then, those surfaces don't necessarily have a natural order of which one(s) should be first and influence the following ones (beyond perhaps the tubes being fundamental). Even with something like XNURBS, which is like Parasolid's fill surface on steroids, it's going to be a lot of very careful tweaking to get anything decent.
Simon Gatrall | Product Development, Engineering, Design, Onshape | Ex- IDEO, PCH, Unagi, Carbon | LinkedIn
I know Onshape's surface modeling tools are up to the task. I hope one of the community surfacing experts will chime in with a proper solution, but here are a couple of tips in the meantime:
Is this closer to what your looking for? Hard to visualize what you have in mind. Getting it clean definitely requires some understanding on how onshape thinks.
Hi @Matt_Shields thanks, was exactly what I did in the second version. Seems to be the better approach for this kind of design.
Very interesting, how did you do this?
Patchwork quilt method. The top and bottom blends are just fillets but could be done the same way as the middle as follows. The patch in the middle was made by splitting the surfaces and deleting the surfaces I didn't want then a quick single curve sketch to control/connect the inner curvature and fill surface feature with a bunch of tangent edges. thicken and mirror.
This is a classic surfacing challenge. The idea is to use patches instead of trying to do huge blends all at once. Here's an approach. The result isn't yet perfect, but I'm out of time to mess with it. https://cad.onshape.com/documents/18539836b527ad1961df5147/w/d5397f64f47e0cec44f42c19/e/9f6d742b6320cf4452bf19ce
The Onsherpa | Reach peak Onshape productivity
www.theonsherpa.com
@EvanReese Thanks a lot!