Welcome to the Onshape forum! Ask questions and join in the discussions about everything Onshape.
First time visiting? Here are some places to start:- Looking for a certain topic? Check out the categories filter or use Search (upper right).
- Need support? Ask a question to our Community Support category.
- Please submit support tickets for bugs but you can request improvements in the Product Feedback category.
- Be respectful, on topic and if you see a problem, Flag it.
If you would like to contact our Community Manager personally, feel free to send a private message or an email.
Combine hollow cylinder with sphere
 CodyH
Member Posts: 22 ✭
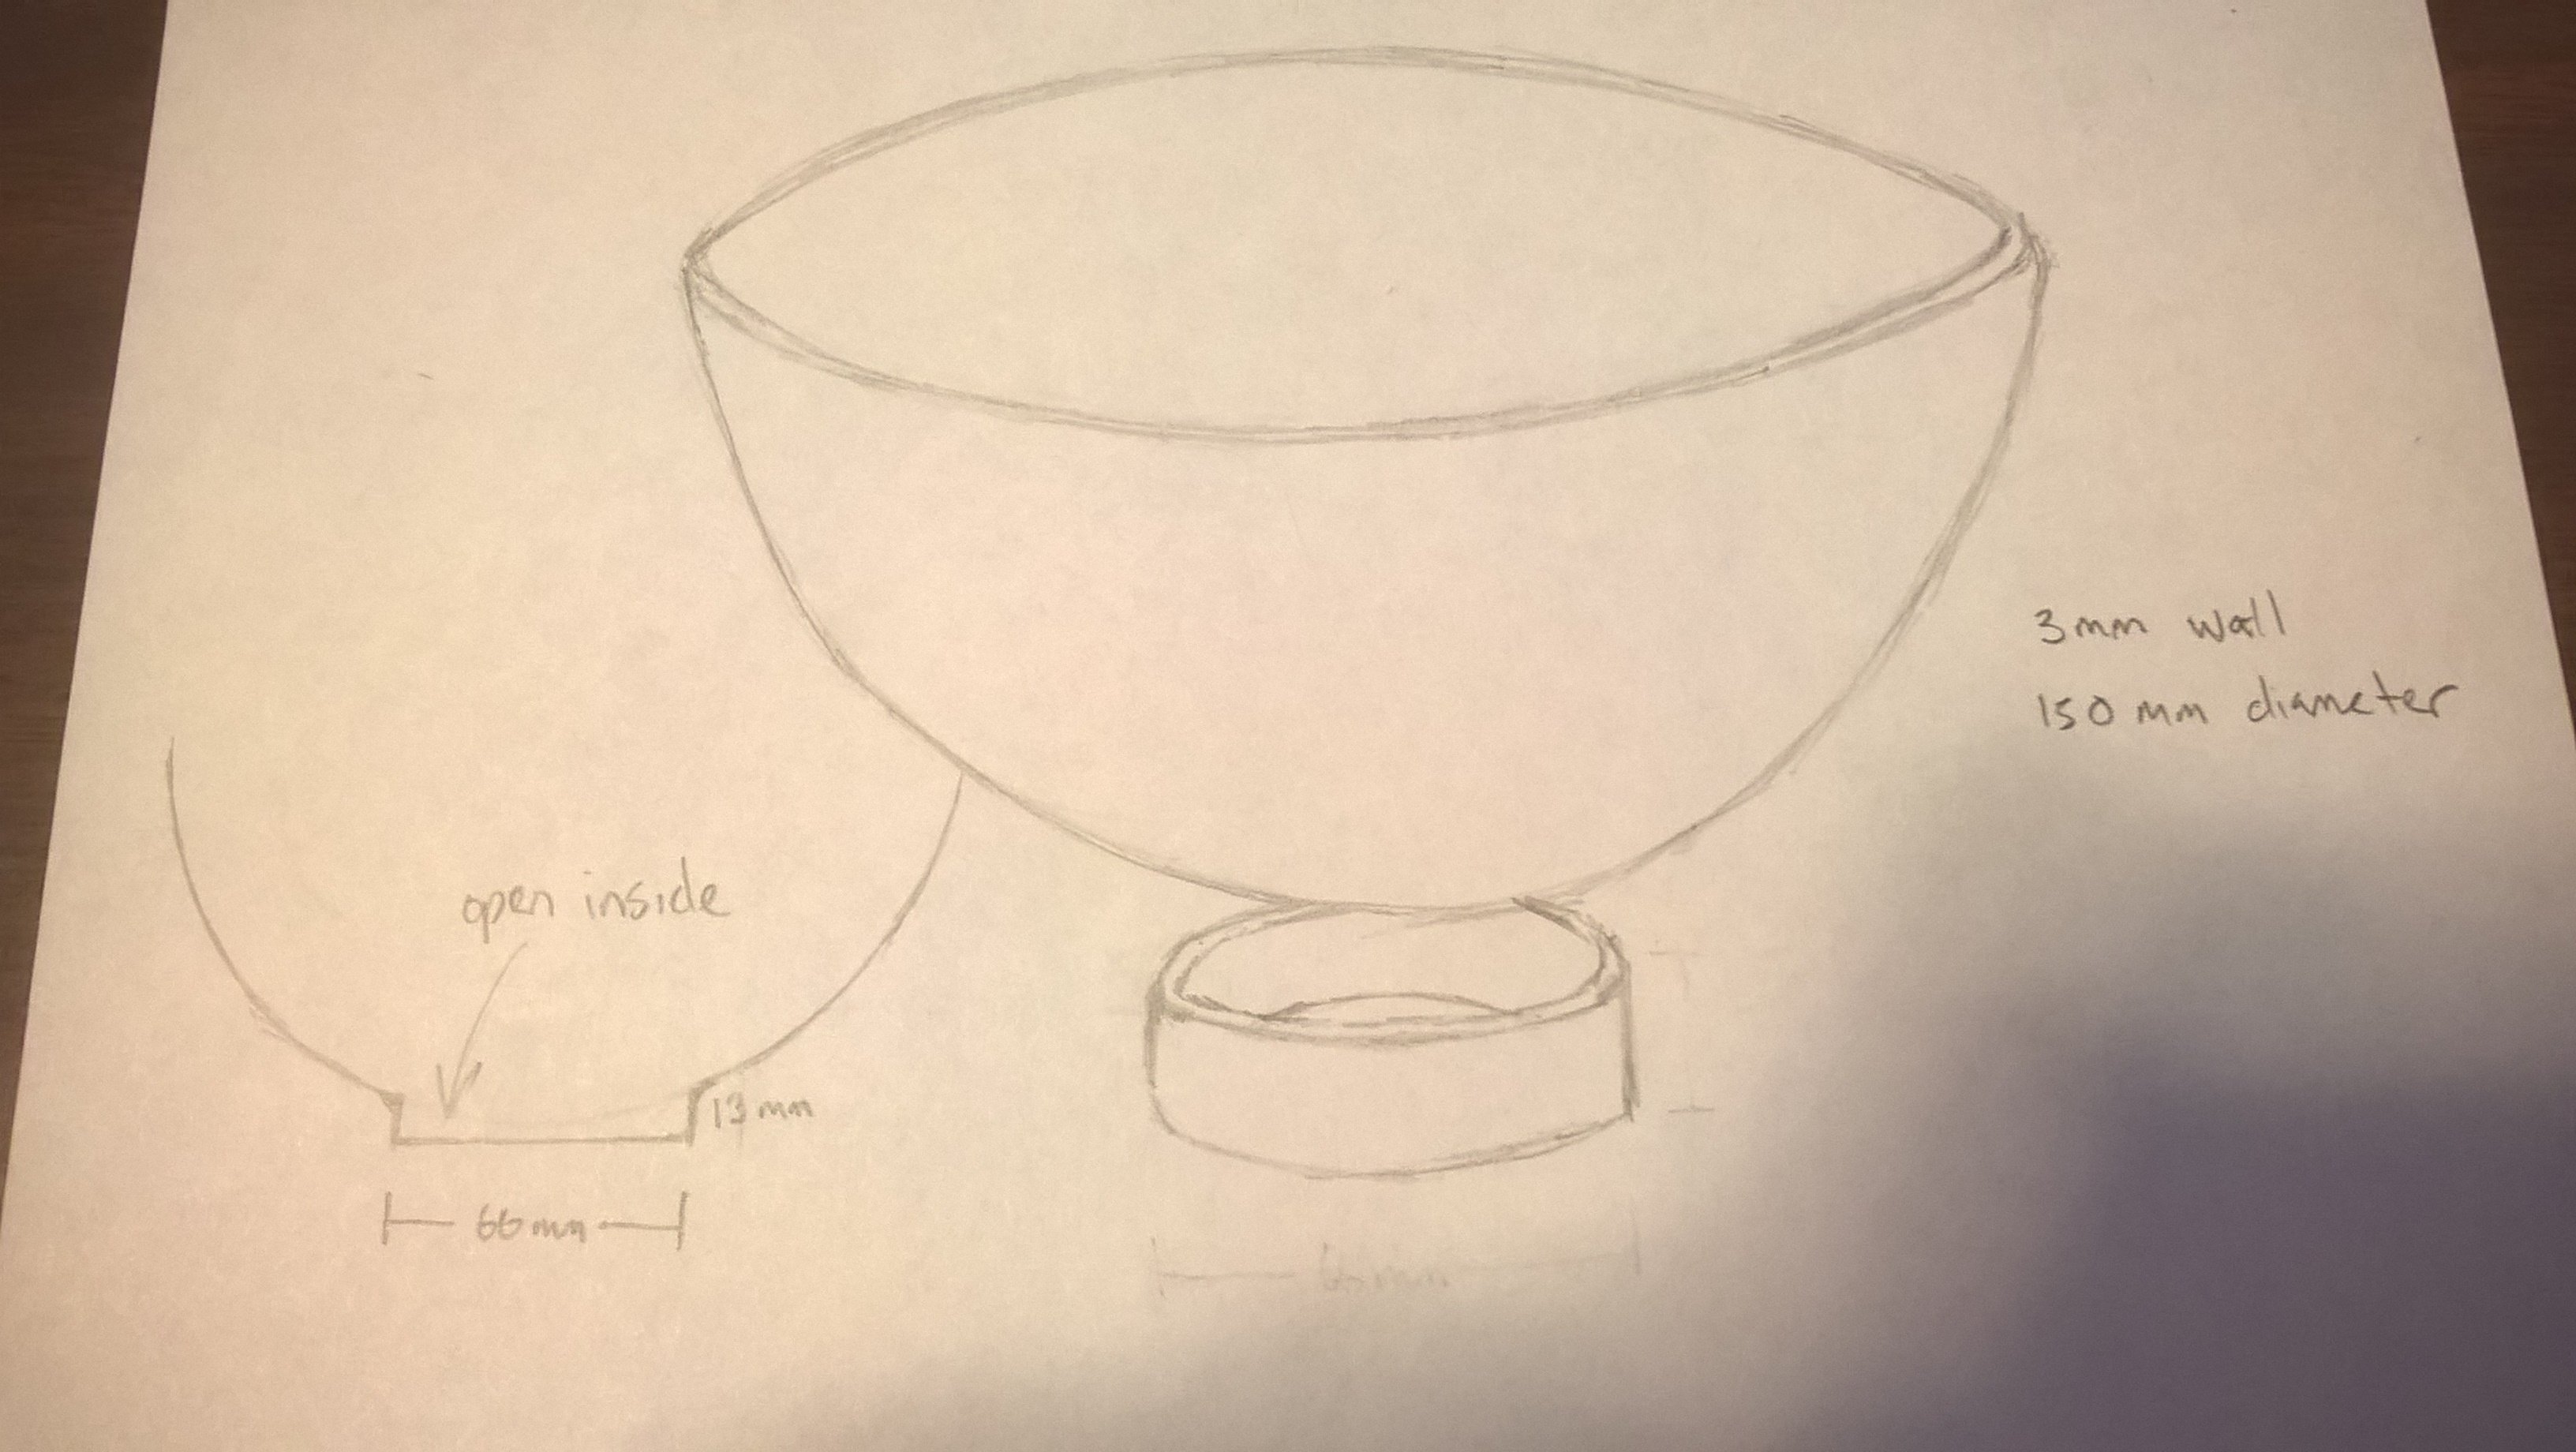
I have a hollow hemisphere I'm trying to add circular base to. I suppose this is essentially combining a cylinder to a sphere. I'm not sure if I'm supposed to combine the two separate pieces or cut a hole in the hemisphere and extrude the base from that. For now I have the two pieces sketched in Onshape but I have no idea how to put them together. Once combined the entire inside is open, including the base. The dimensions are as follows:
150 mm diameter hemisphere
70 mm diameter circular base (edited to fix the 66 mm in the image)
13 mm height for base; edge to contact on hemisphere
3 mm wall for everything
I have included a pencil sketch for illustration. I hope it is able to define everything I'm trying to explain. It seems this isn't very difficult, but I'm VERY new to Onshape and I can't find any tutorials on how to do this. Any help is much appreciated or if someone actually wants to provide a .stl I could work from then even better! Of course, I still need to learn. Thanks!

0
Best Answers
-
 NeilCooke
Moderator, Onshape Employees Posts: 5,987
  Hi Cody - here you go.
https://cad.onshape.com/documents/89ba0b3e4895452b8320ba4c/w/4b1aea5ab5b24dd48c472791/e/3a5f9ff2c4574358ac0d995c
Senior Director, Technical Services, EMEA2 -
 jakeramsley
Member, Moderator, Onshape Employees, Developers, csevp Posts: 669
  If I am reading it wrong and you want to create a single part that has a base and is hollow, then I would make a similar first sketch but instead of thickness make the entire thing solid.
1. Make a similar sketch but rather than offsets, just connect everything so that you have a region going to the origin. Likewise, the bottom line should be non-construction. We've created two regions, but they are connected so they will both be used in the revolve.
2. After revolving everything, start a shell and set the thickness to be 3mm. Select the top face and the bottom faces. What shell does is removes the selected face of the part and then offsets the remaining faces the set distance. This will create a hole in the top and bottom of your part and everything is 3mm thick.
If it is something completely different, I'll need some clarification.Jake RamsleyDirector of Quality Engineering & Release Manager onshape.com1
Answers
https://cad.onshape.com/documents/89ba0b3e4895452b8320ba4c/w/4b1aea5ab5b24dd48c472791/e/3a5f9ff2c4574358ac0d995c
1. On one of the default planes (it naturally feels like front to me), sketch what you have. I started with a vertical line from the origin down. Then I made a semi-circle, center of it coincident with the origin, that has the points horizontal with the origin. Then I sketched a construction line to indicate the empty space in the ring at the bottom (made sure the vertical line went to a mid-point of that construction line). Did some dimensioning, offsets, and closed the regions. I had to add some additional horizontal constraints to make sure the offsets didn't over extend.
2. I pressed the revolve button in the top left. This put the entire sketch in the revolve, which was selecting all of the grey areas. From here I selected the middle line for the axis of revolution.
Is this what you were looking for?
1. Make a similar sketch but rather than offsets, just connect everything so that you have a region going to the origin. Likewise, the bottom line should be non-construction. We've created two regions, but they are connected so they will both be used in the revolve.
2. After revolving everything, start a shell and set the thickness to be 3mm. Select the top face and the bottom faces. What shell does is removes the selected face of the part and then offsets the remaining faces the set distance. This will create a hole in the top and bottom of your part and everything is 3mm thick.
If it is something completely different, I'll need some clarification.
Neil, that's pretty much exactly what I was trying to build, except maybe the fillet on the base. However, now that you did that I may stick with it! Thank you!
Jake, thanks for the fantastic tutorial. I'll get started on it. I would say the bottom model looks the closest. The ONLY change would be the addition of a solid base of 3 mm like the rest of the walls. So could we only select the top face when creating the shell? Would that leave the bottom alone while still giving all of the walls a 3 mm thickness? Now I feel a little silly that I didn't think to draw the lines for the base and THEN do the revolve like I did to create the hemisphere. My brain was stuck on thinking of it as separate parts.
To answer your question, you could draw a sketch that outlines a vertical cross section of the bowl shape then use it to revolve / extrude it. But this sketch would take more time to build. That said, there is more skills involved and would be good practice:
And renders the same shape
If you are just learning this, I would do draw the model using each of the techniques outlined in this thread. It'll be good practice. You can do it all in the same document.
Hi daniel_chow,
one cool thing you can do with this is use in this case is diameter dimensions since it is going to be revolved around and the specifications are in diameters.
1. If you have a construction line as your center line, start a distance dimension by selecting the centerline and the point you want to measure to.
2. Before placing the dimension, if you move the dimension to the opposite side of the center line it will turn into a diametric dimension. This way you can specify these values in diameters instead.
This way you have to do less math and/or (in my opinion) design your sketch in a way that closer resembles design intent.
I will try your suggestion when I get home, looking forward to learning something new in OS today!
Thank you for taking the time to post that!
Thanks again for more technique and clarification! This is helping A LOT! Obviously I have much learning to do just to cover the basics, but this helps at understanding different concepts of modeling and where to even begin.
This is the process of creating a raised section as a new sketch:
Step 1: If the raised section is reaching the bottom of the bowl, get the vertical dimension of the bowl shape
Step 2: Start a new sketch as Jake suggested off the top face of the bowl shape
Step 3: Draw whatever raised pillars / sections you want on the new sketch
Step 4: Extrude it, select the sketch entities, add the dimension to reach the bottom of the bowl, reverse the direction, add it to the existing part
Step 6: You can use this techique to make all kinds of raised planes / edges. This was made in about 15 seconds using the same sketch.
And when you learn how to make a plane at a point / location of your choosing, then you can start a sketch at that plane and draw / add basically whatever you want.
Daniel, Thank you for the reply, however, I can't view the images. I wonder what could be the problem since everything else in the thread is displaying fine. Hopefully it gets fixed since I'm really curious to see your tutorial.
As for drawing planes, I'm still learning how to do that. I haven't been able to find a tutorial specifically teaching this. As you can tell, I'm very novice at this, but this thread is helping quite a bit.
Thanks again!
To make the strip, I would probably leverage the profile sketch you have already done. If you sketch the profile of the strip on the top and sweep it, with a little manipulation can get it to work.
1. Sketch on the top of the top and draw two lines that are coincident with the edge.
2. Draw two lines that are coincident with the edge of the cylinder. Make sketch 1 visible and make the two line symmetric about one of the lines in sketch 1. You can use either the arc or one of the horizontal lines. Note: while it looks like a rectangle, the edges are actually arcs that are concentric with the edge of the bowl.
3. Start a sweep, choose the closed profile and sweep along the arc from sketch 1. The termination of the sweep will be incorrect, even if the arc length is truncated so make sure the sweep is 'New' instead of 'Add'
4. To fix the termination, start a 'Replace face' and select the end of the sweep. Replace that face with either the interior or exterior of the bottom of the bowl. This will move the end of the face to either touch the interior or exterior of the bowl. I chose the interior.
5. Boolean the parts together to become one part.