Welcome to the Onshape forum! Ask questions and join in the discussions about everything Onshape.
First time visiting? Here are some places to start:- Looking for a certain topic? Check out the categories filter or use Search (upper right).
- Need support? Ask a question to our Community Support category.
- Please submit support tickets for bugs but you can request improvements in the Product Feedback category.
- Be respectful, on topic and if you see a problem, Flag it.
If you would like to contact our Community Manager personally, feel free to send a private message or an email.
Best Of
Hole Feature - no more blind in last?? and no more custom hole sizes

Surfacing with the new stuff
You gotta watch this:
And then use these:Greg's Curve and Surface eval tools are here:
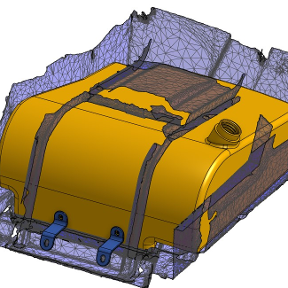
This is my 3rd generation design for this part, it's a 2016 BMW R9T (8 years old):

This is the most primary surface in my design, Greg talked about these in his video and getting these correct is important. Most organic designs will have primary surfaces:

This is actually a good single span surface patch with degree 3 & 4 to create it's shape.
This is how my old design was created using a simple loft through 3 curves:

Turns out this surface is terrible:

Instead of using a 3 curved loft to create my primary surface, I switched to a 4 sided boundary surface:

This new boundary surface is off by .309 mm using a 4th order target and that doesn't matter for the design. The red dot in the image above shows maximum deviation between the old & new shapes.
This middle curve defines where the part matches the seat:

I can't remove it or ignore it.
So who cares about all of this? I can't say that with this small printed part you can see a difference between clean & dirty surfaces. If you chrome plated these parts and knew what to look for, you might see a difference. Maybe with a larger shiny red car you could see a difference in the surface types. There are benefits though, what you do see is a speed up & robustness in the model.
Time to rebuild clean surfaces is 5.03 seconds:

Time to rebuild dirty surfaces 6.01 second:

This is a real use case utilizing the newer surface tools. It pays to get it right because when designing organic shapes, you rebuild a lot and you tend to push the design to it's boundaries. You have to use Greg's tools and focus on spans & curve degree for the surfaces created keeping the surfaces lean and mean.
 billy2
Re: Randomly shifting lines by .0001 and scuffing entire projects seemingly at random
It seems like you could pattern one rectangle and maybe do a couple of mirrors. Manually drawing all of that in a single sketch is not the way to go.
 S1mon
S1mon
Re: Randomly shifting lines by .0001 and scuffing entire projects seemingly at random
Not sure what the context of all that repeated work is but generally you'd only want to do maybe 1/8 of that and then mirror/pattern the rest of it.
 MDesign
Re: Appearance
50%? No, but shift-T will make parts temporarily transparent. I would prefer that it wasn't quite so transparent. There's also "translucent" mode under the Camera and Render options menu (the isometric cube menu on the upper right). That makes all parts translucent, which can be useful while trying to work on internal features. By default, there's no keyboard command for that, but you can assign one.
S1mon
Re: Randomly shifting lines by .0001 and scuffing entire projects seemingly at random
Please share the doc URL. Top tip: keep sketches to 10 lines or so, not 500. Just asking for trouble.

Re: I would like a forum "for dummies"

Maybe a book instead? Have you seen the learn.onshape.com website yet? Good stuff
MDesign
Re: Where Used Without Where Used And Part Confusion
This helps a lot, thanks. I forgot that multipart studios existed. I will probably not be using them anytime soon considering what's happened here.
Many of our multipart studios appear to be dead projects, doodles. I can yank the erroneous part definitions from them and jsut worry about collapsing references in the true assemblies. I will start with screws. I will need a proper method of tabulating their properties. I can't find anything on this
The first step is getting our screws in order the hard way. My end goal is to have something like this in OnShape, but for screw parameters such as shaft diameter, shaft length, etc.

In Inventor, this is achieved by exporting a dimension parameter to an iProperty then mapping to a property in Vault. How is this done in OnShape?
Re: I would like a forum "for dummies"
I have been on onshape for just over two years now. I never learned cad 3d in my life. All I did was to follow several of the self paced courses and then started to do things. I am now designing model engines for 3d printing. Yes I am a machine engineer but all I ever learned cad wise was autocad light back in the 2D days, and that is decades ago.
Never did I have the feeling the onshape community, or the PROS, were explaining things overly difficult. In fact I found it very accessable, approachable and often instantly to the point.
Can you give us some examples? I cannot find you other post so please link to it?
I would advise you to follow the self paced courses which are free and very bitsize. Couple of short videos and then a test before you go to the next section that builds on the previous theme. Start with cad basics so you understand their way of terminology and concepts. Then go on to the sketches and after you understand the environment, go to the part building courses. By no means do you need to do all of them but these are kind of needed before you will get a feel of the onshape world. If you don't know where to find them go to the upper right of your screen and find the head with gears, this is the learning center.
Looking forward to your examples so we can try to do it again.
Re: I would like a forum "for dummies"
With Onshape’s forum, I don’t recall anyone ever taking a ‘forget you’ type of attitude. Especially towards those new to the forum. In fact, a lot of the time, long time users of the forum take time to welcome newbies. So, welcome to the forum.
I am of the opinion that a lot of the time, the reason questions may take awhile to get answered, is because those reading the original post, are possibly having a hard time understanding exactly what is being asked.
Other times, there may be some that are of the thought that the person asking the question would possibly be better off doing otherwise than what is being asked. So in a case like that, someone like me will wait for others to respond to the original post, then, at that time, I would offer up a response something like this —— ‘hey, you also MIGHT be interested in taking this approach …’
Of all the CAD forums I have ever participated in, this is the most professional and cordial of all. I say professional in that people don’t get petty as in other CAD forums I have participated in. Maybe it’s because there are a lot of engineers here.
I suggest you post your questions as clearly stated as possible, with hand sketches or the link to your document, and see what happens. There are a lot of very helpful participants here in this forum.