Welcome to the Onshape forum! Ask questions and join in the discussions about everything Onshape.
First time visiting? Here are some places to start:- Looking for a certain topic? Check out the categories filter or use Search (upper right).
- Need support? Ask a question to our Community Support category.
- Please submit support tickets for bugs but you can request improvements in the Product Feedback category.
- Be respectful, on topic and if you see a problem, Flag it.
If you would like to contact our Community Manager personally, feel free to send a private message or an email.
Efficiently set mate connectors
 rune_thorsen229
Member Posts: 182 EDU
Hi, this question relates to :https://forum.onshape.com/discussion/8799/select-mate-connectors-in-context-menu-assembly
john_mcclary have a proposal.
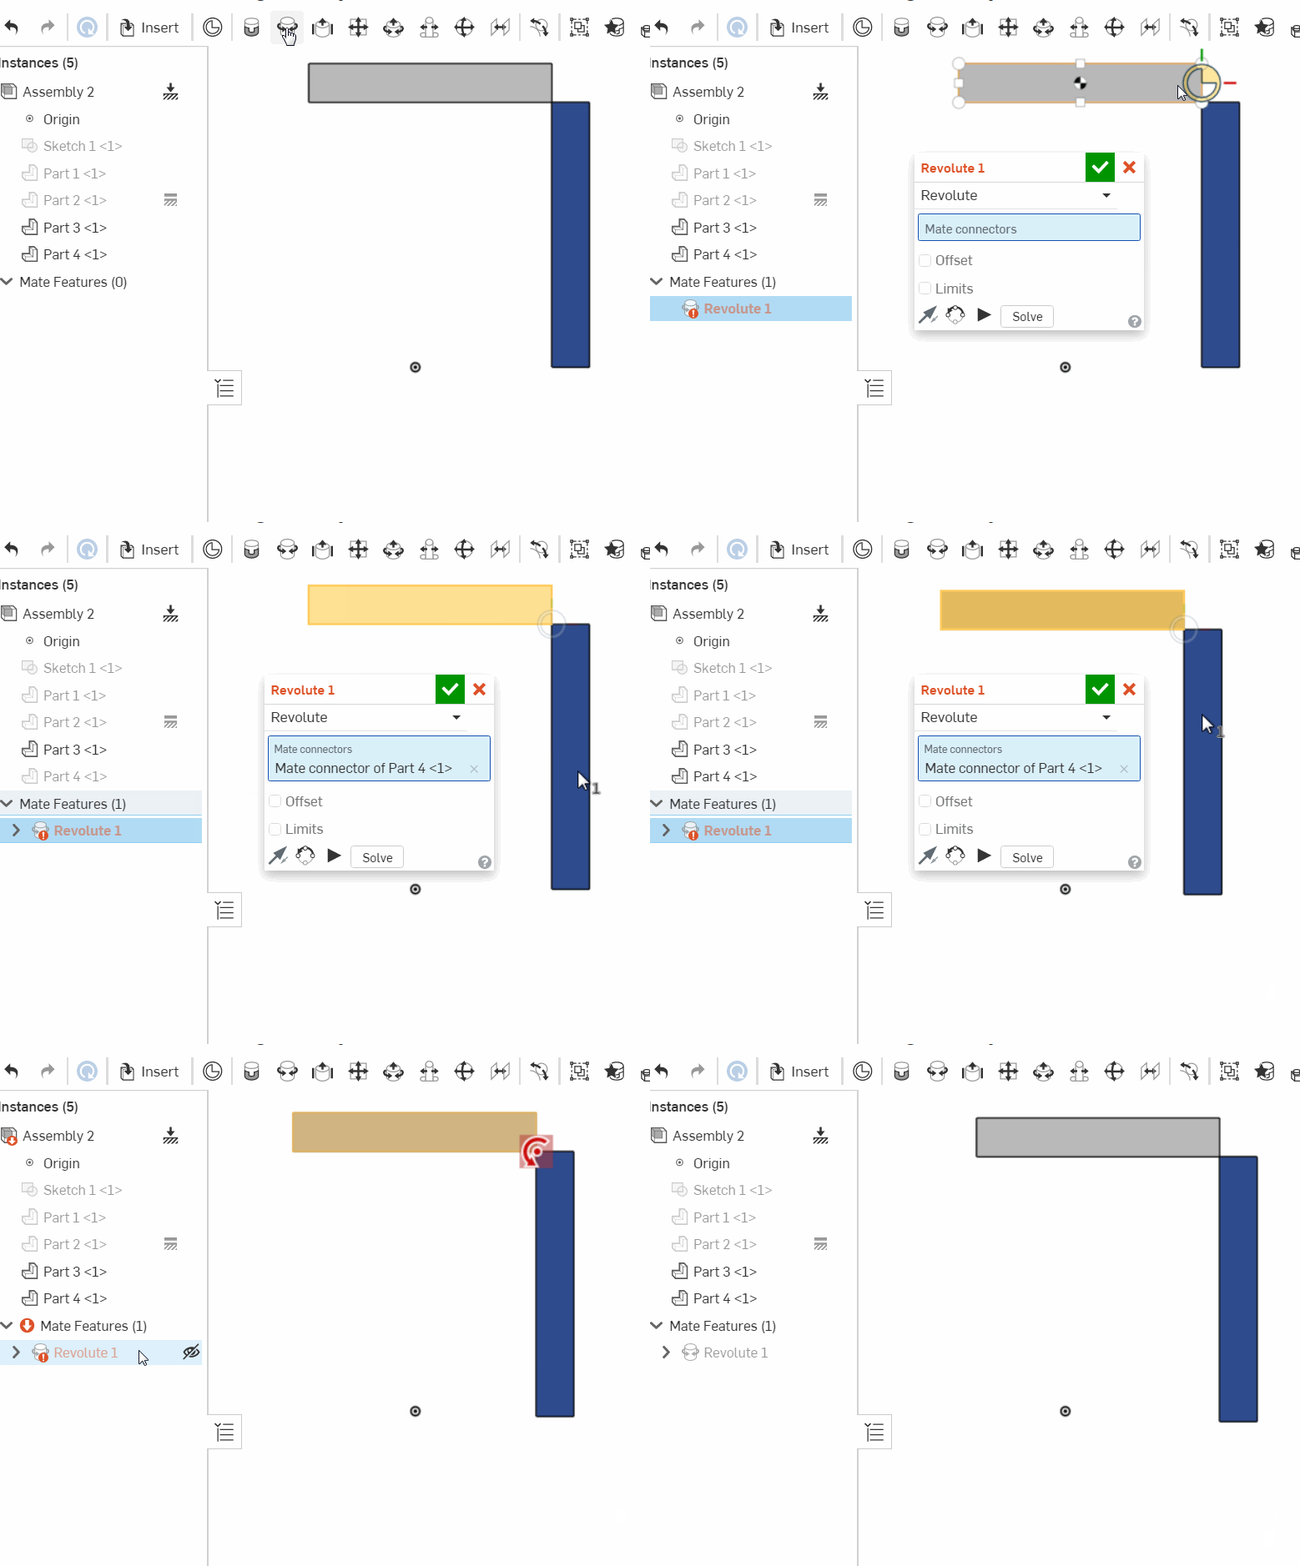
The problem is that paring mates e.g. revolute mates on the same position is difficult. Say I want to set a Revolute mate pair on the corner of part 4 so it coincides with the corner of part 3.
This is practical impossible if the parts are already in place (see animation). I have to move one of the parts first. I expected that I could hide the one that I have already mated but it doesn't work that way.

What is an efficient way to do this? Is there some (select other part trick?)
john_mcclary have a proposal.
The problem is that paring mates e.g. revolute mates on the same position is difficult. Say I want to set a Revolute mate pair on the corner of part 4 so it coincides with the corner of part 3.
This is practical impossible if the parts are already in place (see animation). I have to move one of the parts first. I expected that I could hide the one that I have already mated but it doesn't work that way.

What is an efficient way to do this? Is there some (select other part trick?)
Tagged:
0
Best Answers
-
 NeilCooke
Moderator, Onshape Employees Posts: 5,997
  You don't have to put the cursor directly over the vertex to snap the mate connector – try zooming in a bit to make the selection area larger.Senior Director, Technical Services, EMEA5
 -
 john_mcclary
Member, Developers Posts: 4,065 PRO
In order to use Re-Align, You will need an existing axis pointing in the desired z direction (by means of: a sketched line, the edge of a part, or cylindrical face)
Move, should give you the option to Rotate about 1 of the three axis. Which is how you do it without additional reference geometry.
2 -
 steve_shubin
Member Posts: 1,118 ✭✭✭✭
BELOW IS A GIF SHOWING WHAT @john_mcclary SAID RE. MATES — IN PART STUDIO (@bruce_williams)

Those new to Onshape should know that it only takes a few seconds to CONSISTENTLY set a Mate in Part Studio — oriented along any axis you choose. 10 seconds or so.
- select Owner part
- select Realign and tap a plane, face, edge or line
- select Origin
BUT — an IR to have Mates work in Part Studio, as Bruce showed in Assembly, is something I’d be up for
5
Answers
Here is a way that’s not difficult
Before you move your mouse, hold SHIFT. This will lock those points. Now pick your first mate point.
Let go of shift now
Mouse over part 2, and then hold shift again once the face points appear. Now select point 2.
The desktop does have its advantages
Itt would be nice to have some way of doing that on iOS (See the post below)
Great tip John
I figure I better get in here and clarify things. Actually the iPhone does have something similar to the desktop version. It’s just that now and then it can be a little picky when you go to select or try to select that second revolute mate
I hope the UX designers understand that that is an issue.
Thanks @steve_shubin for your solution you make a lot of mouse actions. If you were to apply mates for many components I think one should be able to do it in the most intuitive way.
Neil gave the best answer, but it is 'unintelligent' behaviour of OS not to temporarily) disable the first selected mate when your intent is to select a PAIR.
Thanks for your input everyone. Most appreciated.
Now Im at it I always have problems with orienting the mate specially to origin. Say I want it to be oriented normal to the ZY plane (Front), it keeps proposing the other orientations contrary to what I would expect. Shift- no shift. I would expect to click on the Front plane- press shift and then keep that orientation but no. Eventually I have to turn the dice to see it from the bottom an I might get lucky. Any hidden trick?
How I approach a mate is shown in the animation below, When holding shift you just need to get close enough to the point that the connector snaps to the corner.
You can see how far away my cursor is to the point all around it. So there is a huge tolerance for your mouse click precision.
also if you look half way thru the animation, you can see when you mouse over the existing mate, it appears to shrink, giving a visual queue that you are selecting the existing mate for removal.
as for the origin, yea getting the mate in the right axis is a Bitch. Even after a lot of practice I still fumble during the mouse click and end up getting the wrong axis...
I hope the UX developers read this thread so I would expect the mates to behave different so just my 2 cents:
In a context (RB) you should select which of the 3 axis (also relative to the object) you want - not this rubbish of a mouseposition and view angle. Simple and clean. When selecting a mate pair the first should go in background allowing you to select the second. Deselection is already in the menu - this Microsoft philosophy of doing the same thing in multiple ways is bad / code smell (sorry).
Let selection on the dice work like selecting a face (make a consistent userinterface) and use the axis for flipping reorienting the axis (this sucks as well - sorry).
While I'm at it. I would expect e.g. Planar Mate to take multiple >2 connectors
Oh , finally I think the naming of the mates are hopeless: Fastened mates (8 possible solutions?). Revolute mate ???. They are effectively constraints so use the same terminology, same shortcuts etc. and in the tool-tip remind us of what DOF they have - X Y Z.
Hope it may be useful for discussions like : Dealing with employers
Fasten is interlocking two parts indicating no DOF
Revolute is shown spinning on the axis of a cylinder standing up-right, Z normally faces UP, so: you can only revolve around the Z axis.
Slider shows the same cylinder and two dark lines with an arrow coming out the top face, this looks like something that can only slide about the Z axis.
Planar shows a plane with arrows going only in the X and Y directions. (I agree, it would be nice to combine planar mates together, when you want many parts to follow the same offset, rather than mating a master part, then everything planar to "that" part...)
Cylindrical shows both slider and revolute images combined, indicating it does the same thing as if you had one of each mate.
Pin-Slot, is not very intuitive, it doesn't indicate the cylinder can rotate in the slot, and it doesn't let you know that it slides along the X axis..
There must be a direct way.?
Move, should give you the option to Rotate about 1 of the three axis. Which is how you do it without additional reference geometry.
In Part Studio when choosing Vertex of Origin as the Origin entity, the primary axis defaults to Z up. Then since it is a Part Studio we always have standard planes and previously created geometry to Realign to if desired.
In Assembly we are given a visual clue as to axis of choice. First rotate the view to see all three axis. Then while hovering the cursor, the various axis will highlight yellow and X, Y, or Z may be selected as Primary. This is handy since there are no standard planes and geometry may not be present yet. Then Realign & Move may be used if desired.
BELOW IS A GIF SHOWING WHAT @john_mcclary SAID RE. MATES — IN PART STUDIO (@bruce_williams)
Those new to Onshape should know that it only takes a few seconds to CONSISTENTLY set a Mate in Part Studio — oriented along any axis you choose. 10 seconds or so.
BUT — an IR to have Mates work in Part Studio, as Bruce showed in Assembly, is something I’d be up for
A new part with just one sketch and one line cannot have a mate.
There's also the excellent Multi Mate Connector FeatureScript by @konstantin_shiriazdanov
that (among other great functionality) allows you to set a Mate Constructor as "Construction" which removes the requirement for a part owner: https://cad.onshape.com/documents/5d8da63844bedebe5cff72b1/v/ef3f978424d1f49e3e40a09e/e/11dcab8f665add80b9aced0a
Custom FeatureScripts are fantastic tools to extend the functionality of this platform. Often, Onshape will build them into the core product over time, once they understand how people are using them, and what kind of workflows are successful.
Definitely check them out!
You said —
... with just one sketch and one line cannot have a mate
@romeograham mentioned how a Mate Connector can be owned by a plane
Here is a GIF showing what Romeo was talking about