Welcome to the Onshape forum! Ask questions and join in the discussions about everything Onshape.
First time visiting? Here are some places to start:- Looking for a certain topic? Check out the categories filter or use Search (upper right).
- Need support? Ask a question to our Community Support category.
- Please submit support tickets for bugs but you can request improvements in the Product Feedback category.
- Be respectful, on topic and if you see a problem, Flag it.
If you would like to contact our Community Manager personally, feel free to send a private message or an email.
Understanding Curves: Air Intake Exercise - What start/end order do I use Bridging Curves?
 Skelobones
Member Posts: 37 EDU
Skelobones
Member Posts: 37 EDU
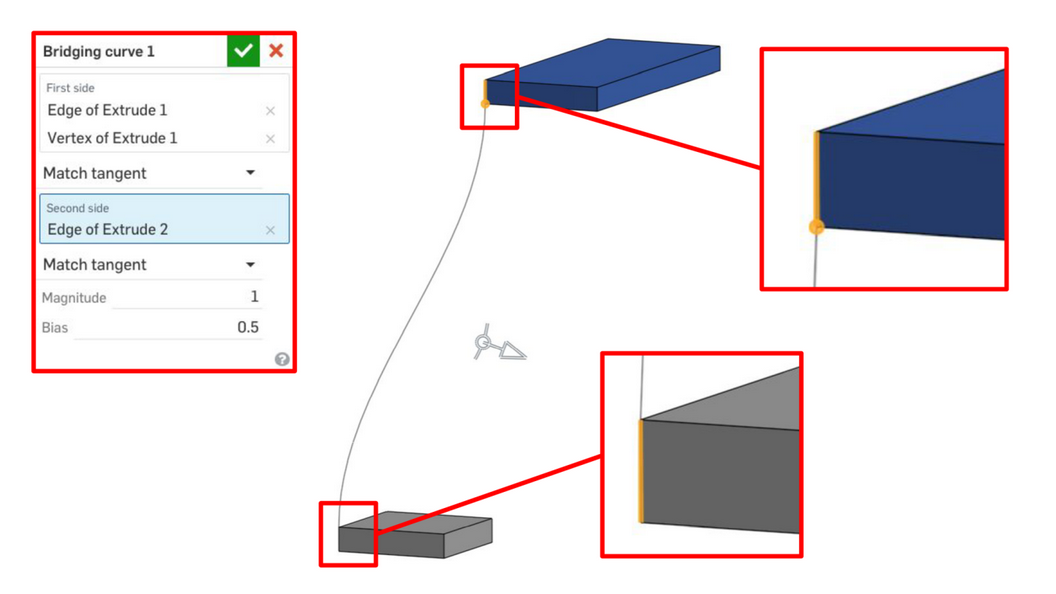
What is the reason that we select Dark Blue's edge and point before selecting Grey's edge in step 1?
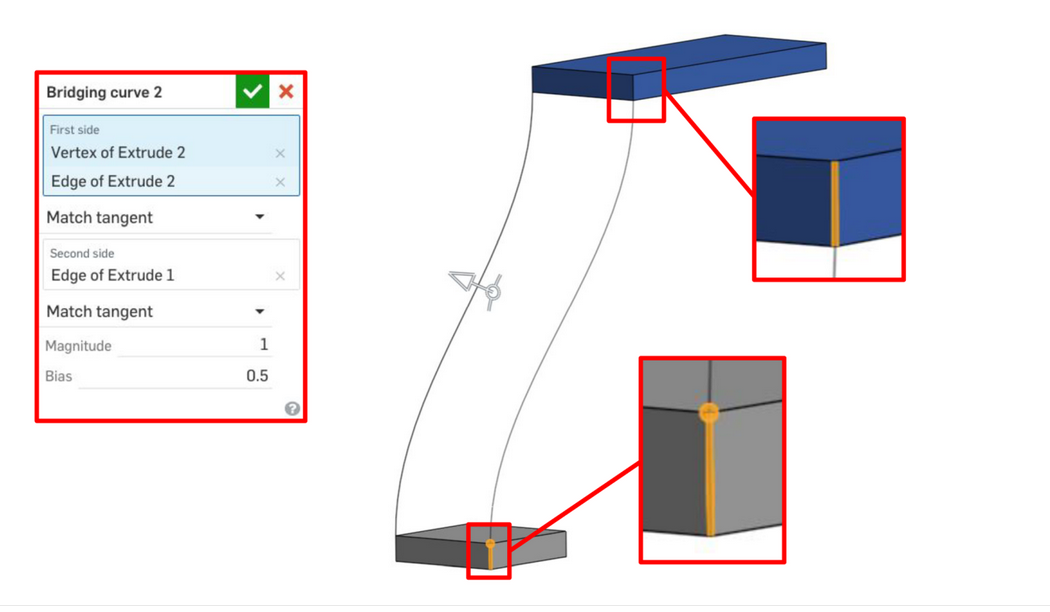
What is the reason that we select Dark Blue's edge before selecting Grey's edge and point in step 2?
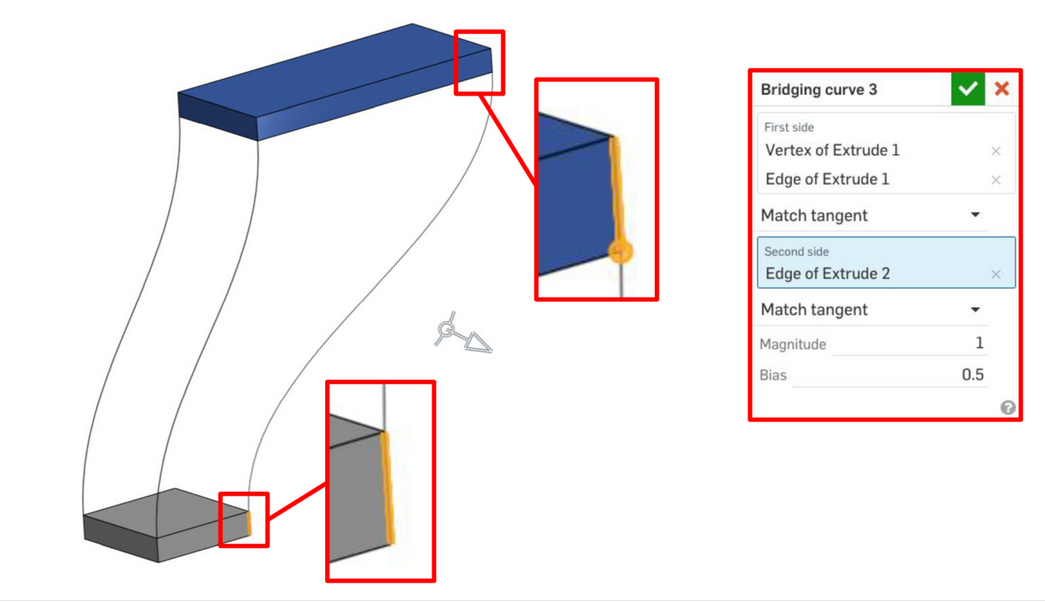
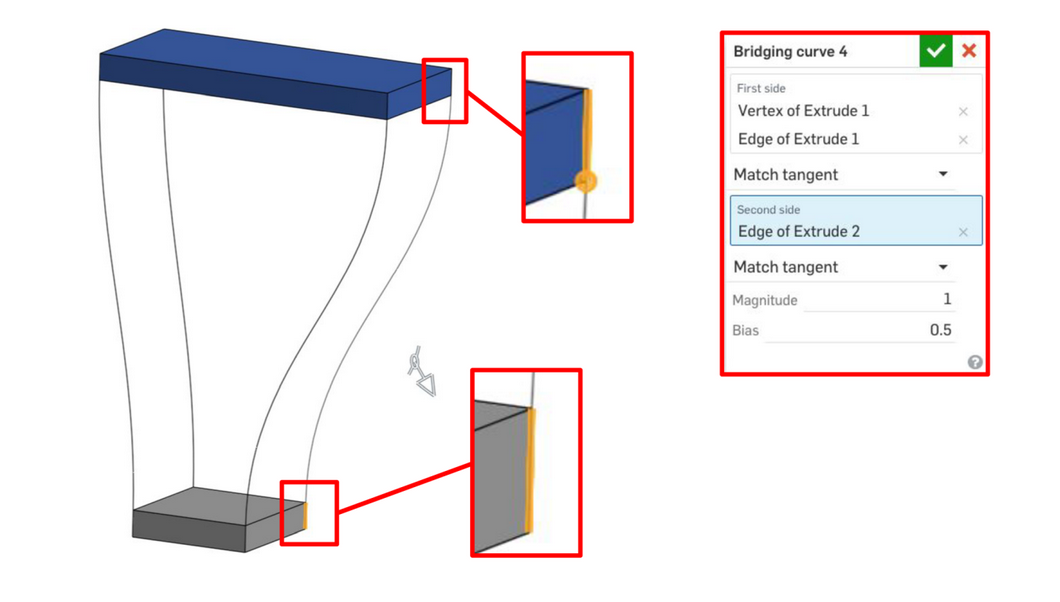
et cetera…
For what reason are the edges chosen in this manner? I want to understand why a single piece doesn't have all the Start selection. What is the best practice to making Bridging Curves? Is it similar to fastening a tire, tightening the nut across from one another in a star shape as if i'm evening out pressure?
I would really love if this part of the course was more clear on what effects my ordering of parameters will have, if any :).
Answers
That's one of those tools which has had lots of upgrades over the years, except for its associated help files.
A couple of prompts for your LLM of choice . . .
In Onshape - when was the 'Bridging Curve' introduced and what problems was it trying to solve?and
In Onshape - with 'Bridging Curves' does the order of edge or point selection affect the resulting shape of the curve?Here's Google's attempt at an explanation - https://share.google/aimode/LulrmVu1JV5KT7xoj
Unemployed Onshaper- Operating on European time - More of me here ➤➤ https://linktr.ee/Liam.GOk. I've just spent an hour experimenting with 'Bridging Curves' because I realised I didn't fully understand them myself.
Edit: Specifically using the G3 continuity option.
My observations:
A useful playground I made - have a go at adding the remaining three Bridging Curves with G3 continuity - https://cad.onshape.com/documents/c5c668a888cca9e5718a94c5/w/937dc1b803a314c1b486d6c8/e/d60c90a4a8d8edce42af1560?renderMode=0&uiState=69e9fbc29e20224e14c17fe4
Unemployed Onshaper- Operating on European time - More of me here ➤➤ https://linktr.ee/Liam.GI love bridging curves, and I also think the standard help content is fairly straightforward.
Standard help is 'far' from complete IMHO. There is only a single video that is many years old and it doesn't demonstrate any of the newer options that the tool now contains.
Also, the direction changing buttons - indicated below - are not mentioned anywhere, and they make a huge difference, which I only 'accidentally' discovered.
Unemployed Onshaper- Operating on European time - More of me here ➤➤ https://linktr.ee/Liam.GOk, but by the time you reach the point in your Onshape learning path where you start using bridges, you should already have seen and used the same orientation‑switching arrows before, for example in extrudes, right?
But I’m probably a bit biased toward arrows… and I’m probably holding some kind of record for the highest number of different arrows in a single feature with my new custom feature, hehe:)
uhm…. I think I need to explore that custom feature.
Custom feature which is just a set of vertexes each with their own arrows to form a mesh ("I am the king of arrows!") hehehe