Welcome to the Onshape forum! Ask questions and join in the discussions about everything Onshape.
First time visiting? Here are some places to start:- Looking for a certain topic? Check out the categories filter or use Search (upper right).
- Need support? Ask a question to our Community Support category.
- Please submit support tickets for bugs but you can request improvements in the Product Feedback category.
- Be respectful, on topic and if you see a problem, Flag it.
If you would like to contact our Community Manager personally, feel free to send a private message or an email.
Options
importing dxf- file into drawing for creating an template
 matthias_ramaekers
Member Posts: 3 ✭
matthias_ramaekers
Member Posts: 3 ✭
in Drawings
I found this video for importing my drawing template (dxf-file) into a drawing.
( https://www.youtube.com/watch?v=AbN3CBIaU_A)
If i insert my dxf template i get nothing. I get a white drawing. I need to get the template from my school to work on.
I have read about model space and paper space, but i don't know how to fix the space of the schools template.
sincere thanks
(
https://www.youtube.com/watch?v=AbN3CBIaU_A)If i insert my dxf template i get nothing. I get a white drawing. I need to get the template from my school to work on.
I have read about model space and paper space, but i don't know how to fix the space of the schools template.
sincere thanks
Tagged:
0
Comments
https://cad.onshape.com/help/#templates-custom.htm?Highlight=custom template, paying attention to the following section:
Using traditional CAD drawings as templates in Onshape
Create an Onshape drawing template..
In Onshape, create an empty drawing:
To tweak the fonts, select the text and change the font to an internally supported font of your choice.
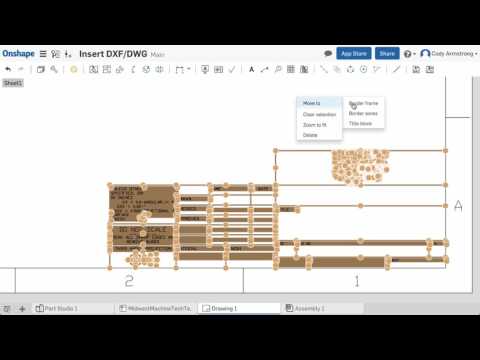
Elements will be added to the corresponding layer: title block, border frame, or border zones.
Twitter: @onshapetricks & @babart1977
Importing borders from SW:
-export DWG file of the border from SW
-import DWG into OS document
-create blank OS drawing
-insert DWG into OS drawing by inserting DWG in blank OS drawing
-export OS drawing into DWT format
-when creating a new drawing, click 'Created by me', and choose DWT
It works well once you figure it all out. One thing that should be noted, you don't need any other programs to create the DWT. All can be done inside OS now.
Also, the DWT's are searched for when creating a new drawing. But you have to find them. I found them under the 'created be me' option when creating a new OS drawing and it's asking for a template.
From draftsight, you have to export DWG or DXF
Inside OS you import either of these
Create a blank OS drawing
Insert DWG or DXF into blank OS drawing
Export this OS drawing as a DWT
Select this DWT when creating a new OS drawing
If draftsight won't export DWG or DXF. I don't know what you do.