Welcome to the Onshape forum! Ask questions and join in the discussions about everything Onshape.
First time visiting? Here are some places to start:- Looking for a certain topic? Check out the categories filter or use Search (upper right).
- Need support? Ask a question to our Community Support category.
- Please submit support tickets for bugs but you can request improvements in the Product Feedback category.
- Be respectful, on topic and if you see a problem, Flag it.
If you would like to contact our Community Manager personally, feel free to send a private message or an email.
How to create a countersunk hole?
 4DeltaEDU
OS Professional Posts: 15 PRO
I am trying to create a countersunk hole using various commands on Onshape but I have been unsuccessful.
I tried to create a large circle on the top surface and a smaller on the lower and loft it. Didn't work. I tried the chamfer command in various ways (it does kind of word but not with the dimensions that I want)
Specifications
Top hole: 8.5mm
bottom hole: 4.5mm
Is there anyway to achieve the result shown in the photo with the specifications mentioned above?
Many thanks.
I have attached a photo of the countersunk hole the way I want it to look
0
Best Answers
-
 nav
Member Posts: 258 ✭✭✭✭
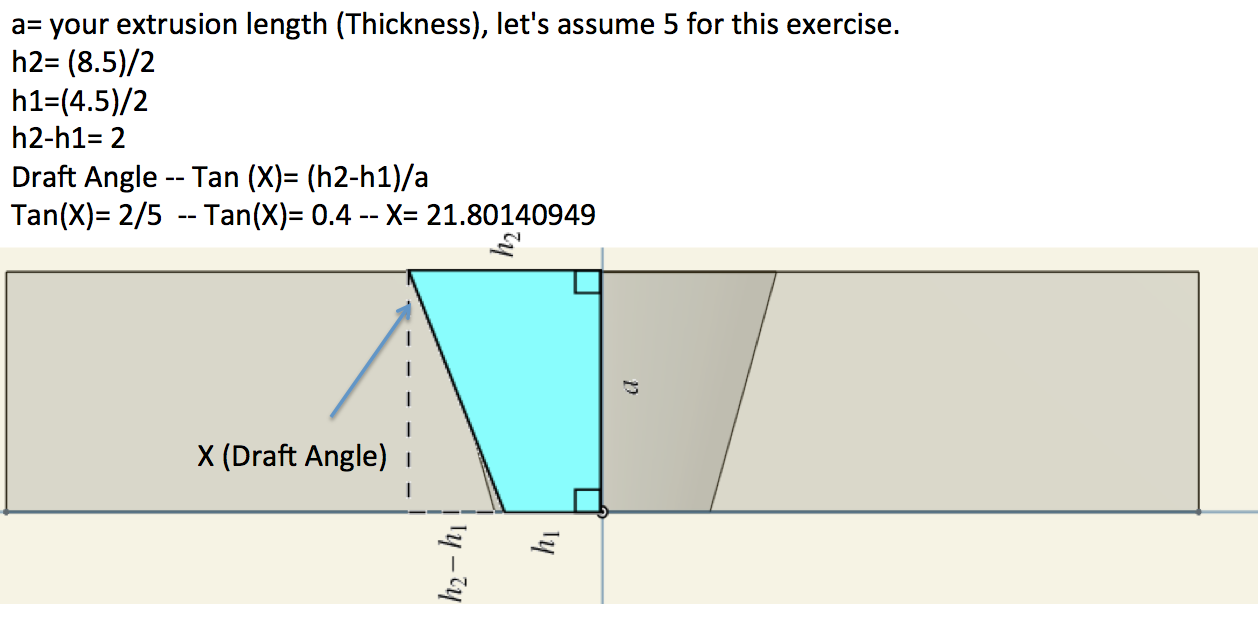
Hi @george_papageorgiou there is a workaround if you don't mind doing a little math, I`ve used your values as example.
Then use the draft feature, input the result above and the lower hole should have the dimensions you need.
Nicolas Ariza V.
Indaer -- Aircraft Lifecycle Solutions6 -
 3dcad
Member, OS Professional, Mentor Posts: 2,477 PRO
Is this what you need?
https://cad.onshape.com/documents/d29ff8e74a0f49809e533f48/w/48fedb2064cc4f30a27ee6e8/e/2b59680947d64f9298ea4978
I used material thickness of 2mm, so both values in chamfer are 2mm - change the first value according to your material thickness.
//rami5
Answers
In the meantime you will need to draw that circle for the purposes of construction, in order to "pierce" it with the orthogonal sketch used as the revolve (removing material) profile.
Or are you asking for one step solution?
Rightly or wrongly, I assumed @george_papageorgiou was looking for a solution which would recalculate correctly when a single diameter dimension was changed. Rather than him having to do maths to derive a chamfer dimension which resulted in that diameter. (Admittedly, the necessary maths ops could be captured fairly transparently in the dimension entry box)
But I could easily have the wrong end of the stick.
George
Then use the draft feature, input the result above and the lower hole should have the dimensions you need.
Indaer -- Aircraft Lifecycle Solutions
https://cad.onshape.com/documents/d29ff8e74a0f49809e533f48/w/48fedb2064cc4f30a27ee6e8/e/2b59680947d64f9298ea4978
I used material thickness of 2mm, so both values in chamfer are 2mm - change the first value according to your material thickness.
thanks a bunch
George
Just create hole with 4,5 dia and then chamfer 2mm