Welcome to the Onshape forum! Ask questions and join in the discussions about everything Onshape.
First time visiting? Here are some places to start:- Looking for a certain topic? Check out the categories filter or use Search (upper right).
- Need support? Ask a question to our Community Support category.
- Please submit support tickets for bugs but you can request improvements in the Product Feedback category.
- Be respectful, on topic and if you see a problem, Flag it.
If you would like to contact our Community Manager personally, feel free to send a private message or an email.
Another design contest
 emagdalenaC2i
Member, Developers, Channel partner Posts: 863 ✭✭✭✭✭
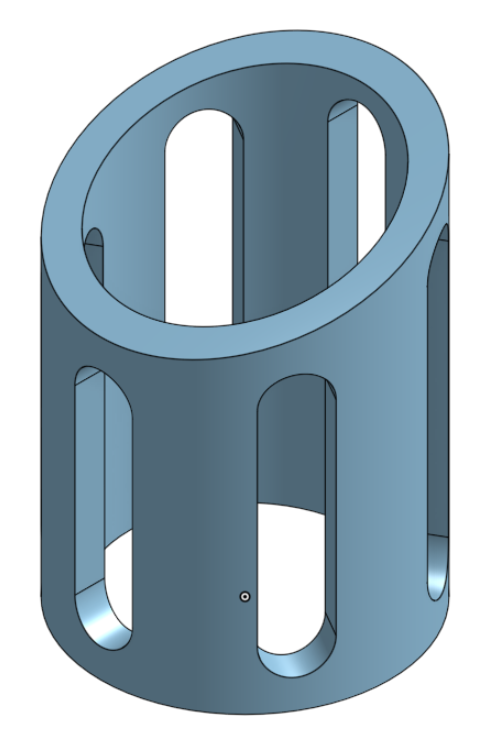
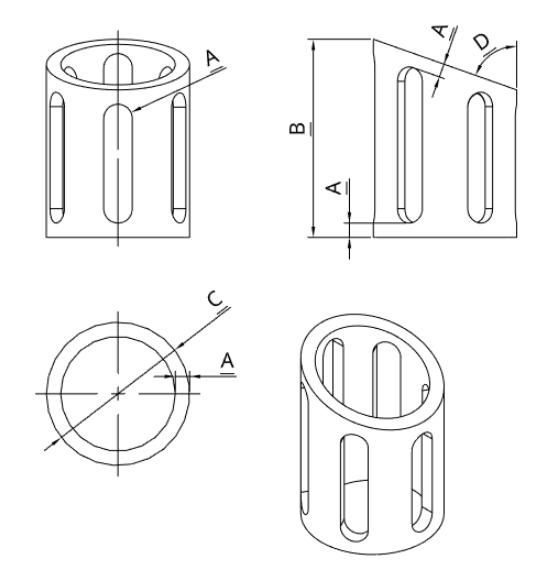
The contest as usual is to design this part with the least number of features:
Rules:
The best answers will be marked as accepted answers ;-)
Good luck


Rules:
- The number of slots may vary
- All slots are tangent to the faces of the cylinder with an offset of A millimeters
The best answers will be marked as accepted answers ;-)
Good luck
Un saludo,
Eduardo Magdalena C2i Change 2 improve ☑ ¿Por qué no organizamos una reunión online?
Partner de PTC - Onshape Averigua a quién conocemos en común
Eduardo Magdalena C2i Change 2 improve ☑ ¿Por qué no organizamos una reunión online?
Partner de PTC - Onshape Averigua a quién conocemos en común
2
Best Answers
-
 brucebartlett
Member, OS Professional, Mentor, User Group Leader Posts: 2,148 PRO
Gee, you copied that quick, I was just fixing straight after I posted. here my latest version https://cad.onshape.com/documents/c4ba2cbb65d395eeb3d2009f/v/a12d522befd126afde469faf/e/5f281deafc8d6fbf12fc26f6
I am still not perfect on the top dim but that's the best I can do, for now, I had to add an extra measure feature too. It is a bit of a challenge thanks.
6 -
 NeilCooke
Moderator, Onshape Employees Posts: 5,943
  hmm, best I could get is 7 microns out - think QA would pass it - 9 features
https://cad.onshape.com/documents/132908f652f6ebeb86dccf55/w/657ad40db02fcf3f72bd345d/e/6af53f5236d0b8bb579f5bc0
Senior Director, Technical Services, EMEA8 -
 MBartlett21
Member, OS Professional, Developers Posts: 2,064 ✭✭✭✭✭
@NeilCooke
@emagdalenaC2C
8 features (borrowed from NeilCooke) https://cad.onshape.com/documents/229de1e68736c4ef4a8679721 -
 jon_sorrells
Onshape Employees Posts: 52
  Here's my solution: https://cad.onshape.com/documents/70a31c6d454db044732ecab8/w/fdb8ce0e270ef922e33bdd3a/e/954db5f0f4de84ed4322fc65I made a, b, c, and d configuration variables, and also made one for the number of slots.
8 -
 emagdalenaC2i
Member, Developers, Channel partner Posts: 863 ✭✭✭✭✭
For those who want a more detailed explanation of my model (Part Studio 4):
https://cad.onshape.com/documents/98c43f730cc7deb2d25486e7/w/988e18dbc7c3f809e9da275c/e/b9028454f0634d679840eab5
- Move face. The move face feature with the Rotate option is a great tool to rotate faces. Here I use a construction line created in the sketch to rotate the upper face of the cilinder 30º
- Extrude 3 feature. This extrusion feature creates a surface instead of a solid part. If I try to create a solid extrusion the accuracy is worse and the cut of the slots would not be perpendicular to the cylinder.
1- You can extrude a solid or surface in 2 opposite directions, like in this picture
2- But if you change the second direction (flip the arrow Opposite direction) then instead of start from the sketch plane the extrusion strat from the difference of Depth 1 and Depth 2
- Extrude 3 feature.(Continuation). So the extrude 3 feature use the above option to extrude up to the lower face of the cylinder from the upper face (the slopper one). To keep a separation of 10 mm with these faces, the offset option is activated and a distance of 10 mm is indicated.
- Thicken feature. The thicken feature removes from the cylinder the solid created by giving thickness to the previous surface. To ensure that there are no problems it is assigned twice the thickness of the cylinder wall (if a thickness of 10 mm is indicated, the operation gives an error)
- Circular pattern feature. The circular pattern of the features Extrusion 3, Thicken and Fillet is created with the option Apply per instance activated. So the rest of the surfaces instances are created, which are given thickness, removing them from the cylinder and rounding their edges.

If you uncheck the the option Apply per instance, the circular pattern just copy the geometry in each instance without recalculate them.
Un saludo,
Eduardo Magdalena C2i Change 2 improve ☑ ¿Por qué no organizamos una reunión online?
Partner de PTC - Onshape Averigua a quién conocemos en común4 -
 MBartlett21
Member, OS Professional, Developers Posts: 2,064 ✭✭✭✭✭
Answers
PD: One of these days we will make Onshape break with this game
Eduardo Magdalena C2i Change 2 improve ☑ ¿Por qué no organizamos una reunión online?
Partner de PTC - Onshape Averigua a quién conocemos en común
1) A macro in FeatureScript would actually use other design operations as a base, so it makes sense to first try to do the design and then automate it with FeatureScript
2) I would love to see a FeatureScript for this example
Eduardo Magdalena C2i Change 2 improve ☑ ¿Por qué no organizamos una reunión online?
Partner de PTC - Onshape Averigua a quién conocemos en común
https://cad.onshape.com/documents/c4ba2cbb65d395eeb3d2009f/w/7d6175fc813e559e009c547e/e/5f281deafc8d6fbf12fc26f6
Twitter: @onshapetricks & @babart1977
Eduardo Magdalena C2i Change 2 improve ☑ ¿Por qué no organizamos una reunión online?
Partner de PTC - Onshape Averigua a quién conocemos en común
I am still not perfect on the top dim but that's the best I can do, for now, I had to add an extra measure feature too. It is a bit of a challenge thanks.
Twitter: @onshapetricks & @babart1977
Eduardo Magdalena C2i Change 2 improve ☑ ¿Por qué no organizamos una reunión online?
Partner de PTC - Onshape Averigua a quién conocemos en común
https://cad.onshape.com/documents/132908f652f6ebeb86dccf55/w/657ad40db02fcf3f72bd345d/e/6af53f5236d0b8bb579f5bc0
It's exactly the same as what I got.
Although I have one less operation... because I did not eliminate the surfaces ;-)
https://cad.onshape.com/documents/98c43f730cc7deb2d25486e7/w/988e18dbc7c3f809e9da275c/e/9c7eb4a95229a265fa805dbf
Eduardo Magdalena C2i Change 2 improve ☑ ¿Por qué no organizamos una reunión online?
Partner de PTC - Onshape Averigua a quién conocemos en común
Thanks
It's amazing some of the black magic I've seen people do in onshape.
I really need to learn how to think abstract like that too.
In the sketch it is easy to add that dimension, but in the drawing... well, it is not so simple
Eduardo Magdalena C2i Change 2 improve ☑ ¿Por qué no organizamos una reunión online?
Partner de PTC - Onshape Averigua a quién conocemos en común
@emagdalenaC2C
8 features (borrowed from NeilCooke) https://cad.onshape.com/documents/229de1e68736c4ef4a867972
IR for AS/NZS 1100
https://cad.onshape.com/documents/98c43f730cc7deb2d25486e7/w/988e18dbc7c3f809e9da275c/e/b9028454f0634d679840eab5
But there are still some problems with the accuracy
Eduardo Magdalena C2i Change 2 improve ☑ ¿Por qué no organizamos una reunión online?
Partner de PTC - Onshape Averigua a quién conocemos en común
“Apply per instance” recalculates each feature of the pattern and is required to change the length of each extrude.
https://cad.onshape.com/documents/98c43f730cc7deb2d25486e7/w/988e18dbc7c3f809e9da275c/e/64b98f6e37be229b12e4dd2d
As you can see in the document, it is relatively easy to obtain a variable linear pattern (See Part Studio Matriz lineal variable)
But in this example, the most accurate result I get is the one you can see in Part Studio 5 (with 15 features, and without the option to automatically change the number of slots)
Eduardo Magdalena C2i Change 2 improve ☑ ¿Por qué no organizamos una reunión online?
Partner de PTC - Onshape Averigua a quién conocemos en común
This is actually a perfect opportunity to discuss "Apply per instance" option in more detail because this is a rare use case when its use is necessary. When patterning extrude with up-to-face bounding condition with "Apply per instance" option, for each instance a copy of the profile to be extruded is moved according to pattern transformation and then extrude of that copy is created. In each location the extrude reaches to the bounding face.
Twitter: @onshapetricks & @babart1977
Using @emagdalenaC2C document as an example: Bounding face is in the definition of Extrude 3:
@brucebartlett
You've caught an internal shortcut
Eduardo Magdalena C2i Change 2 improve ☑ ¿Por qué no organizamos una reunión online?
Partner de PTC - Onshape Averigua a quién conocemos en común
https://cad.onshape.com/documents/98c43f730cc7deb2d25486e7/w/988e18dbc7c3f809e9da275c/e/b9028454f0634d679840eab5
- Move face. The move face feature with the Rotate option is a great tool to rotate faces. Here I use a construction line created in the sketch to rotate the upper face of the cilinder 30º
- Extrude 3 feature. This extrusion feature creates a surface instead of a solid part. If I try to create a solid extrusion the accuracy is worse and the cut of the slots would not be perpendicular to the cylinder.
Extrude in 2 directions:1- You can extrude a solid or surface in 2 opposite directions, like in this picture
2- But if you change the second direction (flip the arrow Opposite direction) then instead of start from the sketch plane the extrusion strat from the difference of Depth 1 and Depth 2
- Extrude 3 feature.(Continuation). So the extrude 3 feature use the above option to extrude up to the lower face of the cylinder from the upper face (the slopper one). To keep a separation of 10 mm with these faces, the offset option is activated and a distance of 10 mm is indicated.
- Thicken feature. The thicken feature removes from the cylinder the solid created by giving thickness to the previous surface. To ensure that there are no problems it is assigned twice the thickness of the cylinder wall (if a thickness of 10 mm is indicated, the operation gives an error)
- Circular pattern feature. The circular pattern of the features Extrusion 3, Thicken and Fillet is created with the option Apply per instance activated. So the rest of the surfaces instances are created, which are given thickness, removing them from the cylinder and rounding their edges.
The surfaces created with the circular pattern have not been removed, they are hidden and you can make them visible again.If you uncheck the the option Apply per instance, the circular pattern just copy the geometry in each instance without recalculate them.
Eduardo Magdalena C2i Change 2 improve ☑ ¿Por qué no organizamos una reunión online?
Partner de PTC - Onshape Averigua a quién conocemos en común
Circular pattern dialog box refers to features it is going to pattern.
Each feature defines its own behavior when patterned, I explained above how extrude behaves. So bounding face does not belong in pattern dialog, it is a part of extrude feature definition. Please try reading feature pattern documentation - it probably explains it better. Try using feature pattern - you'll get a better feel for it.