Welcome to the Onshape forum! Ask questions and join in the discussions about everything Onshape.
First time visiting? Here are some places to start:- Looking for a certain topic? Check out the categories filter or use Search (upper right).
- Need support? Ask a question to our Community Support category.
- Please submit support tickets for bugs but you can request improvements in the Product Feedback category.
- Be respectful, on topic and if you see a problem, Flag it.
If you would like to contact our Community Manager personally, feel free to send a private message or an email.
How do I get my 3D Loft right with 3D Splines?
 dennis_de_klerk
Member Posts: 14 ✭
in Drawings
Dear Community,
I have a question based on a 3D model I'm trying to generate of a 3D curved model plane rudder:

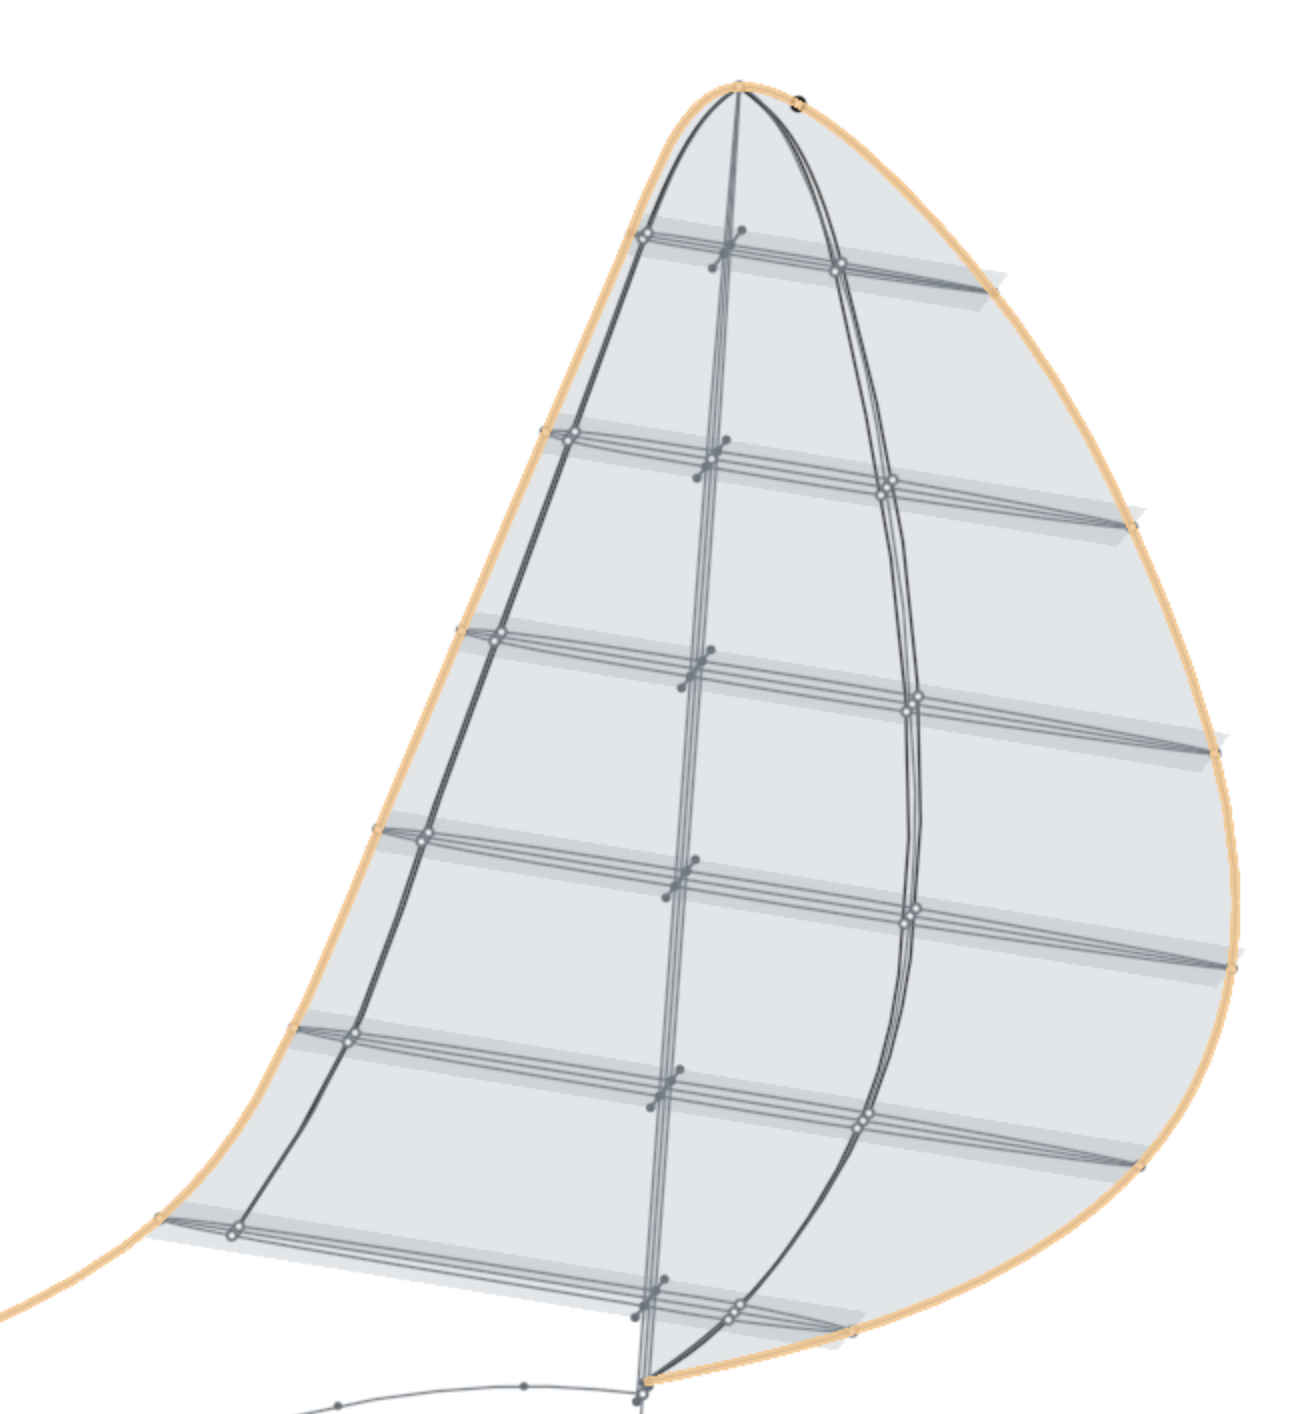
So as you can see I've generated a couple of sections in the rudder with the spline command ("say horizontal plane"). In the "vertical plane" I've generated a sketch and also a couple of 3D Splines. As you can see I've selected the one for the leading and trailing edge.
Here comes my problem: I can generate a 3D solid using Loft straight away but it doesn't follow exactly the 3D splines. I would like to use the 3D splines as guides / path therefore. However, these lines are not selectable from point to point, only as a whole. I therefore need to split the lines (?) into individual (point2point) lines I would think? How can I achieve this best?
Obviously, perhaps my strategy is wrong to start with, so feel free to make any suggestion how to achieve the solid in the first place?
Also, The top section is more of a "triangle" shape, where the loft should start from the profile (surface) and end up in a point. I was thinking of using the Fill command, again needed individual lines (here the spline in the sketch of the profile is the problem: it is only selectable as a whole and not in segments).
So in summary I think I'd like to know how to get point2point selectable lines from splines in sketches and 3D splines?
I have a question based on a 3D model I'm trying to generate of a 3D curved model plane rudder:

So as you can see I've generated a couple of sections in the rudder with the spline command ("say horizontal plane"). In the "vertical plane" I've generated a sketch and also a couple of 3D Splines. As you can see I've selected the one for the leading and trailing edge.
Here comes my problem: I can generate a 3D solid using Loft straight away but it doesn't follow exactly the 3D splines. I would like to use the 3D splines as guides / path therefore. However, these lines are not selectable from point to point, only as a whole. I therefore need to split the lines (?) into individual (point2point) lines I would think? How can I achieve this best?
Obviously, perhaps my strategy is wrong to start with, so feel free to make any suggestion how to achieve the solid in the first place?
Also, The top section is more of a "triangle" shape, where the loft should start from the profile (surface) and end up in a point. I was thinking of using the Fill command, again needed individual lines (here the spline in the sketch of the profile is the problem: it is only selectable as a whole and not in segments).
So in summary I think I'd like to know how to get point2point selectable lines from splines in sketches and 3D splines?
Thanks and kind regards!
Tagged:
0
Best Answers
-
 dennis_de_klerk
Member Posts: 14 ✭
Ok, after quite some time of trial and error I finally have the 3D shape done. In the end it wasn't that difficult after all:
Basically I was constantly trying to use the Sketches as Guide lines. But in the end I just had to generate 3D splines that fitted the sketches as good as possible.
In the top, the Loft ends in 1 point, all other sections are 2D splines with the same amount of point on them, defining the 3D splines.
Up next is the generation of the ribs and sheeting for the real thing.
Thanks for the support and kind regards.0 -
 billy2
Member, OS Professional, Mentor, Developers, User Group Leader Posts: 2,129 PRO
@dennis_de_klerk I'm not an aerodynamicist but I do a lot of surfacing for consumer products.
If I were going to make a wing:
I'd break the steps up into:
-get the air foil correct
-then trim the outer boundaries
I fear the outer boundaries in your picture and the fact that you're using them to create the surface, this is messing everything up.
Think about it this way.
Get the air foil correct:
Then work the outer boundary:
When I'm looking at surfaces, I construct the shape 1st without looking at the boundaries, then I trim the shape to give me the correct profile.
It's a different way to think about wing design, it'll produce very robust wings, you could drive the wing design with a configuration table and provide many variations.
I've never liked trying to re-create a consumer product using the edges that I can see.
2
Answers
Thank you for your nice reply. It is an RC Glider, called "Bird of Time". It was really good in its days, and I like the elegant lines it possesses. I'm happy to share a public link, if I understand what to do ;-). I'm relatively new here. So you mean to make the project available publicly right? I don't think there will be much problems with copyright of the original drawing, so if you mean this, I'll do so indeed?
Please let me know, I look forward to your reply. Just to get you more exited:
Kind regards,
Dennis
Just copy the URL if the document
IR for AS/NZS 1100
https://cad.onshape.com/documents/e2d2b4301276ce26de3472fb/w/eec3f7031143beaa7d33f651/e/4ff3b819dbabbc51bd149e98
THX!
The link you shared was a view only link. Sometimes this is all that is needed for someone to help you.
Where you have 'fiddly' problems (like this loft), the only way for someone to help you (by actually completing the loft), is to make the document public. At that point, a good samaritan (of which there are plenty on here), will make a copy (they cannot change yours) and fix it. Once fixed, they will post a link to their document (having made it public) so that you can see how they did at. At that point you can do it yourself OR, make of copy of the new public document for yourself and just carry on.
Ok, I think I've made the document public now and perhaps you need a new link:
https://cad.onshape.com/documents/e2d2b4301276ce26de3472fb/w/eec3f7031143beaa7d33f651/e/dffe4288f7d5b460198fe36b
No problem sharing, like mentioned, I don't think it has any copyright anymore (original drawing) and I'd be honoured if someone would built it from the OnShape 3D model at some point ;-)
Hope you can fix it. I got some result, but not the right result by all means.
Kind regards.
Basically I was constantly trying to use the Sketches as Guide lines. But in the end I just had to generate 3D splines that fitted the sketches as good as possible.
In the top, the Loft ends in 1 point, all other sections are 2D splines with the same amount of point on them, defining the 3D splines.
Up next is the generation of the ribs and sheeting for the real thing.
Thanks for the support and kind regards.
If I were going to make a wing:
I'd break the steps up into:
-get the air foil correct
-then trim the outer boundaries
I fear the outer boundaries in your picture and the fact that you're using them to create the surface, this is messing everything up.
Think about it this way.
Get the air foil correct:
Then work the outer boundary:
When I'm looking at surfaces, I construct the shape 1st without looking at the boundaries, then I trim the shape to give me the correct profile.
It's a different way to think about wing design, it'll produce very robust wings, you could drive the wing design with a configuration table and provide many variations.
I've never liked trying to re-create a consumer product using the edges that I can see.
Thanks for your answer; I'll definitely will try it this way next time! Trying to reconstruct a fully curved 3D shape from an old drawing is pain indeed! I do like the design though, so thought I could give it a try. BUT, building directly from the drawing itself would have been easier / quicker in the end..
Thanks a bunch and kind regards.
I perhaps have a novice question to add, as now I want to put the resulting ribs in a drawing so I can have them CNC cut. The ribs in the part study have an angle though compared to the global coordinate system. As such I can't easily insert the ribs in a drawing:
As a simple insert gives the upper part, which as you can see is a projection and I really need the G-G cross section only. Is there a simple solution to this? I thought of 2 others, e.g. make a new part studio and paste the sketches or generate an assembly and rotate the parts there onto the global X,Y,Z.
Hope it's a stupid question and there is a quick fix ;-)?
What you may have to do is move the view for the cross section off the sheet.
Or you could use this approach:
Delete all views apart from top view
Right click on top view and align the long edge horizontal
Project your view down
Delete the top view
IR for AS/NZS 1100
THX!
Sorry about confusing you.
IR for AS/NZS 1100