Welcome to the Onshape forum! Ask questions and join in the discussions about everything Onshape.
First time visiting? Here are some places to start:- Looking for a certain topic? Check out the categories filter or use Search (upper right).
- Need support? Ask a question to our Community Support category.
- Please submit support tickets for bugs but you can request improvements in the Product Feedback category.
- Be respectful, on topic and if you see a problem, Flag it.
If you would like to contact our Community Manager personally, feel free to send a private message or an email.
Equal constraint - Use with Care between sketches
 andrew_troup
Member, Mentor Posts: 1,585 ✭✭✭✭✭
In the excellent webinar on basic sketching which has just gone up on the site, the question came up "How do I relate entities in one sketch to entities in another". Cody replied that at present the only two methods are "Derive Sketch" and "Equal" constraint.
I though it might be worth adding a "Yes, but" to that second option, which if he'd gone into it more deeply, I'm sure Cody would have mentioned.
Essentially, an equal relation in sketch A will make an entity equal to the PROJECTION, into sketch A, of an entity in sketch B.

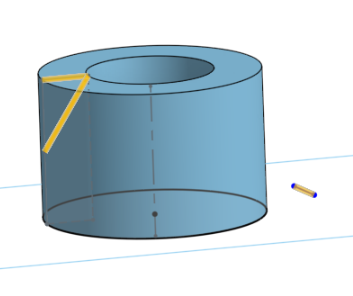
The bottom right line is sketched on plane A, defined by the underside of the hollow cylindrical solid.
It makes no difference to its length which of the highlighted lines at top left (on plane I constrain it equal to, even though their lengths are clearly different.
The line at bottom right is actually the same length as the upper one at top left.
It doesn't appear to be, being foreshortened in this view, because it is actually normal to the top left line.
It comes out of the page, from left to right.
I though it might be worth adding a "Yes, but" to that second option, which if he'd gone into it more deeply, I'm sure Cody would have mentioned.
Essentially, an equal relation in sketch A will make an entity equal to the PROJECTION, into sketch A, of an entity in sketch B.

The bottom right line is sketched on plane A, defined by the underside of the hollow cylindrical solid.
It makes no difference to its length which of the highlighted lines at top left (on plane
The line at bottom right is actually the same length as the upper one at top left.
It doesn't appear to be, being foreshortened in this view, because it is actually normal to the top left line.
It comes out of the page, from left to right.
Tagged:
0
Comments
What you say is entirely true.
However it does not invariably invalidate using it with planes which are not parallel to each other:
In the case of planes not parallel to each other, it still works in special cases, because an equal relation in sketch A will make an entity equal to the PROJECTION, into sketch A, of an entity in sketch B.
My graphic showed such an instance: Plane A is normal to Plane B, and yet there is still the possibility of deriving benefit from an equal relationship.
In the case of the upper left line in my graphic (on Plane B ), it is constrained parallel to Plane A (the base face of the cylinder).
So it will project its full length onto that plane, meaning an equal relation to that line will "do what is says on the tin", with entities in sketch A.
If you look closely at the graphic you may see the faint grey lines indicating the projection of the Plane B lines: there's a rectangle there which is actually the revolve sketch for the cylinder.
(Note that the last statement in my previous post, about the line on Plane A being normal to the page, was included purely to help others interpret the ambiguity of a 2D graphic depicting 3D geometry.
That line could be skewed to any angle on Plane A, yet the equal relation would keep it constant in length)
My vote, this is a bug.
I think it's a question of consistency with how other constraints operate.
All sketch constraints, without exception, are 2D not 3D, and are essentially internal to the sketch.
It seems to me this is so desirable (for robust behaviour to model changes) as to be almost essential.
I'll explain what I mean by "Internal":
Take the example of a parallel constraint from a sketch line to a model edge. That model edge may start out lying on a parallel plane to the sketch plane, in which case a "parallel" constraint is uncontroversial and easy to grasp.
However, say the model changes, so that plane is angled differently.
That edge needs to still dictate the orientation of the sketch line, or the model will fail, even if the plane is reangled by an imperceptible amount. Yet it is geometrically impossible for the entities to remain parallel.
The only way there can be a viable parallel relation after the edit is to resolve the model edge to 2D, by projecting it to the sketch plane (internalising it) before permitting it to participate in a sketch relation.
And this is not a special case. In every instance (although most users do not often notice), sketch constraints operate with the PROJECTED, or internalised, location of external geometry (#).
Hence my comment above, regarding consistency.
More examples: When the user creates a coincident constraint to a remote vertex, it is to the projection of that vertex; same for a model edge wandering about the model at funky angles: It is first projected to the sketch, in the "mind's eye" of Onshape (or SW, or whatever), in order to provide something to constrain an entity from within the sketch. If anyone doesn't get this, I'll knock up a study model to illustrate, but I think it would be even more instructive for interested or curious users to do that themselves.
(#) (except for "Pierce", where it is patently inapplicable. This presents no great problem since the "Pierce" concept is self-defining, moreover it essentially still operates internally to the sketch)
___________
I wonder if the sort of "equality" you (understandably) want to see might be better provided by linking dimensions, or by equations, or some other parametric intervention.
I'm not sure the complication would be helpful if "equal" were made the single member of a third class of sketch constraint, which is external in focus rather than internal.
While it would ease the confusion about that particular relation, it would increase confusion about the significance of all other relations. It could almost be argued that "Equal" currently does the user a favour, by exposing a truth which is otherwise cryptic.
So expect all constraints to act on projections or intersections. We understand that there is a need to set up a parametric relation between, e.g. two circles on non-parallel planes, and we have plans to address that though it is unlikely that we will overload the constraints with more behaviors.
TVP, Onshape R&D
<<expect all constraints to act on projections or intersections>>
Now THAT'S an epic distillation - worth chiselling across the top of a young CAD jockey's monitor.
Not that this means anything, but I just made this assignment in SW and it doesn't project:
'Z' is now up, and external constraints are now projected, I can live with that. Thanks for pointing this out. I submitted it as a bug yesterday so we'll have to see how cad Gods rule on this. I can go either way.
I'm confused by your graphic.
The fact that both lines are hi-lited makes it seem superficially as if both entities appear within a single sketch, but that's not the situation you describe (the only way I can make sense of it: maybe SW is hi-liting the second line as a way of illustrating the participants to the relation, which is indeed external, as is the second line?)
Can you spell out all the construction steps?
(If SW currently works as described, they must have made the change since I disembarked the upgrade treadmill!)
So I'm editing sketch4 which is the green line and I set to the length of the red line. In onshape, this line length would be zero following your example. In SW they are equal.
I think the cad Gods have spoken and the projected method is preferred in OS due to consistencies in downstream operations. This is different than SW. I'm using SW2014, not sure what SW latest thoughts are though (not staying current).
Glad you pointed this out as I would have done it using SW methods and could be off. Thanks.
I think you will find that if you do the same in Onshape, you will get the same result.
The projection of the red line onto the front plane is full-length.
The relation you are creating is in the front plane, as I understand it.
ON EDIT: if you delete the relation, and try to recreate from the top plane sketch where the red line is drawn, I suspect your sketch will collapse and go a funny colour. I recommend the Heineken manoeuvre, should that happen
The cad Gods said that linking dimensions will give us what I (we) want with a more consistent interface. Linking and equation are coming and will handle this relationship.
actually I'm fairly sure of my ground for once, because I just remembered proving this to myself in Onshape recently
because I exploited that exact "loophole" in the rule "do not rely on equal constraints between entities which are not on parallel planes", to carry a dimension derived from a construction sketch over to an orthogonal plane, while responding to the challenge to model a dodecahedron with the fewest features.
It was a workaround for the current inability to use equations or link dimensions between sketches.
We cross-posted, and you might have missed one of my posts.
I think you were mistaken in interpreting the implications of your test:
the example you posted does not demonstrate that SW and OnS are any different in how equal relations are implemented.
So, summing up for constraints/relations: we have verified that Onshape, Creo, Solidworks and Solid Edge all implement them, to elements which do not lie in the sketch plane, the same way: to the projection (#) of those elements onto the sketch plane.
(#) or intersection with the sketch plane, in the exceptional cases @paul_chastell instanced
It's important to remember that projections are always projected normal to the sketch the element is being projected onto.
Obvious as it seems, this occasionally trips up even the most experienced users.